Gateway
Contains information on managing your Gateway connections.
- Adhese Gateway
- Gateway configuration
- Gateway dashboard
- Third-party ad servers and marketplaces
- OpenRTB Native
Adhese Gateway
The Adhese Gateway lets direct sales compete with real-time bidding (RTB) systems. – optimising revenue from every advertising space in real-time.
Before explaining how to enable competition with RTB revenue in the Adhese interface, we will briefly describe the Adhese Gateway itself.
Publishers typically determine whether direct revenue or third-party RTB revenue takes priority. This cascade structure results in an order of precedence where direct sales or in-house campaigns always take priority. The ad space is offered to the next priority level only if the other priority level has no ad to offer. The result is a situation in which there is no competition between the different priority levels – failing to take advantage of potentially higher revenue.
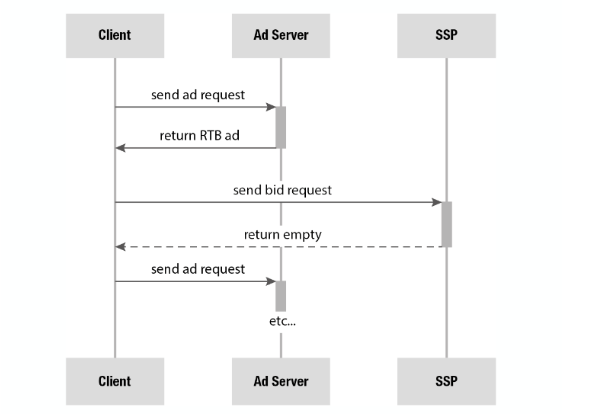
When the gateway receives multiple bids with the same price (and no bid with a higher price), the bids will be put in a reversed alphabetical order base on the name of the market place. The first bidder in line will then win the bid.
The Adhese Gateway is different from the cascading structure. The Gateway allows the two revenue streams to be weighed up against one another so it can select the most economical offer. The SSP receives the original price from direct sales as a proxy bid. This stimulates higher bids as it gives a known value for the impression. In addition, it is possible to specify a dynamic floor price (e.g. based on time or known user data) when a proxy bid from direct sales is unavailable.
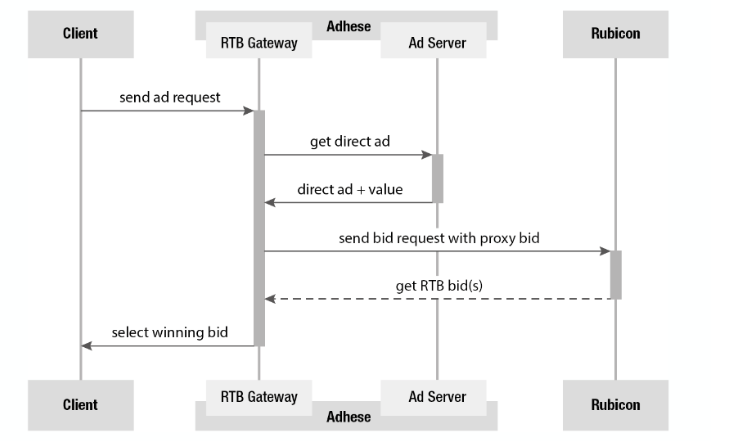
The Adhese Gateway offers a couple of advantages. First, it reduces latency and bandwidth usage. The Gateway ensures that communication with an SSP takes place server-side by applying a strict time-out, so there is no waiting time when loading ads from a third party. Besides, the standardised request-response structure and built-in time-out allow easy implementation across an entire network and across all devices and platforms.
Enable competition with RTB revenue in the Adhese interface
Optional, depends on your Adhese configuration.
The Adhese Gateway allows users to easily specify within the interface whether a campaign and/or booking(s) should compete with RTB revenue:
- For campaigns, go to the Header tab of the campaign for which you want to implement competition with RTB and enable the RTB checkbox. Click here for more information.
- For bookings, go to the Header tab of the booking for which you want to implement competition with RTB and enable the RTB checkbox under the How section. Click here for more information.
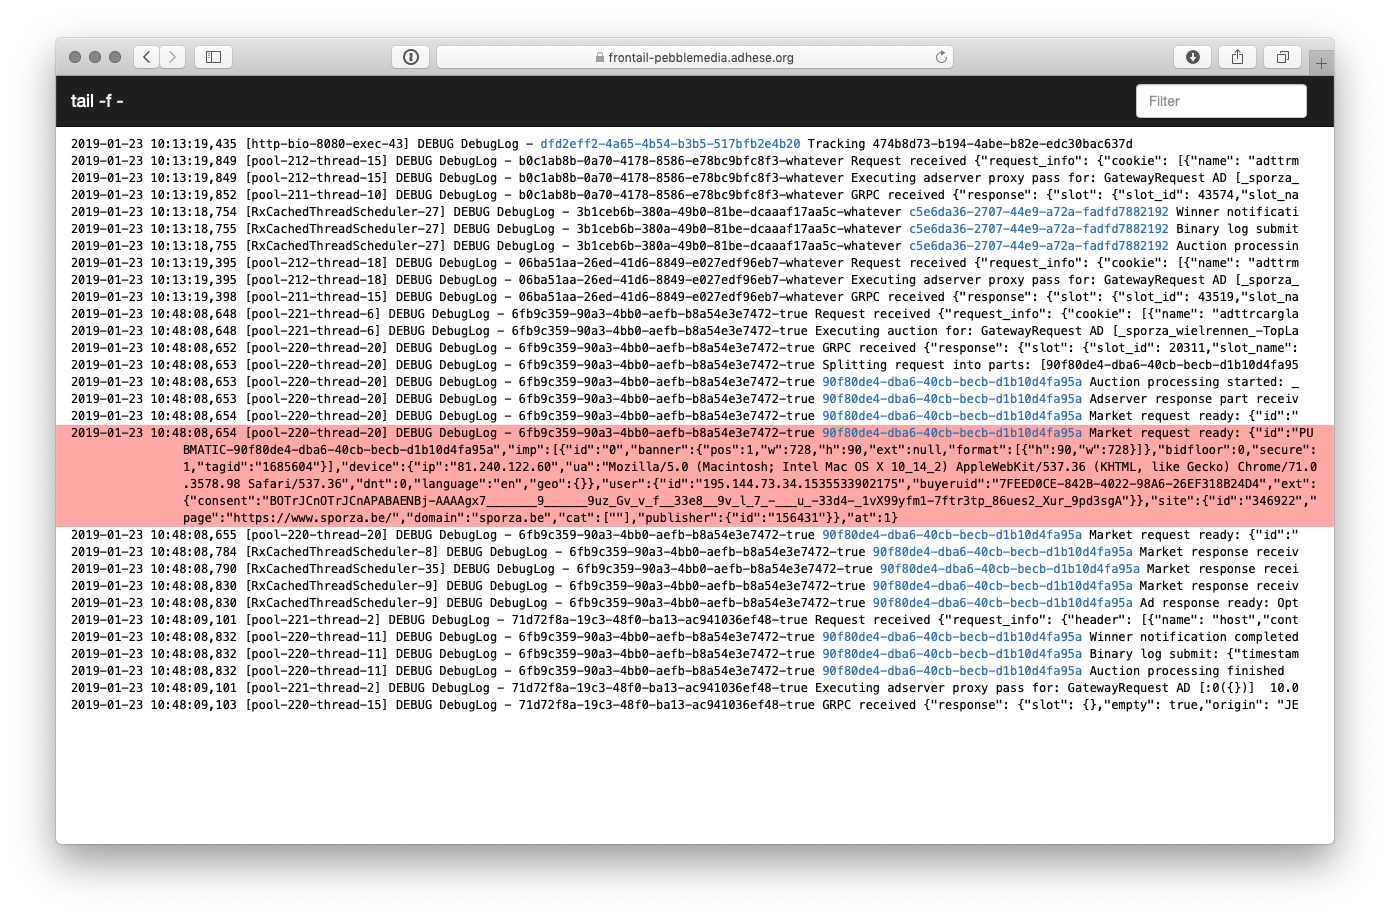
Gateway Debug Logging
Adhese Gateway enables you to run requests in 'debug' mode, allowing you to view all Bid Requests and Responses passing through the gateway for a specific browser.
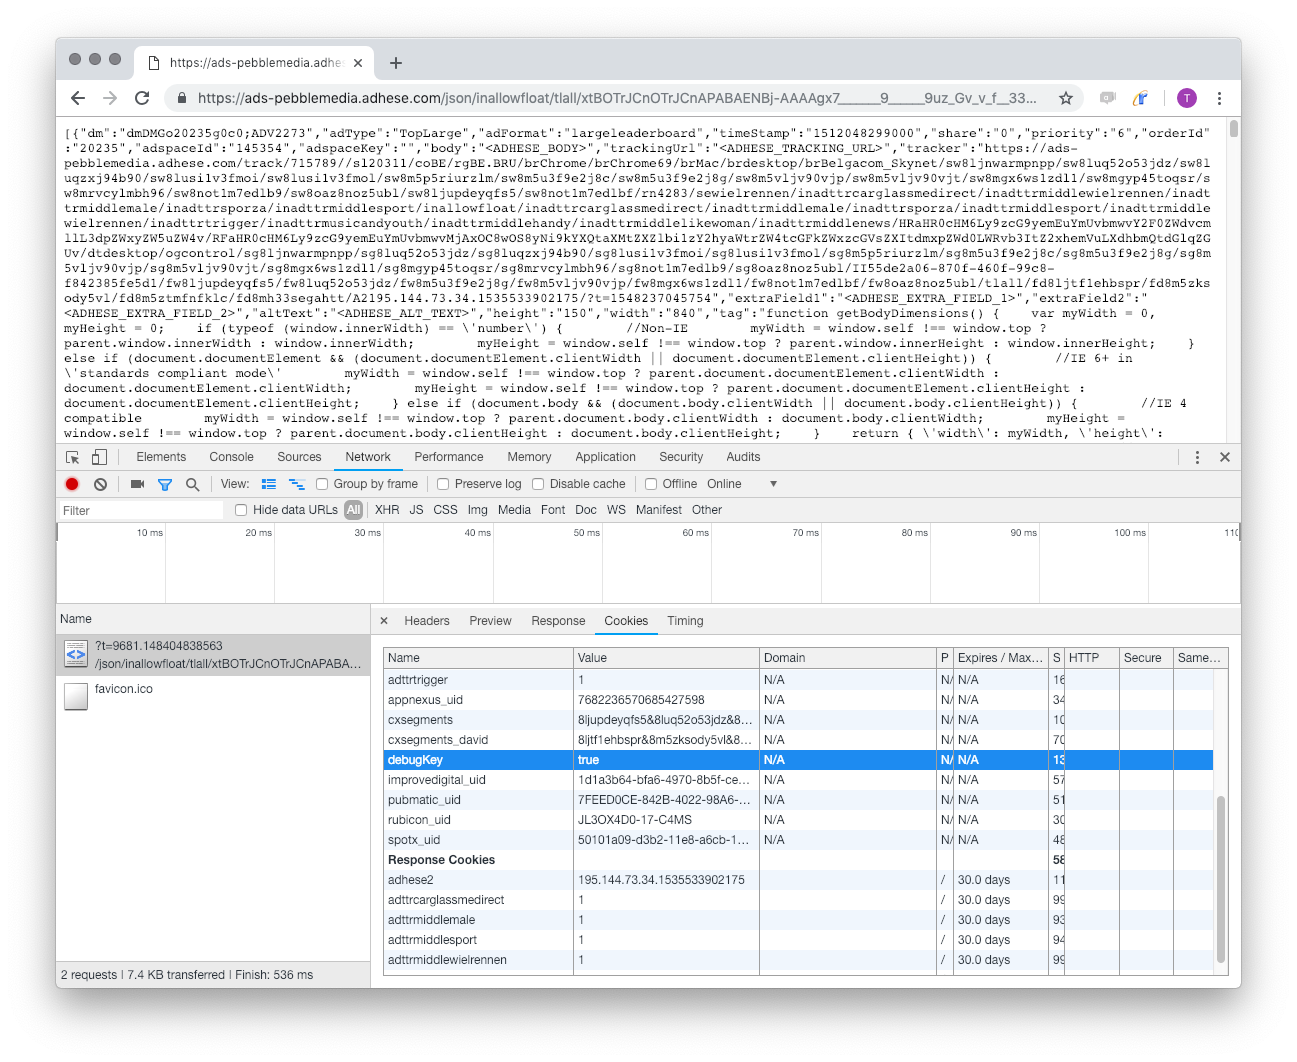
To enable debug-logging, set a debugKey cookie by following the steps below.
-
Open an ad request as executed on your pages in a separate tab and paste the following code into the Javascript console:
document.cookie = "debugKey=YourName; domain=.adhese.com; path=/; Secure; SameSite=None";
-
Refresh the page where that ad request is used and check if the cookie is present in the request header.

-
You have now entered debug mode and can keep surfing with the same browser window.
-
Open https://<your-account>.adhese.org/tools/frontail to see the log information.
-
You can filter the requests on the "YourName" you have entered in the cookie.
If you do not know your password to access the debug tool, don't hesitate to contact our support dept.
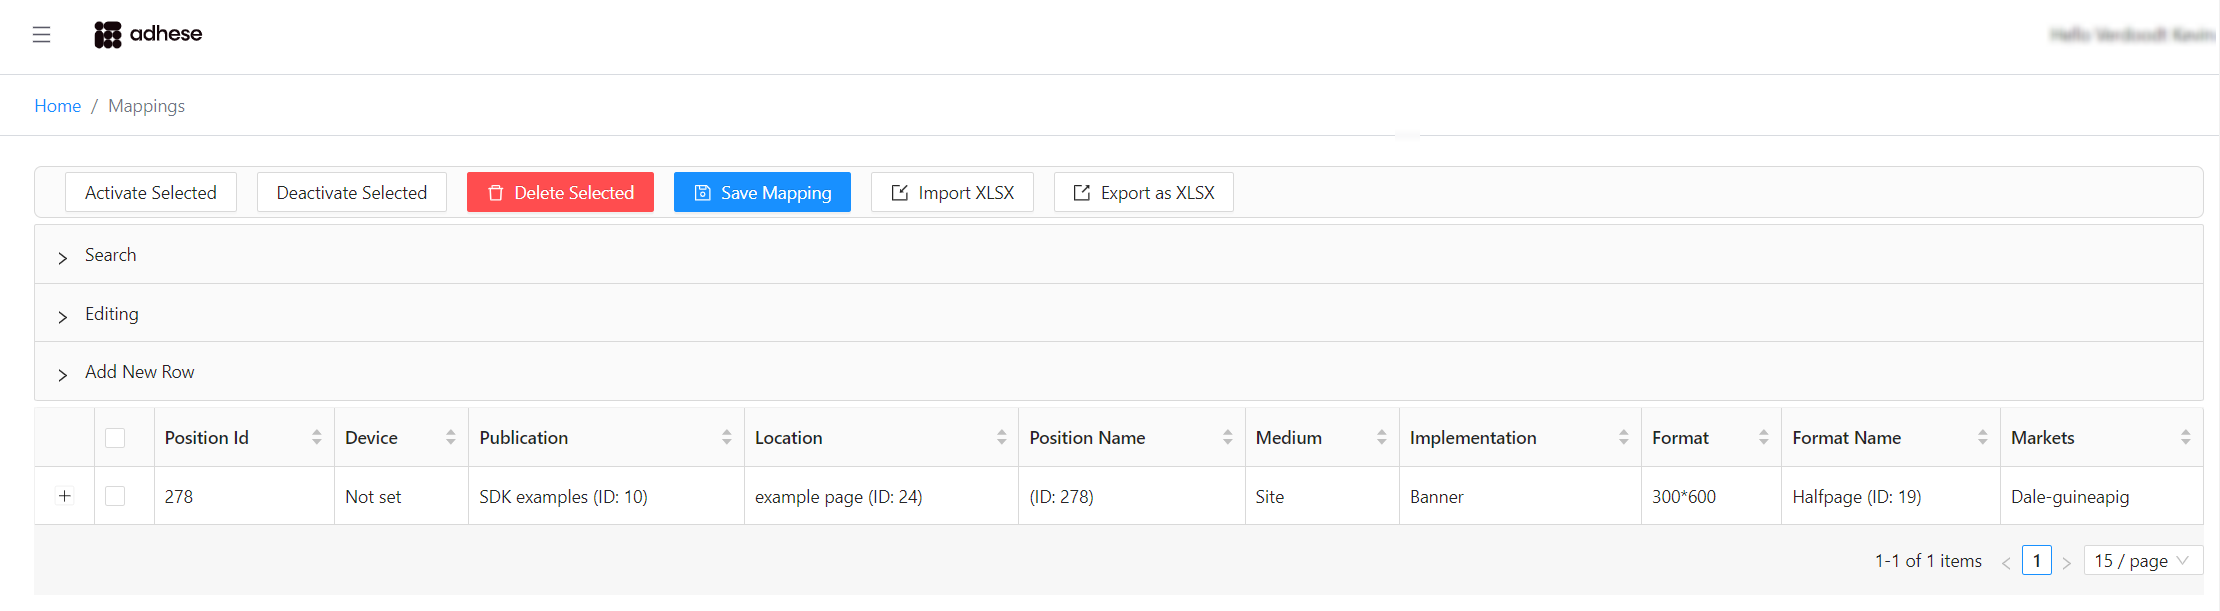
Gateway configuration
Wikan
Wikan is a web-based application that is used to modify the configuration of the Adhese Gateway.
You can access Wikan at:https://[customer].adhese.org/tools/cubeui/mappings
Searching and filtering
Click the light grey bar labelled Search to expand the search form:
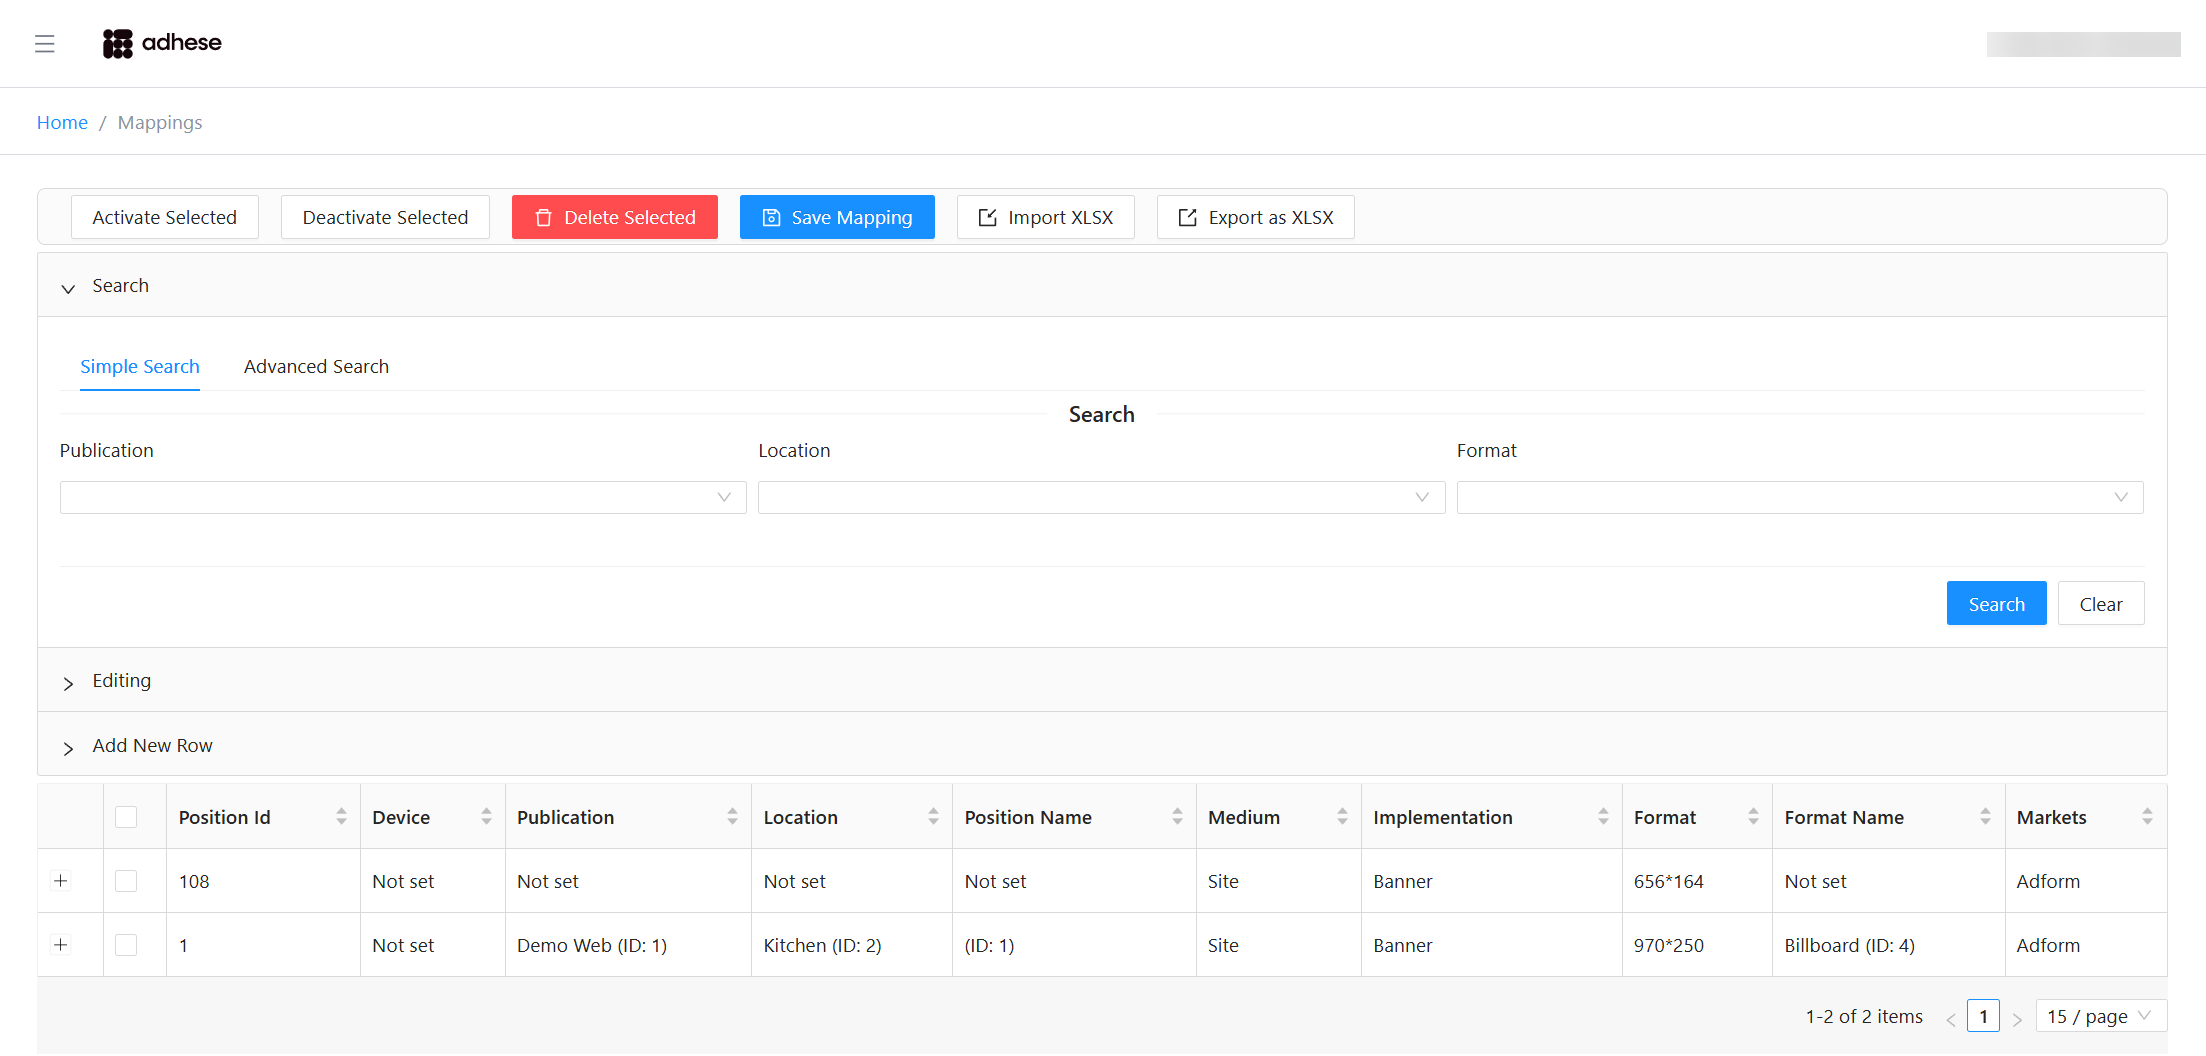
You can perform:
- Simple Search (Publication, Location, Format)
- Advanced Search
To filter the table, fill in one or more fields and click Search. Empty fields are ignored.
In Advanced Search:
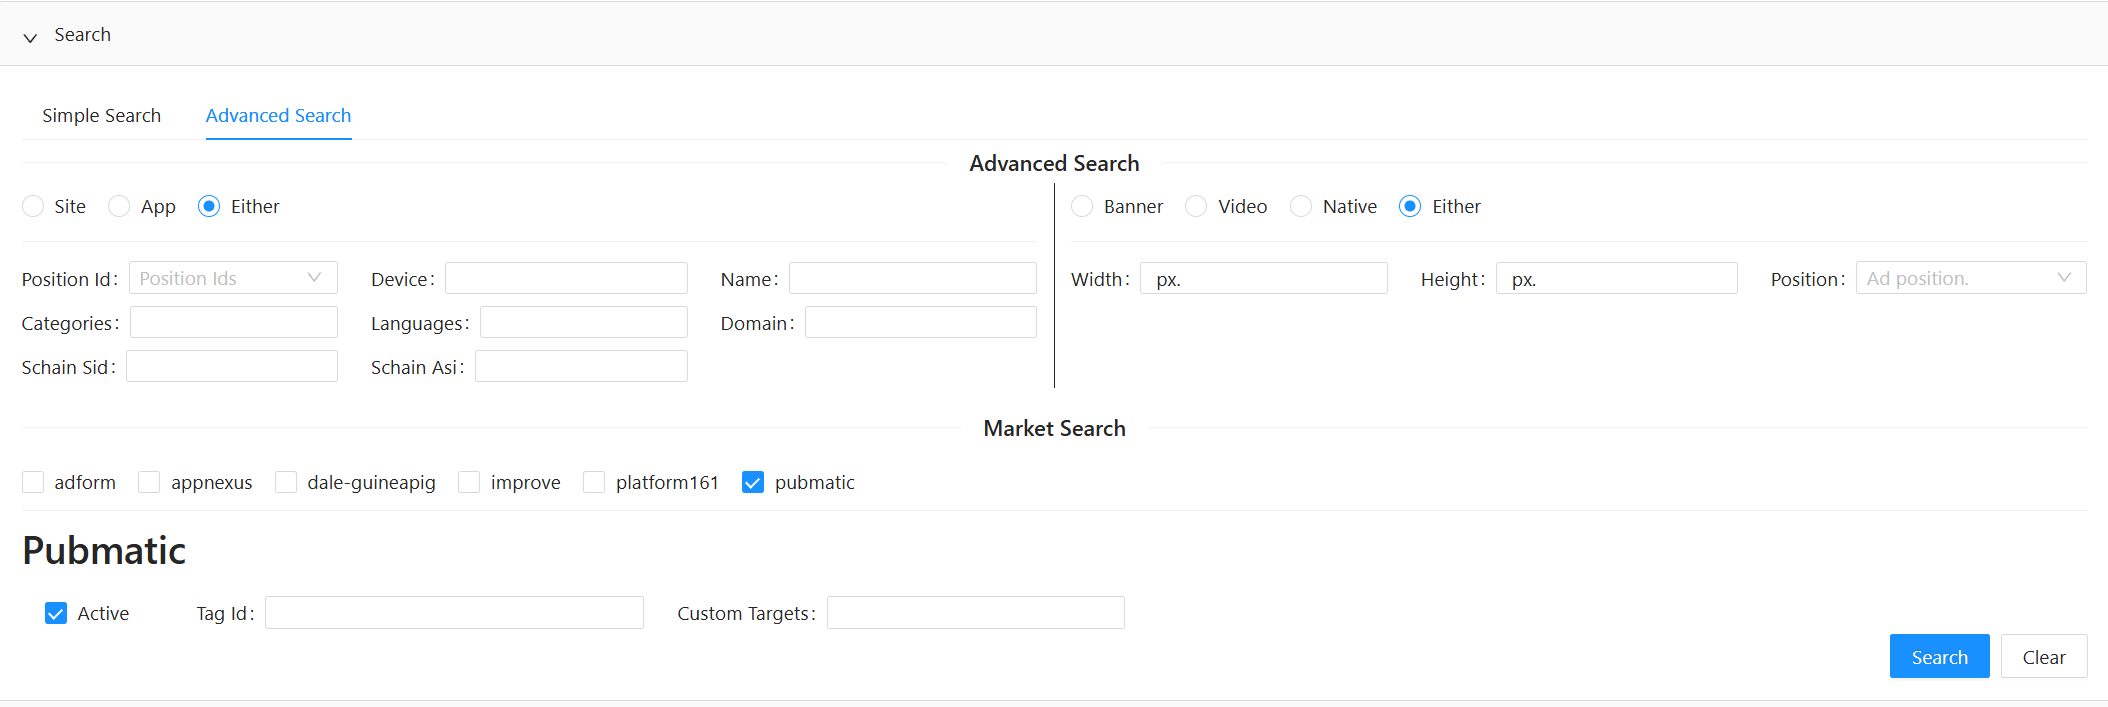
Click Search to apply your filters.
Click Clear to reset all fields and remove the current filter.
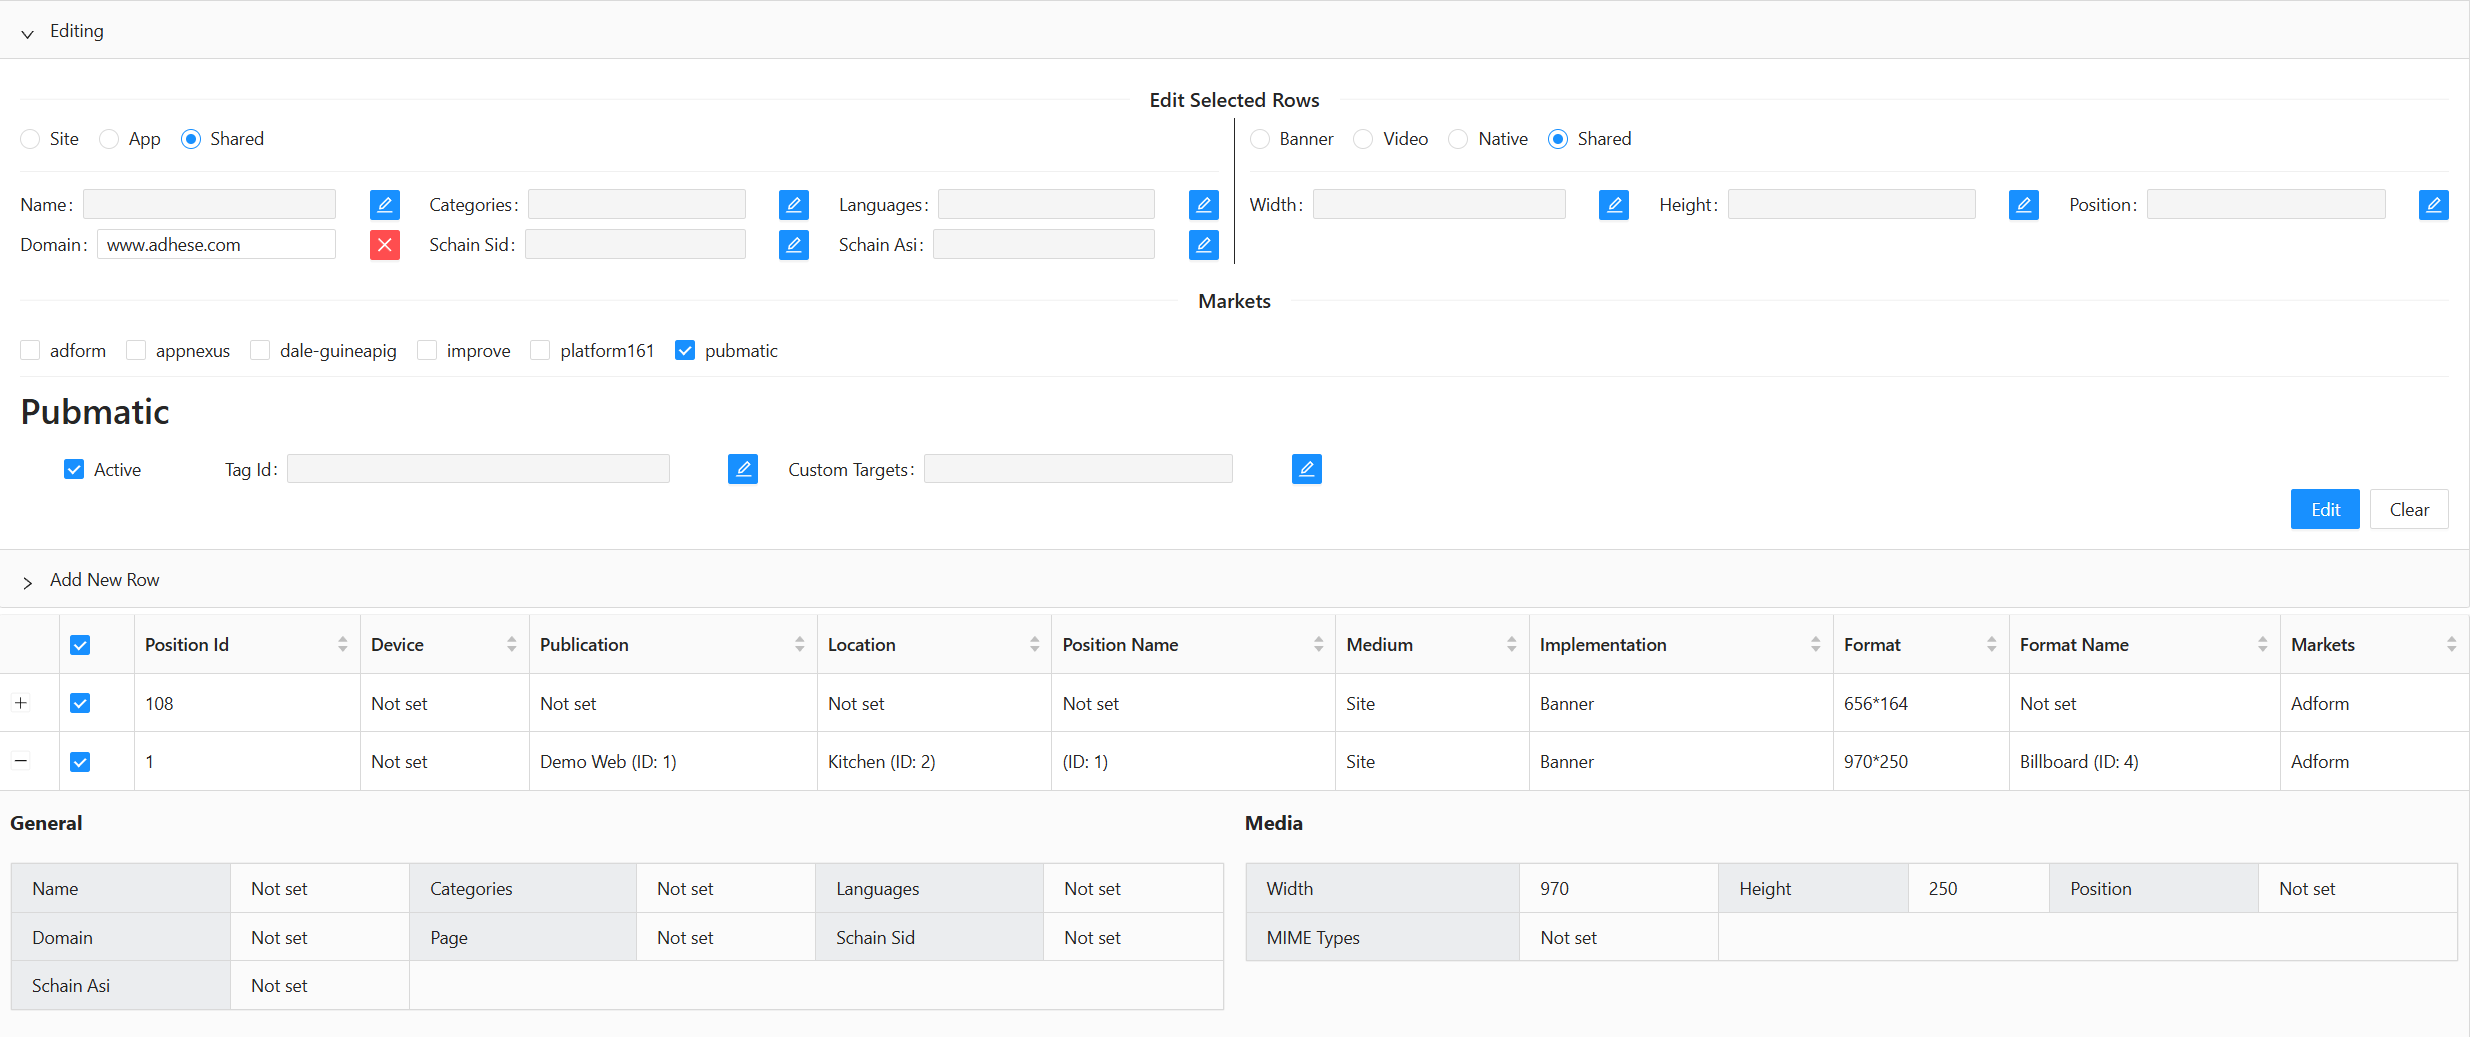
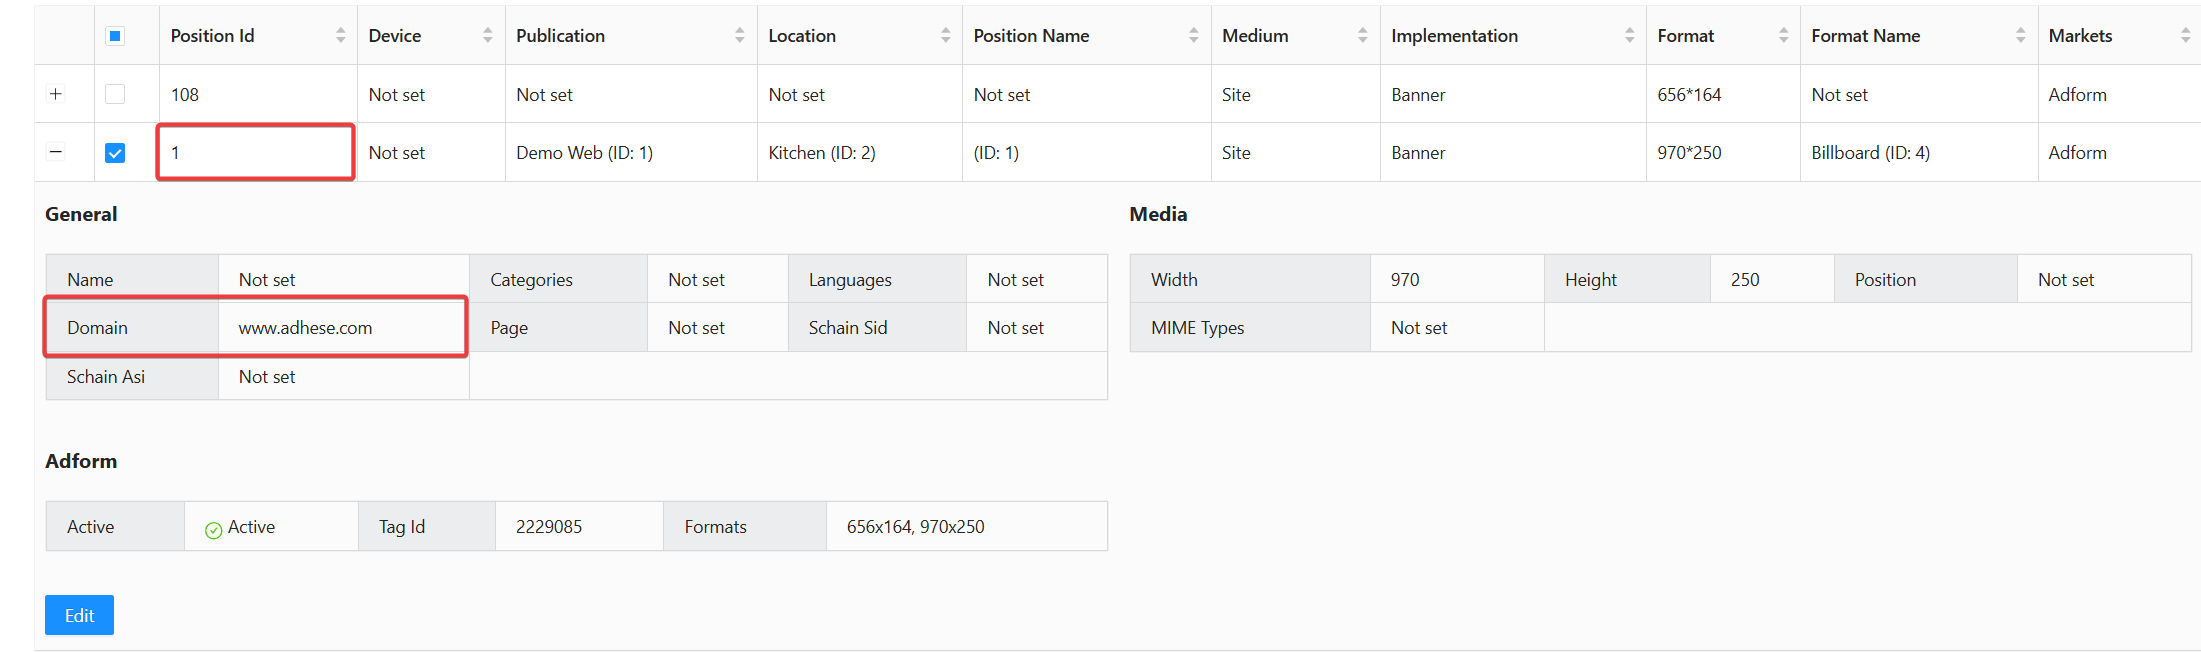
Editing rows
Click the grey bar labelled Editing to open the Editing form
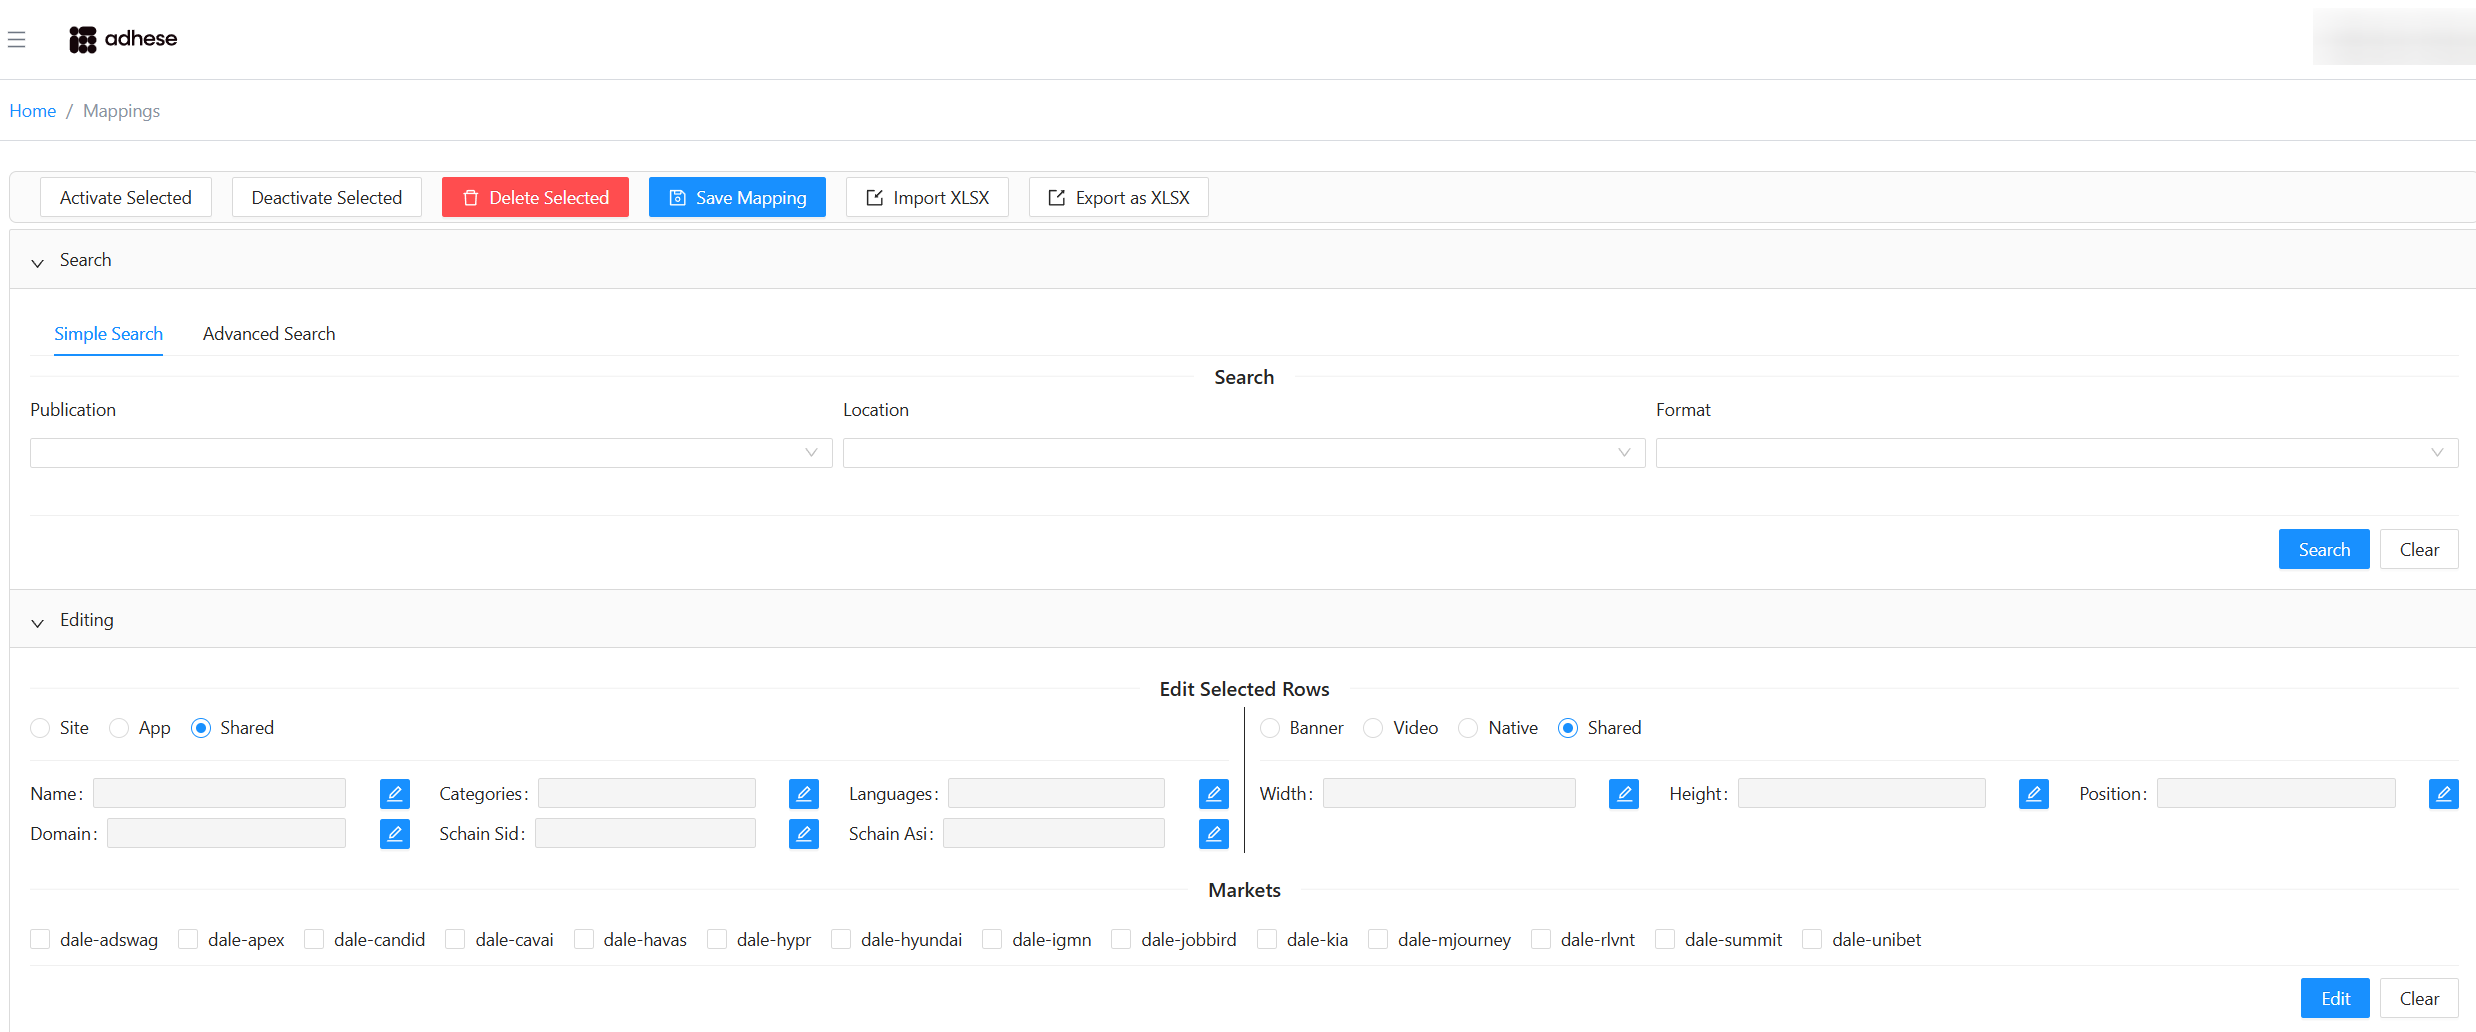
All fields are disabled by default (shown in grey). Enable a field by clicking the blue toggle next to it.
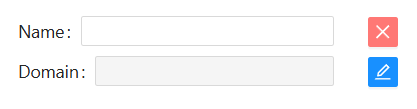
A disabled field is ignored when applying edits:
- If the field already has a value, it will remain unchanged.
- If the field is empty, it will not be overwritten with an empty value.
This prevents accidental data removal.
You can also enable market‑specific sections by selecting their checkboxes

Editing multiple rows
- Select one or more rows in the table
- Click Edit
- Modify the enabled fields
- Click Apply

Editing a single row
- Expand the row
- Click Edit
- Update the desired fields
- Click Apply
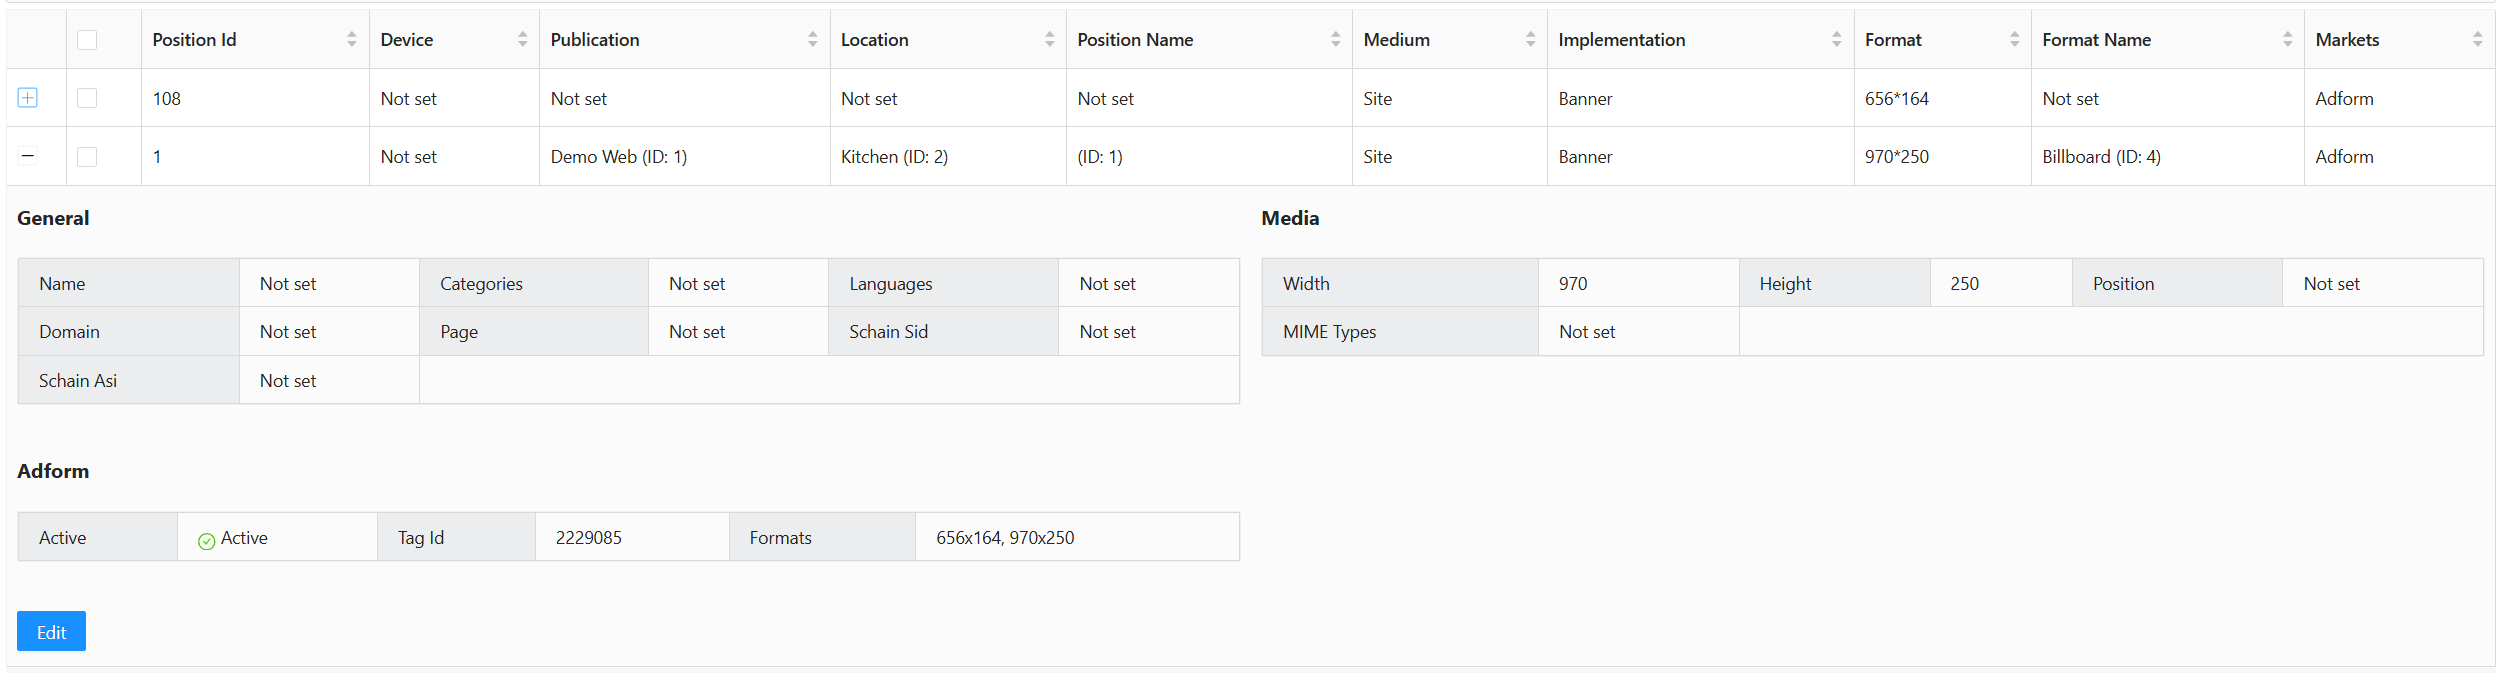
Click the Edit button, and for instance, now change the name field
Once you click apply the changes will take effect
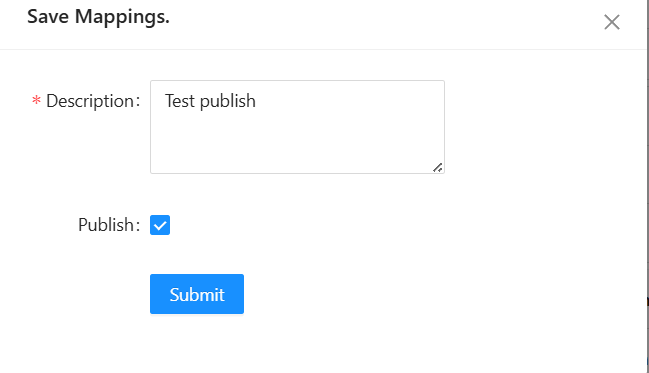
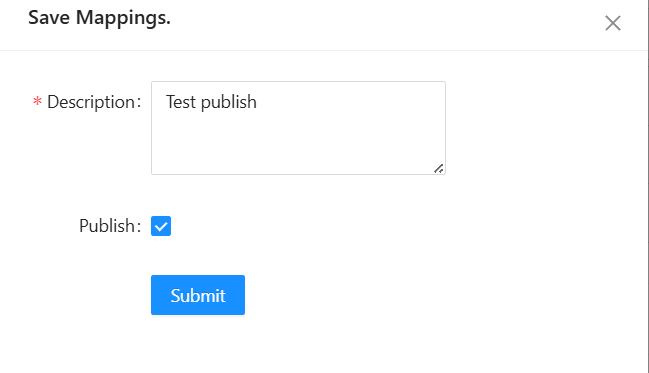
Saving and Publishing Changes
This saves your changes but does not publish them to production.


Publish
After saving, click Publish to push your changes to the cloud.
You must be in Write Mode to publish.
Enter a short description and click Publish.
This final step deploys the changes to production and ends your Write Mode session.
Adding Rows
Click the black bar labelled Add New Row to open that section.

However:
- Required fields are enabled automatically and cannot be disabled.
- Each new row must include at least one market instance. If adding a row with an existing position ID, ensure device type and content type differ from the original.
- Width and Height are required unless the content type is neither Banner nor Video.
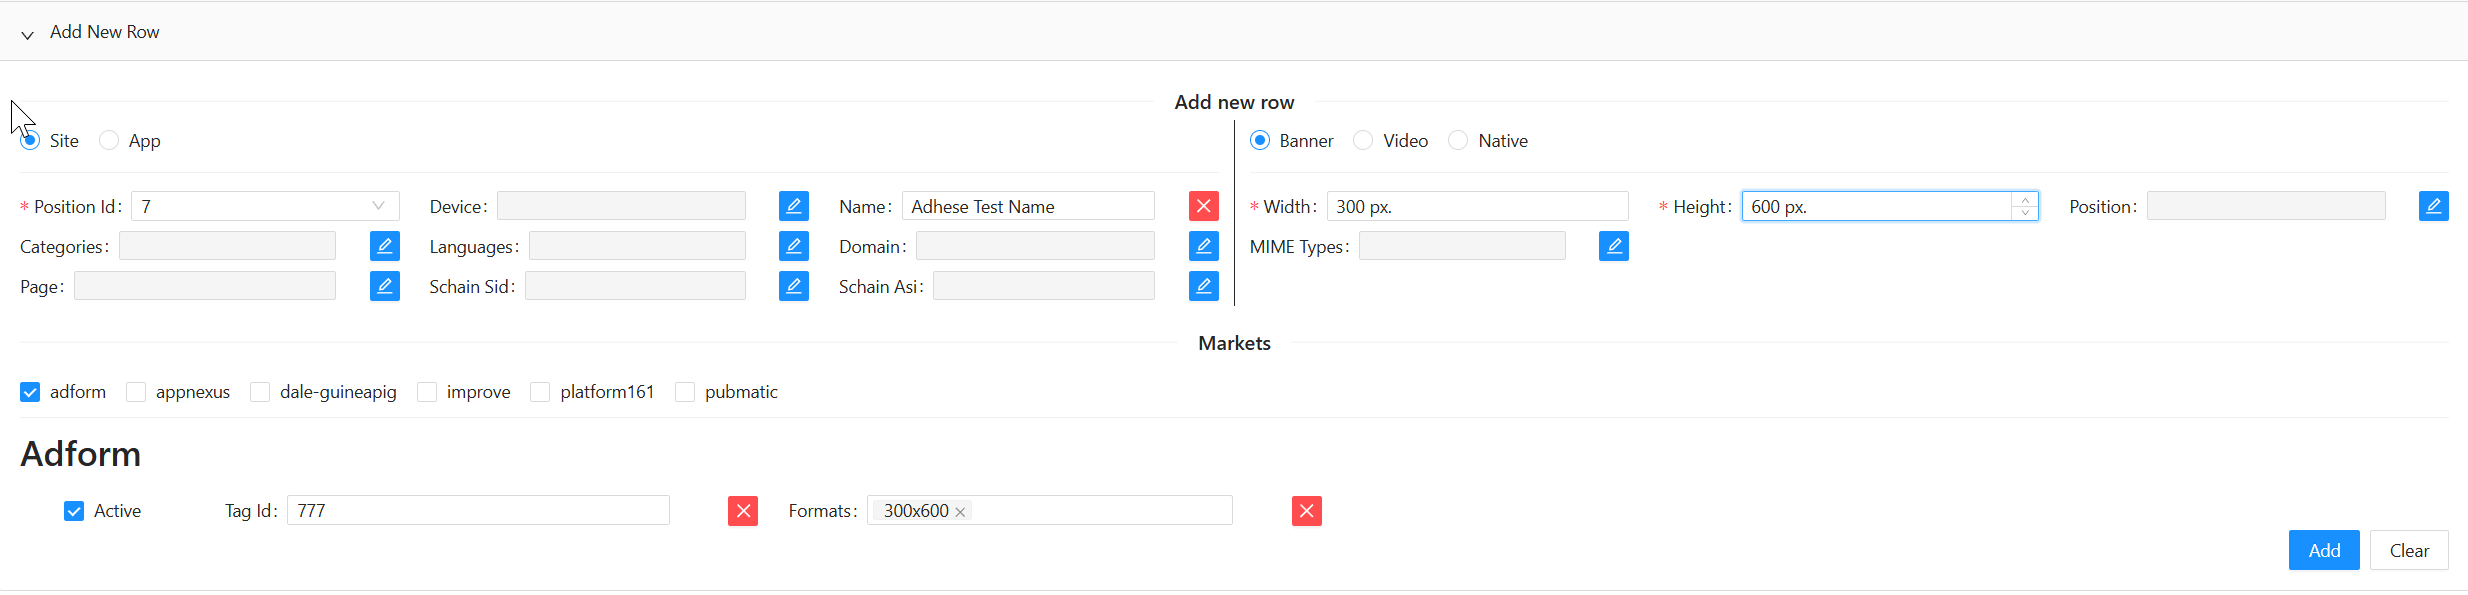
After completing the form, click Apply. A confirmation notification will appear.

Save your changes
To permanently save your changes, click the Save Mapping button in the top-middle of the Wikan UI.
Please note that this does not publish your changes to production; it only saves your progress.


Publish your changes
As your final step, you need to Publish to push your changes to the cloud. To push your changes, you need to be in Write mode and click the Publish button in the top right corner; this will publish the changes and end your Write mode session.
Importing and Exporting Mappings
Export
Click Export as XLSX to download all mapping data as a spreadsheet.
The exported format matches the structure used for importing.

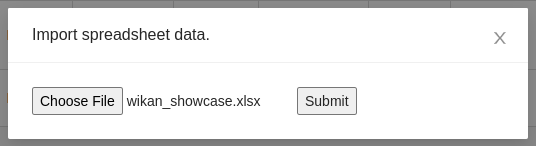
Import
Click Import XLSX, select your file, and click Submit.
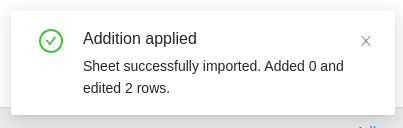
If the import succeeds:
- New rows are added
- Existing rows are updated
A notification in the bottom‑right shows the number of changes made.
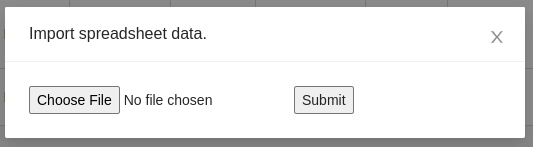
Select the spreadsheet file and click Submit:
If the operation is successful, the system will add new rows and update existing ones. A notification in the bottom right corner indicates the number of new rows added and the number of existing rows updated.
Spreadsheet Fields and Examples
Below is a non-exhaustive list of the fields in an import/export spreadsheet.
|
Field name |
Type |
Example |
Key |
|---|---|---|---|
|
Position Id |
Integer |
55 |
profile.sl |
|
Device |
String |
desktop |
profile.dt |
|
Name |
String |
Dominos |
site.name, app.name |
|
Categories |
String Array |
IAB1-4,IAB2 |
site.cat, app.cat |
|
Languages |
String Array |
fr,nl |
site.wlang, app.wlang |
|
Domain |
String |
test.com |
site.domain, app.domain |
|
Page |
String |
test.com/product |
site.page |
|
site_or_app |
String |
site |
|
|
banner_or_video |
String |
video |
|
|
Width |
Integer |
300 |
imp.banner.w, imp.video.w |
|
Height |
Integer |
600 |
imp.banner.h, imp.video.h |
|
Position |
Integer |
4 |
imp.banner.pos, imp.video.pos |
|
banner MIME Types |
String Array |
image/jpg, image/gif |
imp.banner.mimes |
|
video Delivery Methods |
Integer Array |
4,5 |
imp.video.delivery |
|
video Protocol Ids |
Integer Array |
3,4 |
imp.video.protocols |
|
video MIME Types |
String Array |
video/mp4, video/flv |
imp.video.mimes |
|
video Min Duration |
Integer |
3 |
imp.video.minduration |
|
video Max Duration |
Integer |
30 |
imp.video.maxduration |
|
video Linearity |
Integer |
1 |
imp.video.linearity |
|
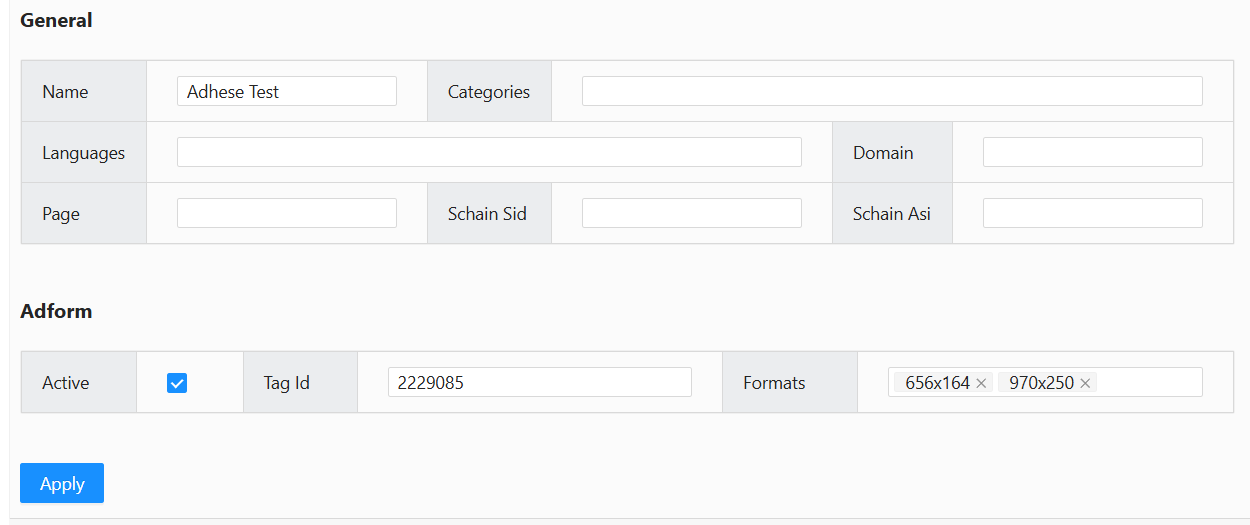
All market instances share the following fields. Replace <market instance> with the appropriate market instance and its name. |
|||
|
<market instance> active |
Boolean |
true |
|
|
<market instance> site/app_id |
String |
3485929 |
site.id, app.id |
|
<market instance> banner Formats |
Format Array |
300x240,400x200 |
imp.banner.format |
|
The following fields are specific to certain market instances. |
|||
|
<market instance> Custom Targets |
Multimap |
value1=result2,value2=placeholder |
|
Gateway dashboard
The Adhese Gateway dashboard provides a comprehensive overview of various segments, including up-to-date information on your real-time bidding (RTB) revenue.
It is crucial to remember that this dashboard is made up of unprocessed data. The revenues and impressions shown should be regarded as estimates, and may differ from the final reports. The dashboard is helpful for keeping a pulse on inventory activity and revenue from RTB
To reach the Gateway Dashboard, append /tools/dashboard to your account's URL.
Example: https://accountname.adhese.org/tools/dashboard
Dashboard
Introduction
The dashboard is intended for operational use. It provides an overview of market performance in real-time, enabling users to identify any changes to their Gateway setup. The screens are divided into various panes, which are described in more detail below.
Overall View
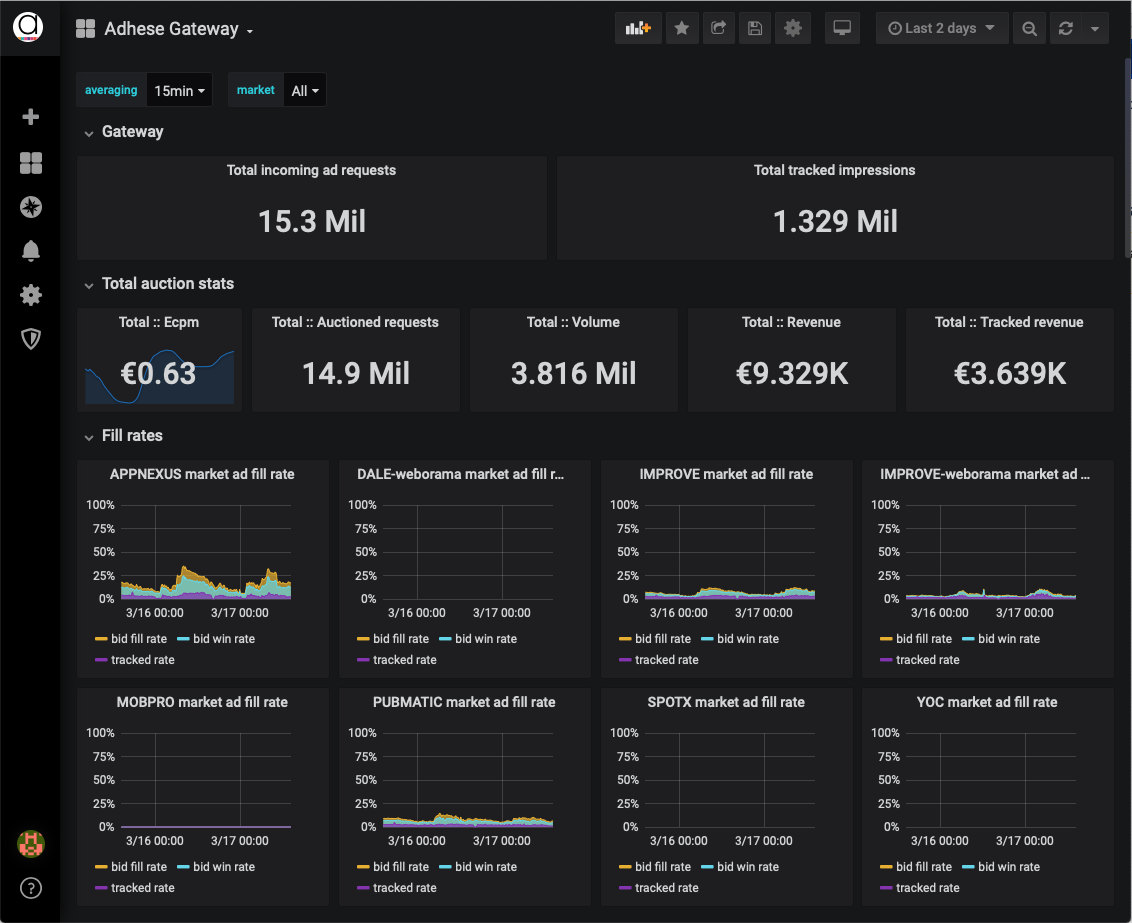
Gateway
Contains the overall total of incoming Ad requests and Tracked impressions.
Tracked impressions are "win notifications" triggered by the client (browser or app) when an ad is rendered.
Total auction stats
- Total Ecpm: overall e-CPM, based on the total number of requests and net revenue generated by Tracked impressions
- Total Auctioned Requests: the total number of Ad requests that lead to at least one Bid request to a market
- Total Volume: number of bid responses received by Gateway
- Total Revenue: monetary value of the accepted bids
- Total Tracked Revenue: monetary value of the Tracked impressions - this corresponds with the paid revenue from all markets together
Fill rates
The fill rates pane contains a chart plotted per Market, showing three percentages over time. The charts give insight into how frequently a market bids, how often those bids win the auction, and how often the bid eventually gets shown to a user.
- Bid fill rate: how often does the demand partner return a bid? What is the chance that a particular demand partner will make a bid for a request? If the rate is around 20%, then on average, the Market will return a bid once every five requests. However, the bid does not necessarily win the auction.
- Bid win rate: how often does a demand partner win a Gateway auction? If the rate is 20%, the demand partner wins one out of five auctions.
- Tracked rate: how many won bids were eventually shown and tracked on the page? When a bid is won, it doesn't always get visualized on a page. Depending on the implementation of the website or app, bids may be collected before the actual page is visible. We add a unique tracker to a winning bid to create an insight into the number of winning bids that are eventually displayed. This tracker will be called when the user reaches the part of the page where the ad is displayed. The number represented here should be close to the number of "Paid Impressions" reported by the SSP's or DSP's in your dashboard.
Per Market statistics

For each active Market, five numbers are reported:
- Ecpm: overall eCPM for all bids (winning and non-winning) sent from this Market
- Requests: total number of bid requests sent to this Market
- Volume: number of bid responses this Market has sent to Gateway
- Revenue: monetary value of all bid responses (winning and non-winning), which indicates the budget a market had available for your inventory
- Tracked revenue: monetary value of the Tracked impressions, which indicates the actual budget a market will pay
Inventory View
The Inventory View consists of three charts, giving insight into what portion of your inventory goes into auction and how much of your traffic has a user ID associated with it.
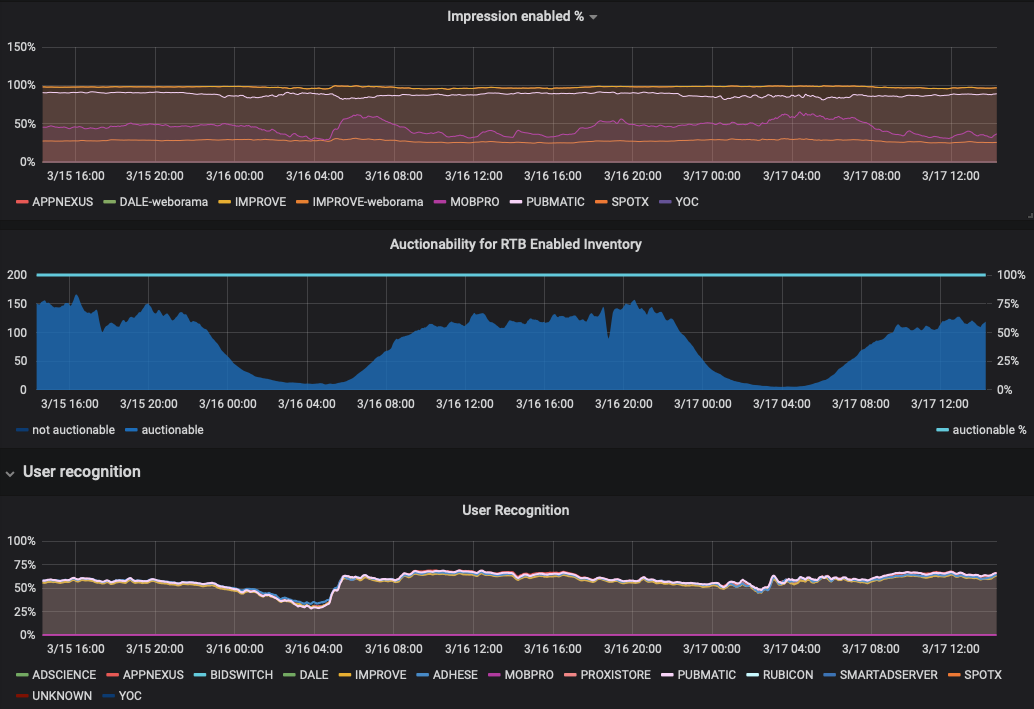
Impressions Enabled
For each Market, a percentage indicates the amount of traffic (all formats combined) that is configured and sending bid requests.
Auctionability For RTB-Enabled Inventory
The percentage of inventory available for the RTB-enabled inventory. This figure is dependent on the 'RTB Compete' feature for direct campaigns and bookings in Adhese.
User Recognition
For each Market, a percentage indicates the number of Bid Requests containing a UUID (Universally Unique Identifier) recognized by the Market.
Technical View
The technical view presents three charts giving insights into latency, errors, and timeouts.
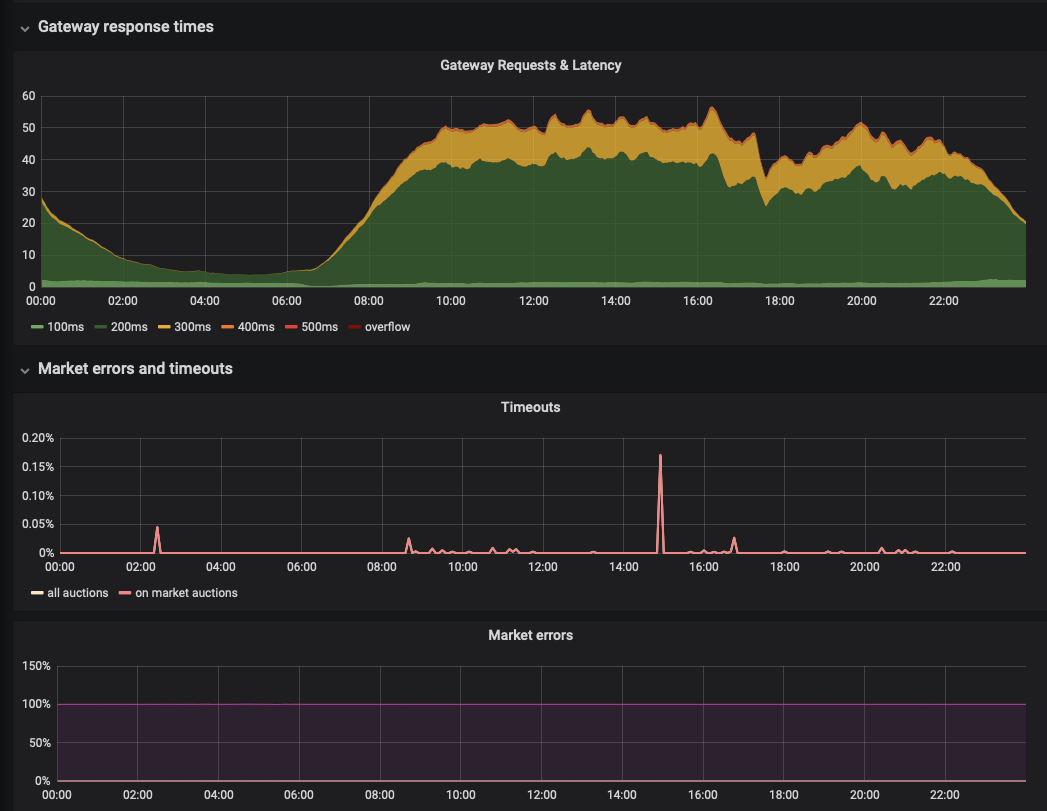
Gateway Requests & Latency
The Gateway Requests & Latency graph shows the millisecond latency for all requests passing through the Gateway. When hovering over the graph, a tooltip displays the number of requests and their respective latency.
Timeouts
The Timeout line chart shows the percentage of timeouts for all auction and bid requests and the selected period.
Market errors
The Market errors line graph shows the percentage of errors for each involved party.
Actions
Expand / Hide dashboard
The dashboard is divided into several sections, including Auction revenue, Prices, and Technical. All sections are expanded by default. To hide an expanded section, click the down arrow next to the section title. To reveal a hidden section, click the arrow next to the section's title.
Timespan
The dashboard period can be changed in a number of ways to reflect the most recent data. You can change the time range in the top right corner:

Clicking on the selected period displays a drop-down menu: there are several options:
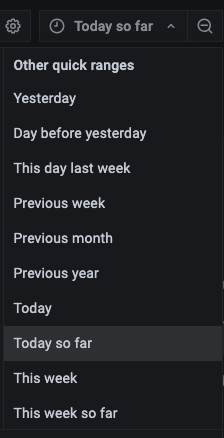
Other relative time ranges include 'last 1 hour', 'last 24 hours', 'last 7 days', 'last 30 days', and so on. To set a new range, simply click on your preferred time range.
You can also change the period using the magnifying glass in the top right corner of the interface.

- Click the left arrow to shift the timespan backwards
- Click the right arrow to shift the timespan forward
You can refresh the page by clicking on the circular arrow icon. If you click the down arrow next to it, a drop-down menu will appear. You can set a time for the page to refresh by clicking the desired refresh rate.

Third-party ad servers and marketplaces
List of third-party ad servers and marketplaces
Adhese offers a comprehensive solution for integrating and implementing third-party technologies, including real-time bidding systems and third-party ad servers. We are continuously expanding our partner network to bring our clients the latest innovations in digital marketing
Currently, Adhese integrates with the following marketplaces:
- adform
- adscience
- xandr
- improve (Azerion)
- justpremium
- kobler
- mobpro
- platform161
- proxistore
- pubmatic
- pubnative
- magnite
- sharethrough
- equativ
- spotx
- triplelift
Contact Support if you wish to implement a third-party ad server or integrate with a marketplace.
Xandr Inventory Setup Instructions
Please contact support if you want to connect to Xandr as this connection requires setup and a change to your contract.
Before you can traffic creatives to Xandr, you need to set up Xandr-specific inventory for a given account.
If necessary, the Support team can help you set this up using DB / UI-API automation scripts.
-
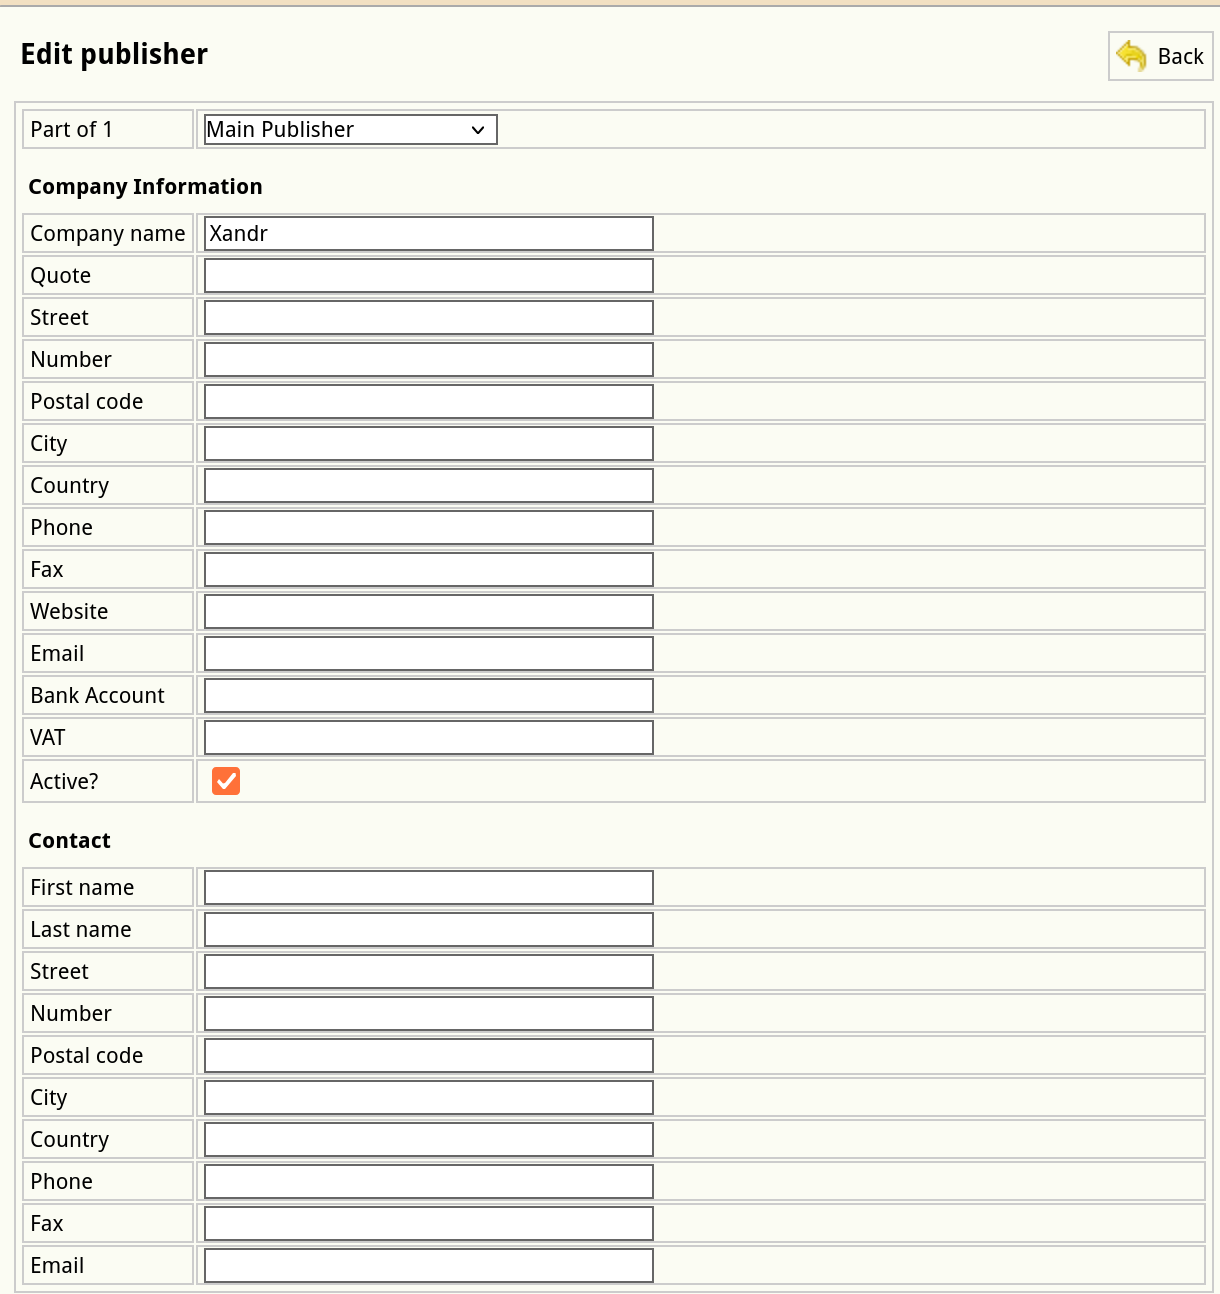
Create a publisher.
-
Part of: "Main Publisher" (or account name),
-
Company name: "Xandr",
-
Active: ✅.

-
-
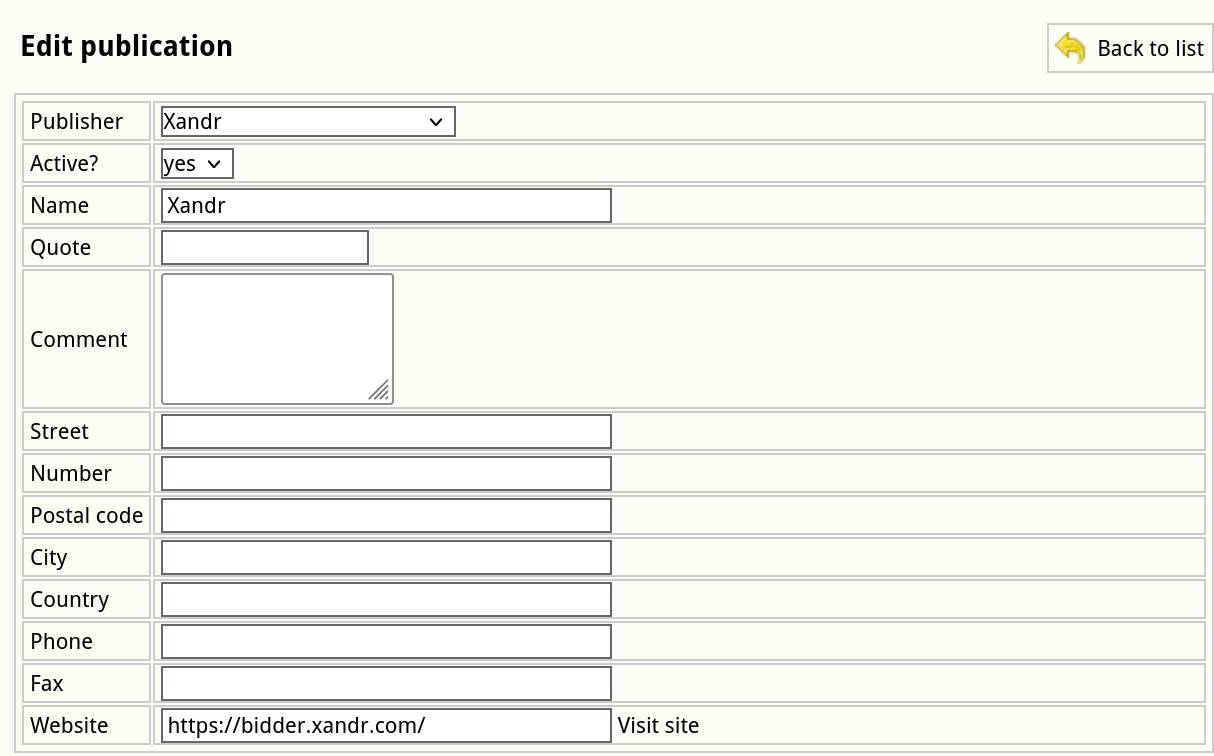
Create publications.
-
For each site domain or app bundle (app ID), there needs to be a publication.
-
Publisher: Xandr,
-
Active: yes,
-
Name: site domain or app name & platform (like “Example.com - Android”) if this is an app-related publication,
-
Quote: leave empty
-
Website: domain name or matching the app ID, like “com.example.android or 123456789” if this is an app-related publication.

-
-
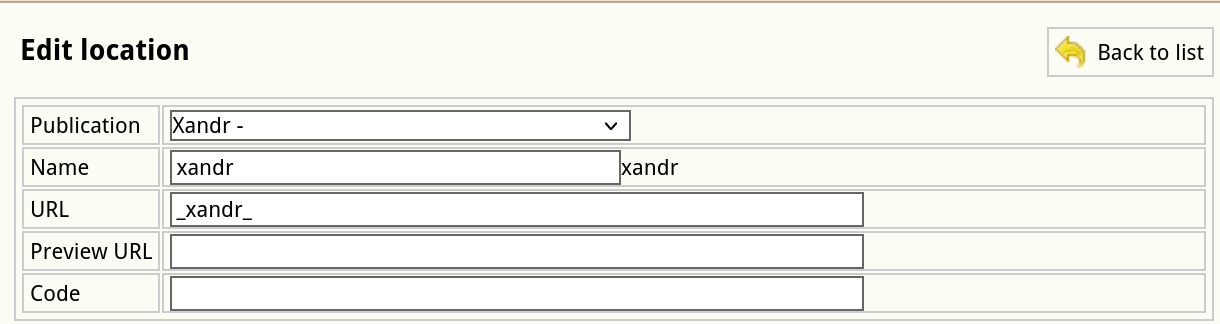
Create a location.
-
For each publication, there needs to be a location.
-
Publication: choose a publication created in step 2,
-
Name: same as the publication name,
-
URL: "xandr_" and the site domain or app bundle, for example:
- “xandr_example.com” for websites,
- “xandr_com.example.android.news.mobilead” for Android apps,
- “xandr_123456789” for iOS apps,
-
Channel: normal position (no group).

-
-
Create missing formats and/or ensure existing formats can be used for Xandr bid requests.
-
Tag: yes,
-
Code tag & Code book: the code tag of a format must contain a tag with numeric dimensions, e.g. "300x600". If another code tag is already defined, prepend the numeric tag with a semicolon, like "300x600;halfpage". Ensure the code book value is also updated (it supports semicolons as well).
-
See documentation on formats for further reference.

-
-
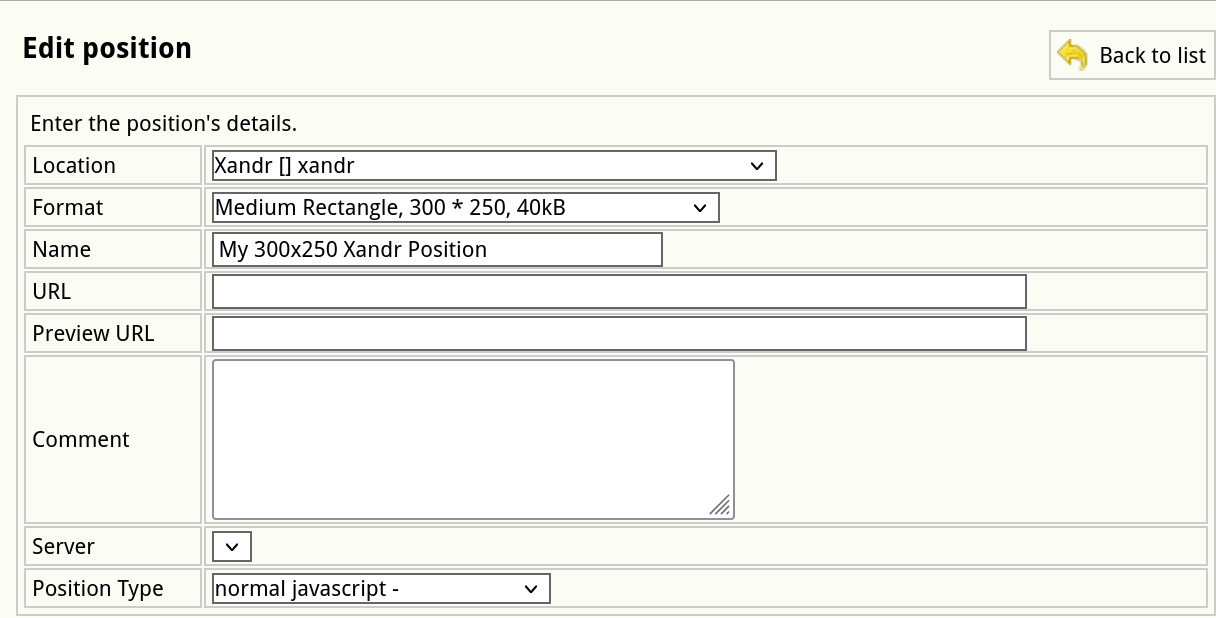
Create positions.
-
For each combination of the Xandr location and a format, there needs to be a position.
-
Location: publication-name [] location-name
-
Format: required format, e.g. Halfpage, 300 * 600, 0kB
-
Position Type: normal javascript

-

Supported formats currently supported with Xandr
Expand List
- 1800x1000
- 970x1000
- 970x250
- 970x90
- 728x90
- 300x600
- 320x500
- 320x400
- 320x240
- 300x250
- 160x600
- 120x600
- 320x100
- 320x50
- 300x100
- 300x50
- 320x480
- 1x1
- 1x2
OpenRTB Native
IAB Specs: OpenRTB API Specification Version 2.5 and OpenRTB Native Ads Specification Final 1.2
OpenRTB Native
OpenRTB Native is a part of the OpenRTB specification and focuses on native advertising. Native ads match the form and function of the user experience in which they are placed, rather than being displayed in predefined, separate spaces. This makes native ads feel like content that is part of the page on which they are displayed.
Examples of native ads are:
- Sponsored products on a retailer's website
- Text ads or video content embedded in a newspaper website within the articles
- Video, product ads, etc... interspersed in social media feeds
OpenRTB Native in Adhese
OpenRTB Native is supported as an advar template in the Adhese UI. It is crucial that the structure of the template follows the specification.
In the Adhese backend, we check the ad body for the string{\"native\":{ to determine whether this is an OpenRTB Native ad type, to prevent some characters from being escaped, which would break the JSON structure.
In the preprocessor, we check for {"native":{ string to determine the ad native type.
The body is string-encoded JSON. As mentioned in the specifications, we plan to support direct object representation in a future implementation.
Example of the advar template body openrtb_native.json
{\"native\":{\"ver\":\"1.2\",\"assets\":[{\"id\":1,\"img\":{\"w\":\"<ADHESE_WIDTH_LARGE>\",\"h\":\"<ADHESE_HEIGHT_LARGE>\",\"url\":\"<ADHESE_SWF_SRC_2ND>\"}}],\"link\":{\"url\":\"<DESTINATION_LINK>\"}}}
Example of openrtb_native.json.descr
{
  "files": [
    {
      "default": "",
      "doc": "The background and visual, width: 714px. - height: 224px., used for Web",
      "label": "Banner image",
      "key": "2nd"
    }
  ],
  "fields": [
    {
      "default": "",
      "doc": "Enter the destination link (click-through URL)",
      "label": "Destination Link",
      "type": "singleLineText",
      "key": "<DESTINATION_LINK>",
      "id": "DestinationLink"
    }
  ],
  "advar": "openrtb_native.json"
}