Setup
- The inventory's structure
- Publishers
- Publications
- Locations
- Formats
- Positions
- Channels
- Request Endpoints
- Clients
- 3rd party tags through 3PAS
- The implementation of the Adhese ad tags
- System-wide over-delivery
- How to deal with responsive web pages
The inventory's structure
A publisher distributes content through one or more media platforms. Online advertising is often the business model of choice to benefit financially from these platforms. A publisher reserves a certain amount of space for advertising purposes: the inventory*.* A publisher is free to choose how it organises and structures its inventory. Adhese supports the client as a strategic partner during this phase of the implementation process.
Each piece of a publisher’s inventory is a position. A position is a combination of a location (i.e. a section within a publication) and a format. The following diagram is a simplified representation of an inventory’s structure.
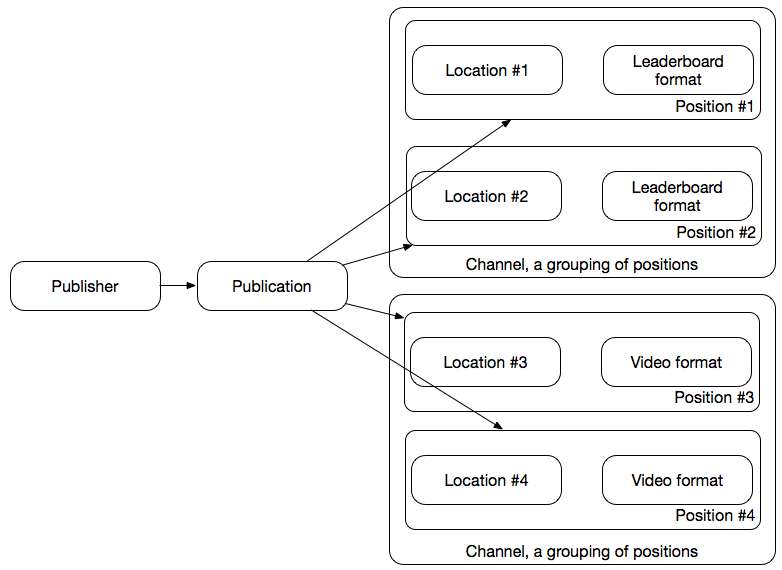
See Positions for a diagram that includes concrete examples of publishers, publications, locations and formats.
The structure of a position
Publication
A publisher maintains online publications such as a website, blog, video channel, newsletter, smartphone app, or webshop. Adhese is platform-agnostic and able to support all online publications.
Location
A location is a (sub)section within a publication, for example, the home page.
Format
A format defines the conditions, such as the file size and dimensions, that a creative must meet to avoid errors while uploading the creative file. A format is not limited to online banner ads. It can also be a native ad or a video ad.
There are two types of formats: main and sub formats. The ad tag for the main format can also fetch the defined sub-formats of its main format. Sub formats appear in the same position as their main format. However, sub formats can have different dimensions. Create a format elaborates on how to distinguish between main and sub formats.
Refer to the Appendix Online advertising formats to define the most important formats and their representation within their environment. The overview is not exhaustive. A publisher can also implement custom formats.
Channels
Channels are a collection of positions within a publication (e.g. run-of-site) or across your network of publications (e.g. run-of-network). Channels group identical formats across different locations, making it easy to target ads on similar web pages.
Publishers
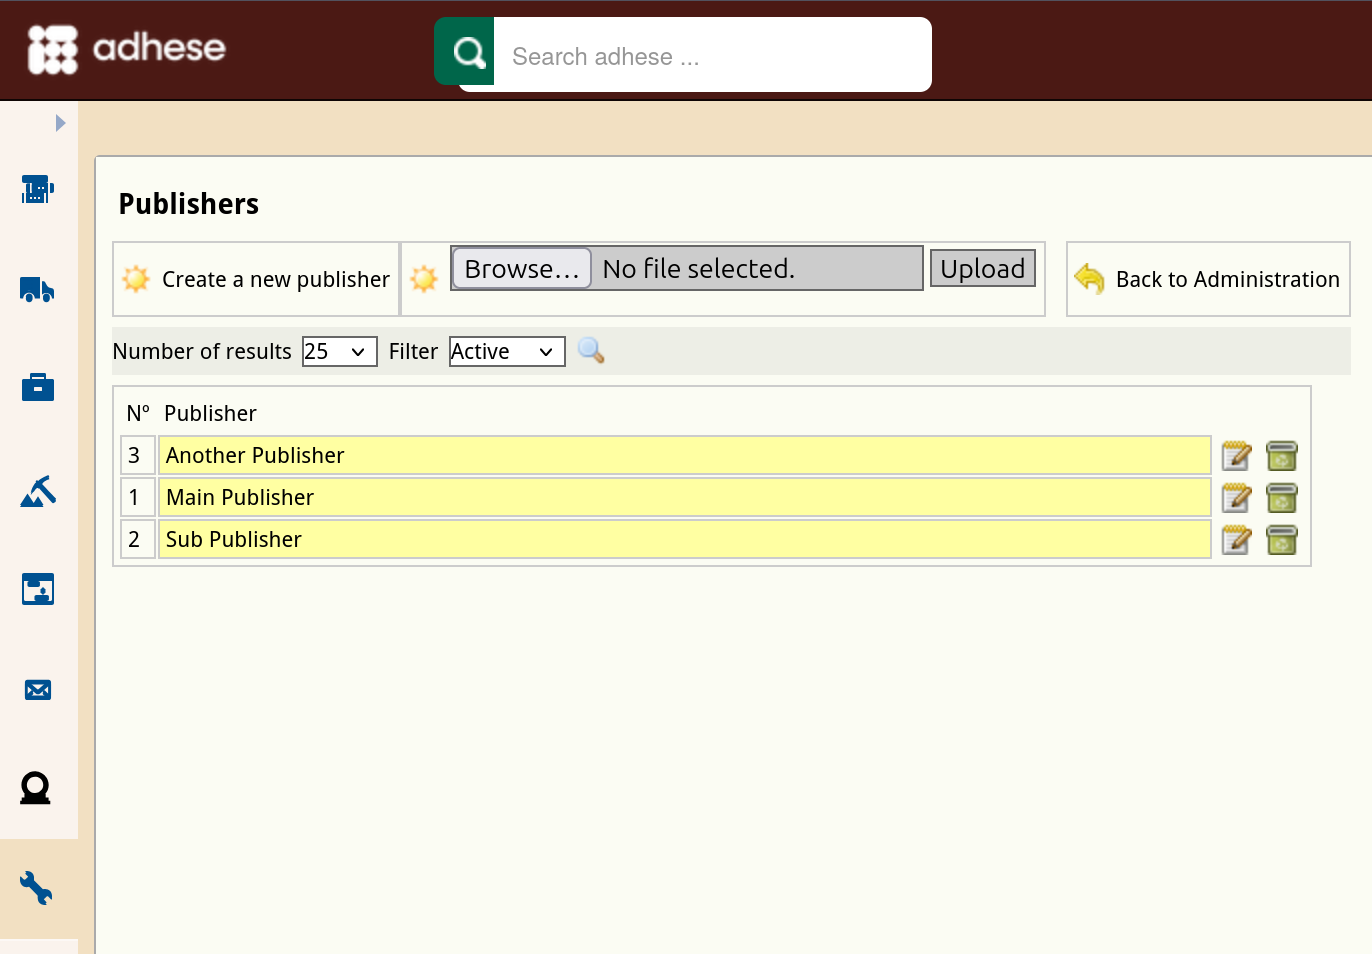
A publisher distributes content across one or more media platforms. Within a company, multiple publishers or sub-publishers can exist.
You can filter the Publishers screen by publisher status using the Filter drop-down menu. Determine the number of results to display from the Number of results drop-down.
Create a new publisher
To create a new publisher:
-
Click Admin in the left navigation menu. This opens the Administration screen.
-
Click Publishers to open the Publishers screen.

-
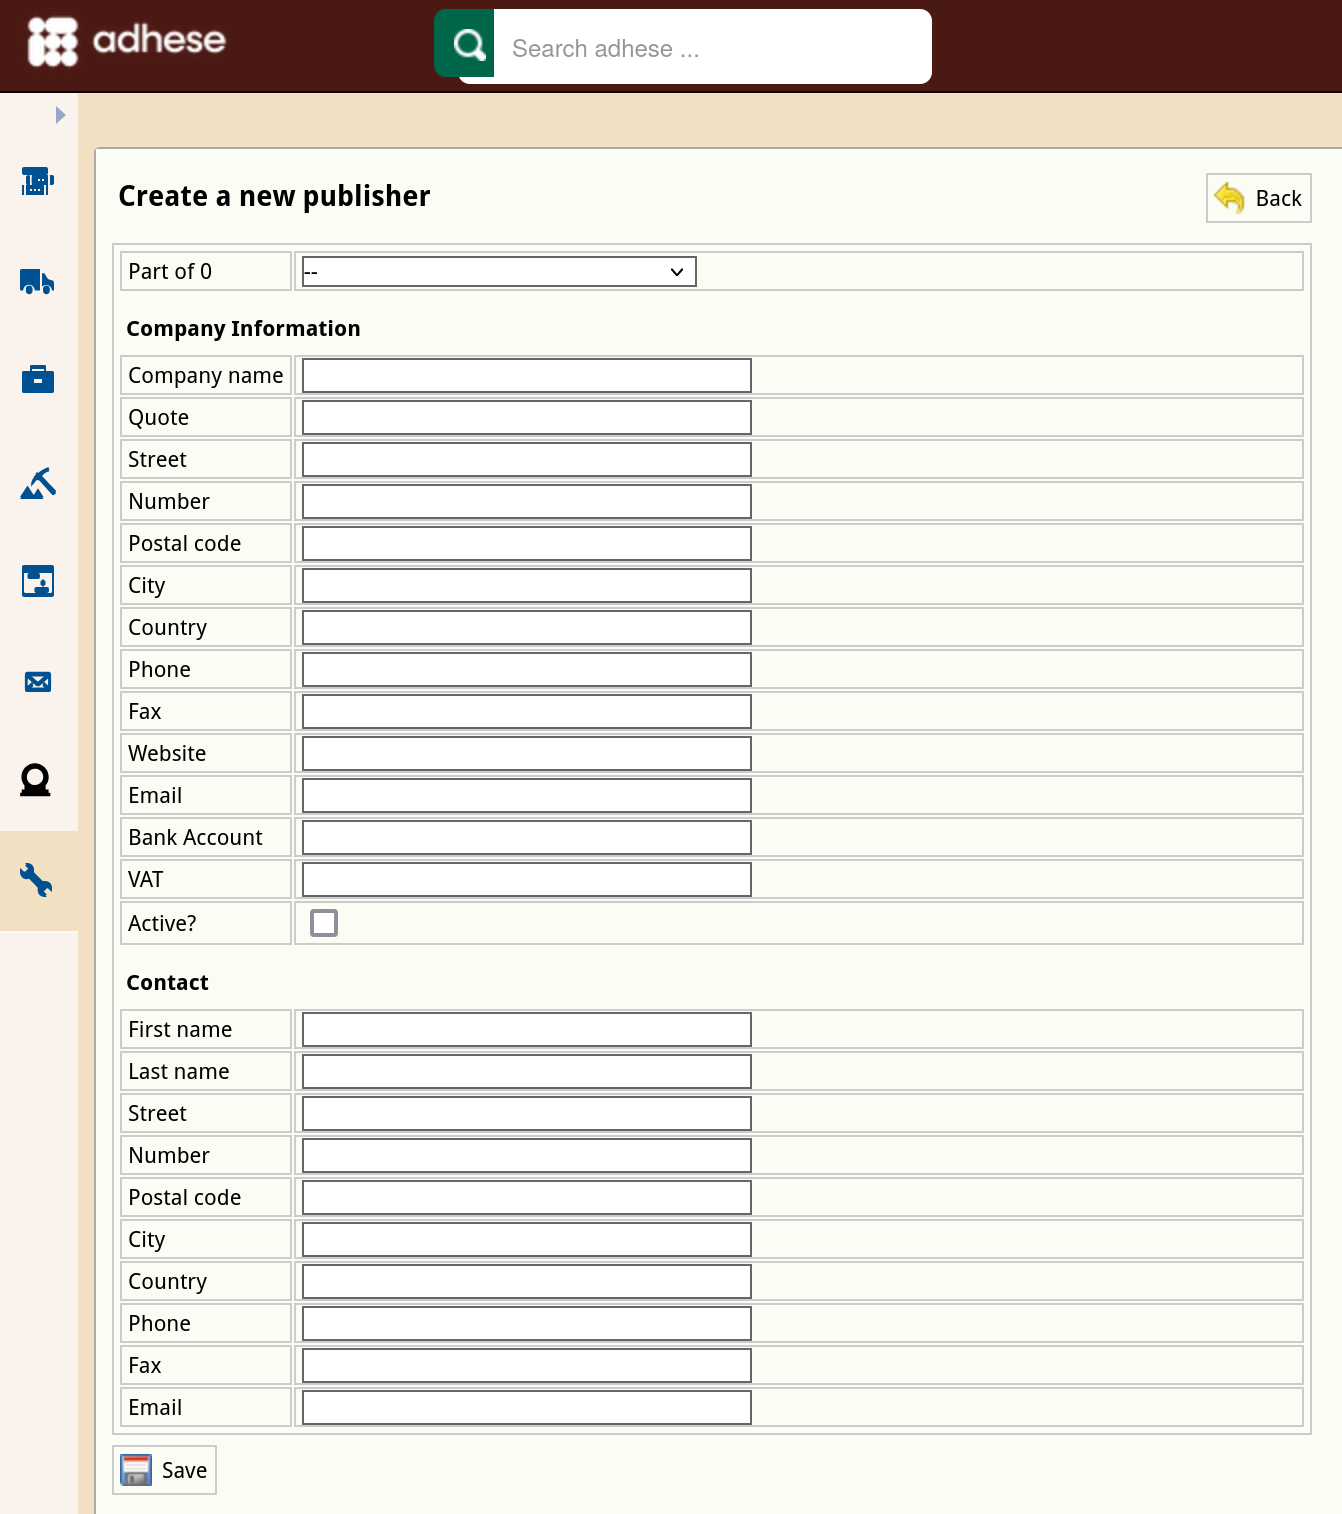
In the overview of publishers, click the Create a new publisher button. This opens the Create a new publisher screen, where you define the details for the new publisher.

-
(Optional) Select an existing publisher from the Part of drop-down list if the new publisher is a sub-publisher of a current publisher.
-
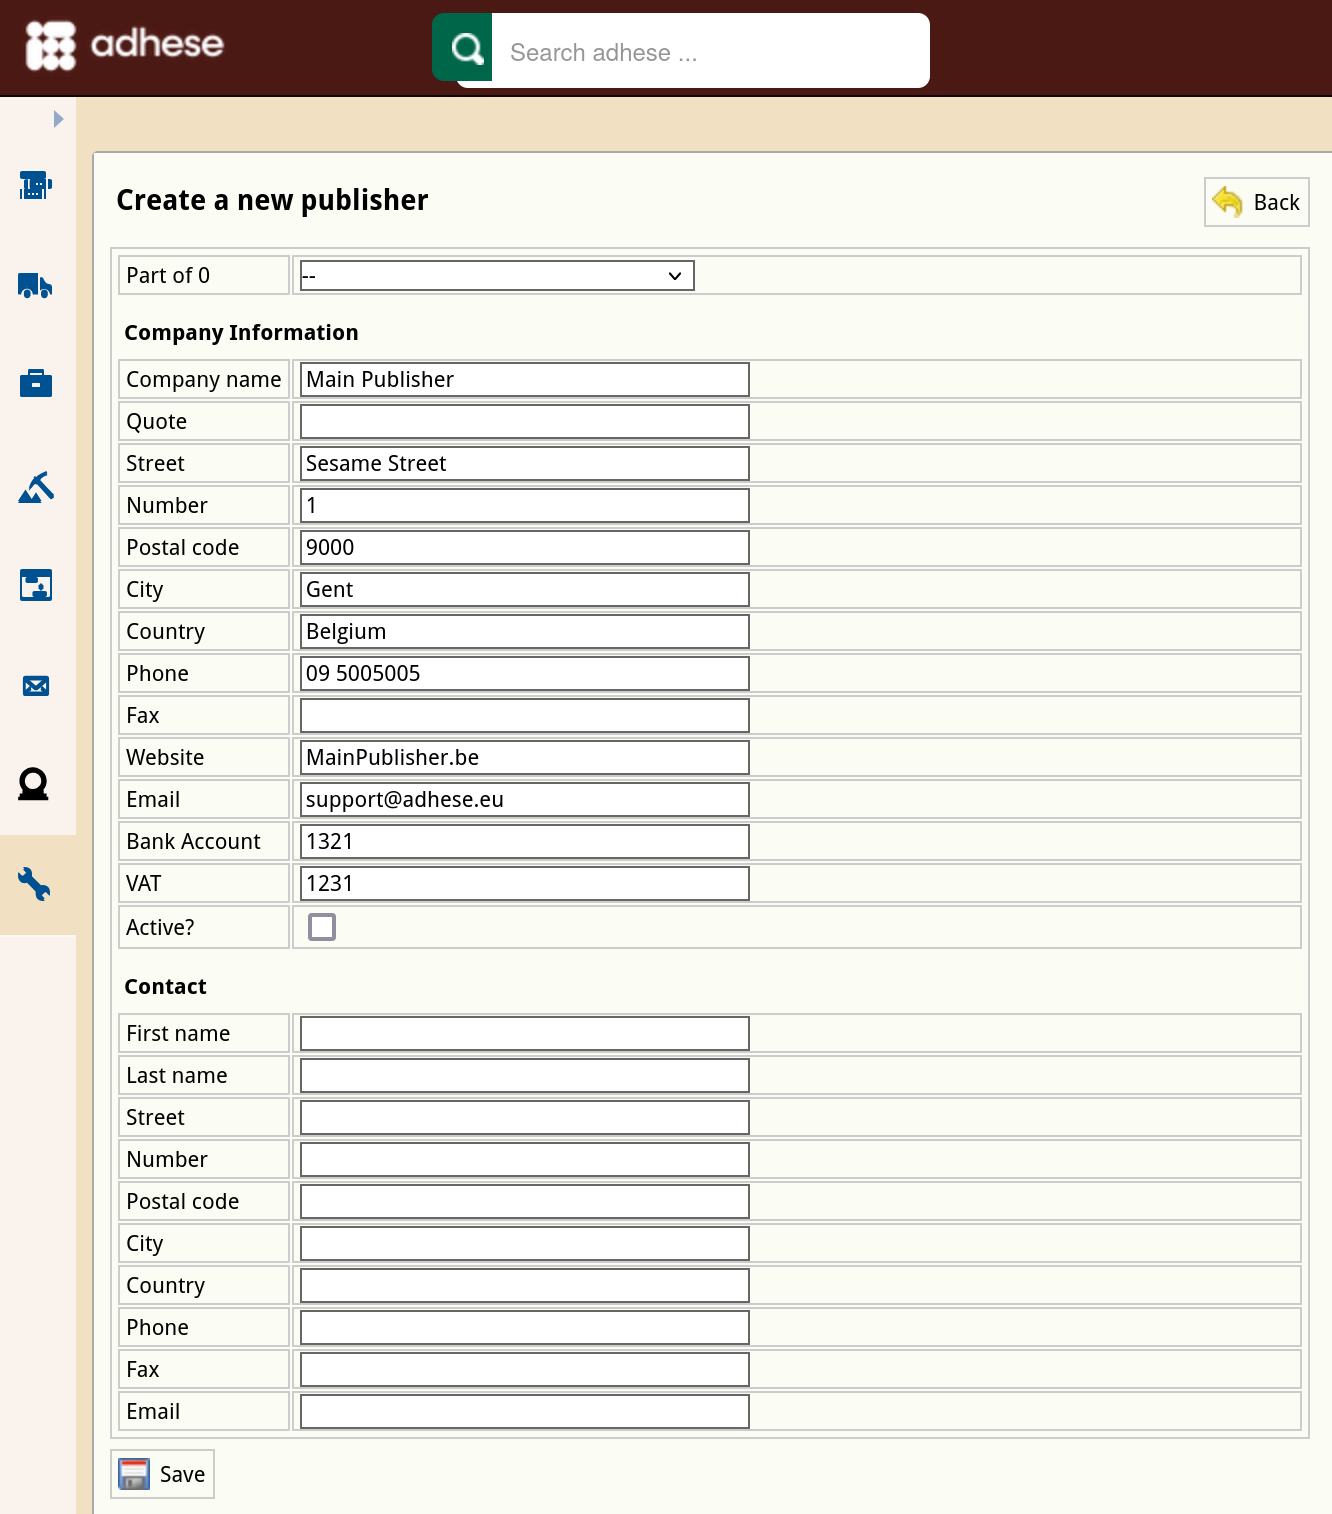
Enter the name of the publisher in the Company name field. This is the only mandatory field. The name of the publisher is needed to categorise the publications you want to create in the next step.
-
All other fields under the Company Information header are optional. However, these input fields can be of importance as the client reports publish this data.
-
(Optional) Enter a short name for the publisher in the Quote field.
It is necessary to enter a quote for the publisher to make sure an XML order upload succeeds. The quote should be used in the <company> field.
-
(Optional) Enter the address for the publisher in the Street, Number, Postal Code, City, and Country fields.
-
(Optional) Enter means of contact for the publisher in the Phone, Fax, Website, and Email fields.
-
(Optional) Enter a bank account number in the Bank Account field.
-
(Optional) Enter a VAT number in the VAT field.
-
Tick the Active? checkbox to declare that the status of the publisher is active.
-
-
All fields under the Contact header are optional. However, data entered here can be of importance as the reports publish it.
- (Optional) Enter the name of the publisher’s contact person in the First name and Last name fields.
- (Optional) Enter the address of the publisher's contact person in the Street, Number, Postal Code, City, and Country fields.
- (Optional) Enter a means of contact for the publisher's contact person in the Phone, Fax, Website, and Email fields.
-
Click the Save button at the bottom of the Create a new publisher form to save your new publisher.
Edit a publisher
To edit a publisher:
- Go to the Administration screen. Click Admin in the left navigation menu.
- Click Publishers.
- In the list of publishers, click the publisher's name you want to modify or click the edit icon
 . This opens the Edit publisher screen.

- Change any of the publisher’s details.
- Click Save.

Deactivate a publisher
To deactivate a publisher:
- Go to the Administration screen. Click Admin in the left navigation menu.
- Click Publishers.
- In the list of publishers, click the publisher's name or the edit icon for the publisher you want to deactivate. This opens the Edit a publisher screen.
- Deselect the radio button in the Active? field to deactivate the publisher.
- Click Save.

An inactive publisher will be grey (instead of yellow) in the list of publishers.
Publications
A publisher maintains online publications such as a website, blog, video channel, newsletter, smartphone app, or webshop. Adhese is platform-agnostic: it can support any type of publication.
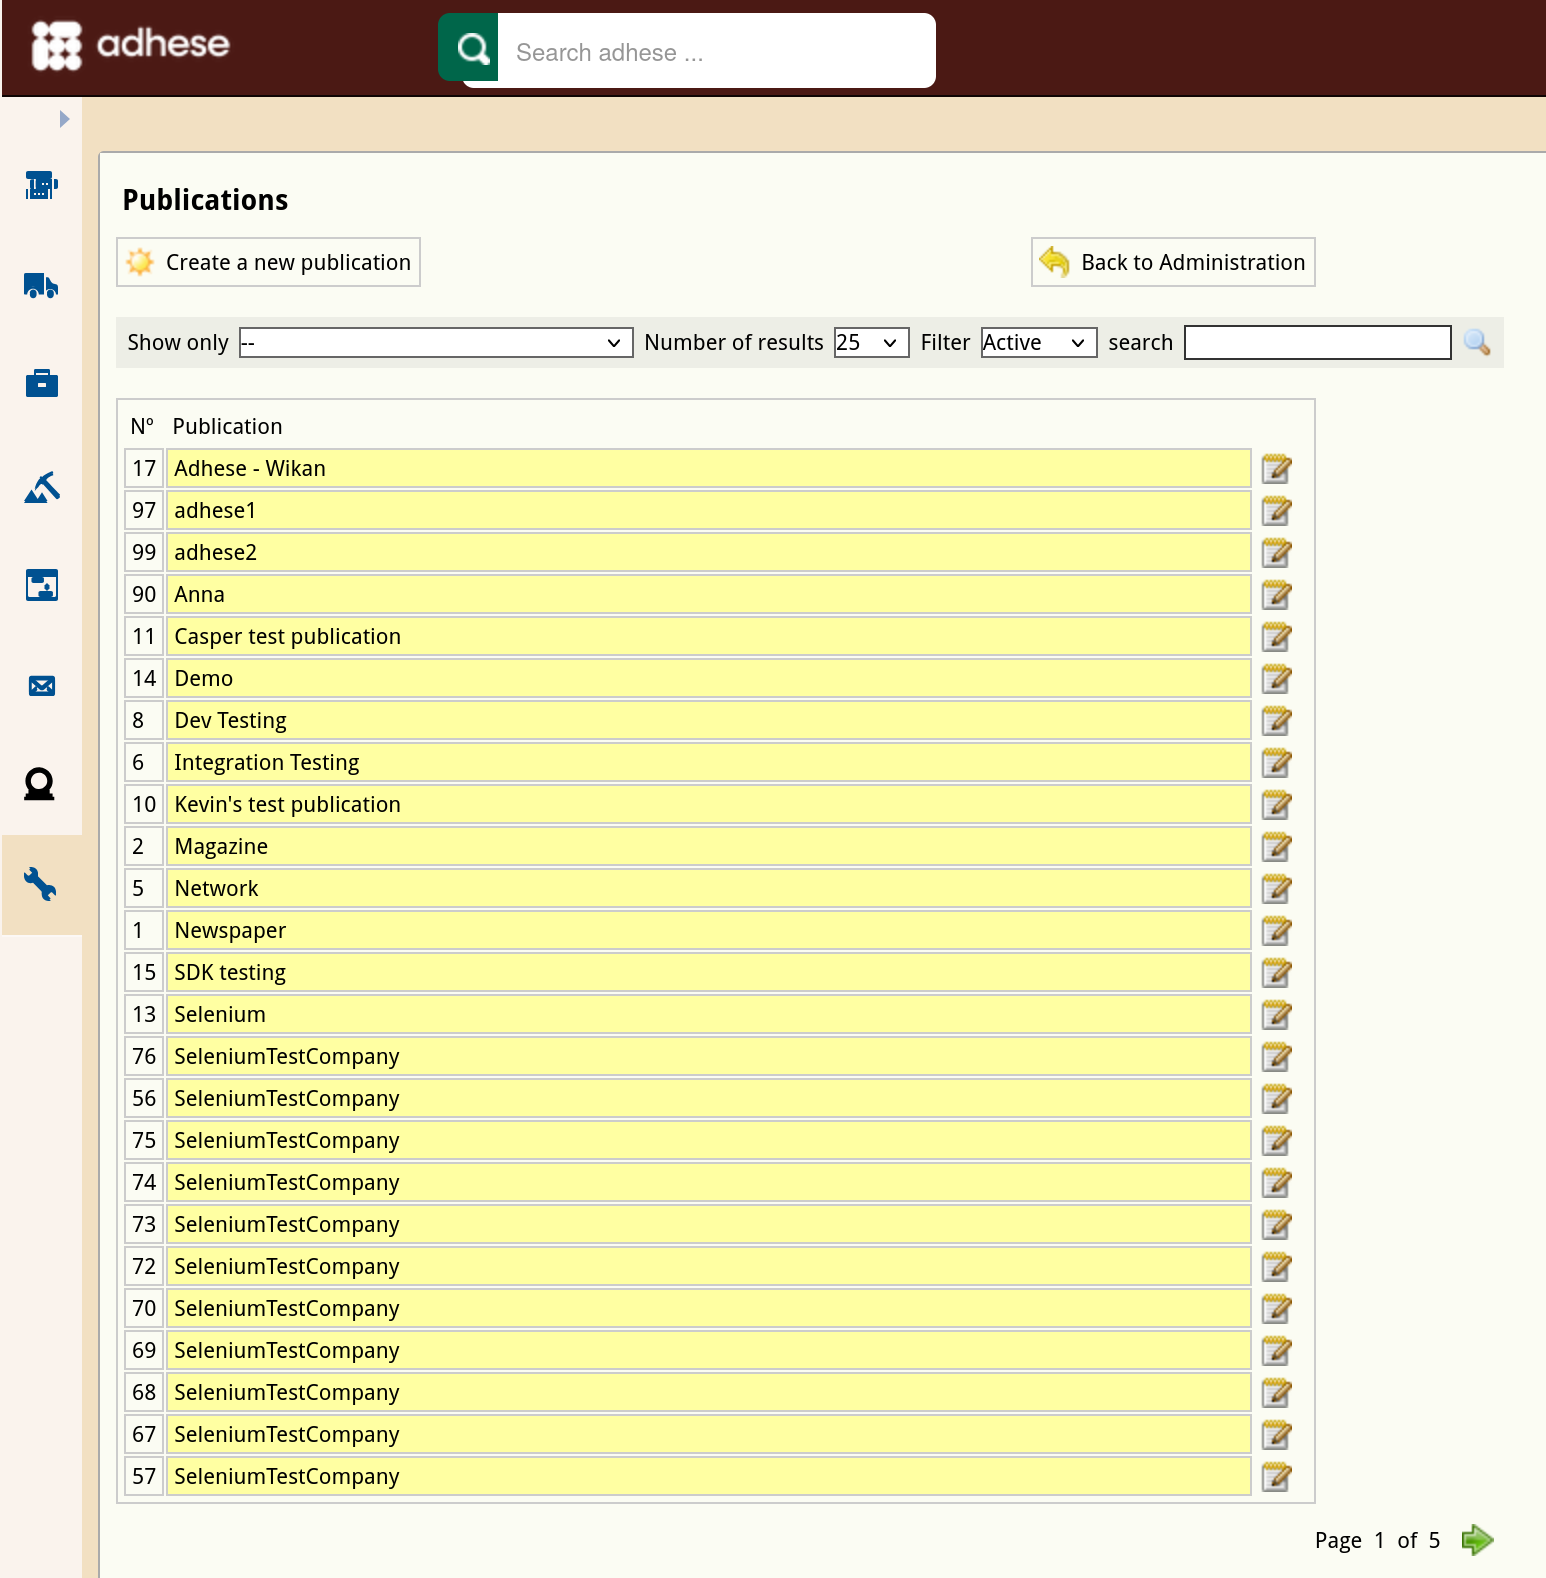
You can filter the Publications screen by publisher and select a publisher from the Show only drop-down menu above the list. You can filter the Publications screen by publication status using the Filter drop-down menu. Determine the number of results to display from the Number of results drop-down. Use the search bar to search for a specific publication.
Create a new publication
To add a new publication:
- Click Admin in the left navigation menu. This opens the Administration screen.
- Click Publications. The Publications screen opens:

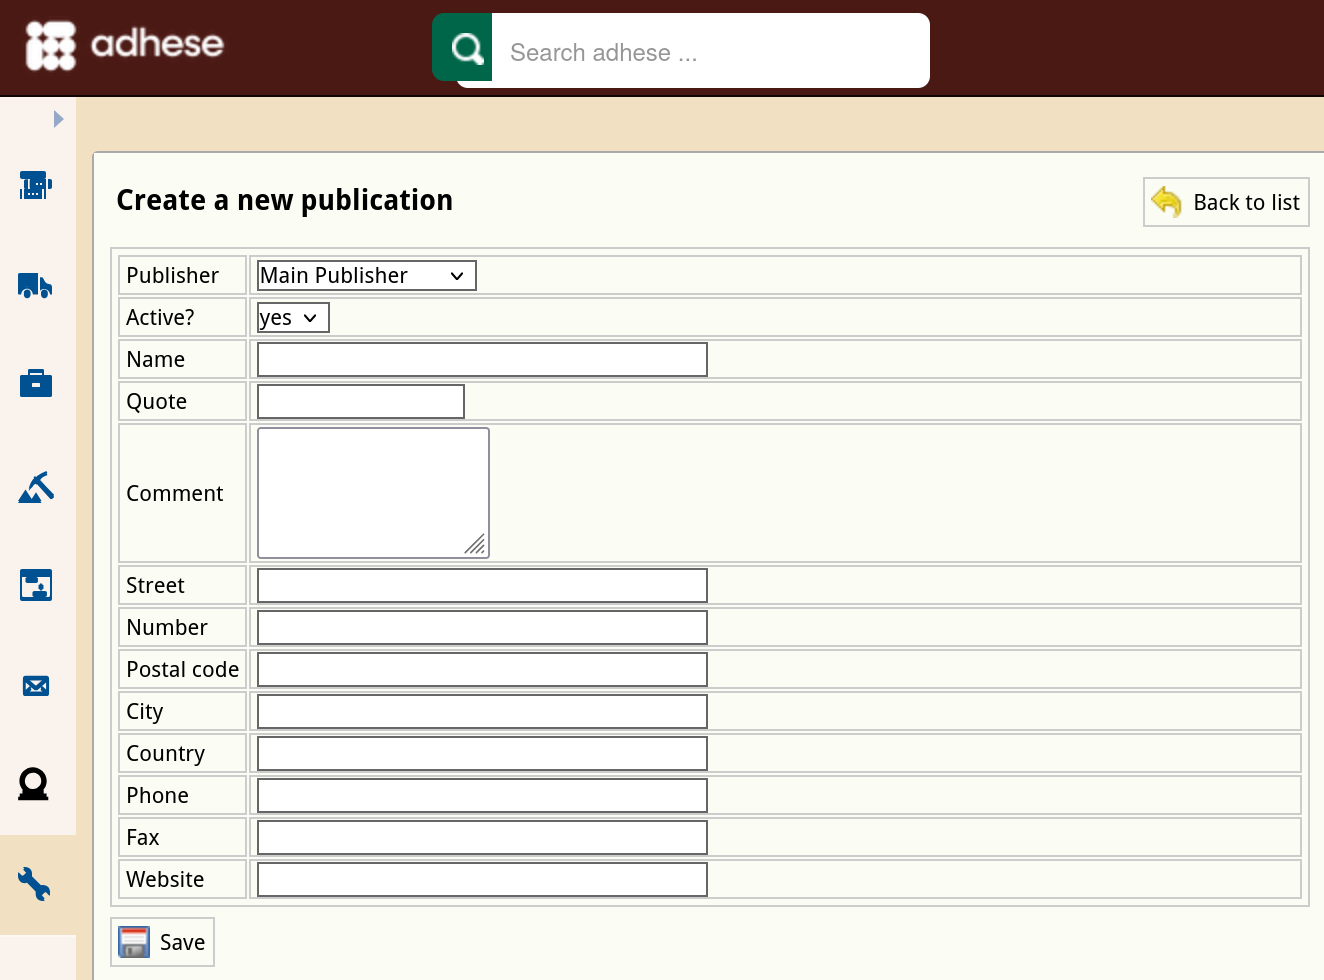
- Click the Create a new publication button. This opens the Create New Publication screen, where you enter the new publication details.

- In the Publisher drop-down, select the publisher to which the publication belongs.
- Select yes or no to determine whether the status of the publication is active or not in the Active? drop-down. By default, a new publication is active. If a publication is set to inactive, you will not be able to use it to serve ads.
- Enter a name for the publication in the Name field.
- (Optional) Enter a short name for the publication in the Quote field. Adhese uses the quote as a short notation for the publication and displays it in the list of locations (see Create a new location).
- (Optional) Enter the publisher’s contact details in the Street, Number, Postal code, City, Country, Phone, and Fax field
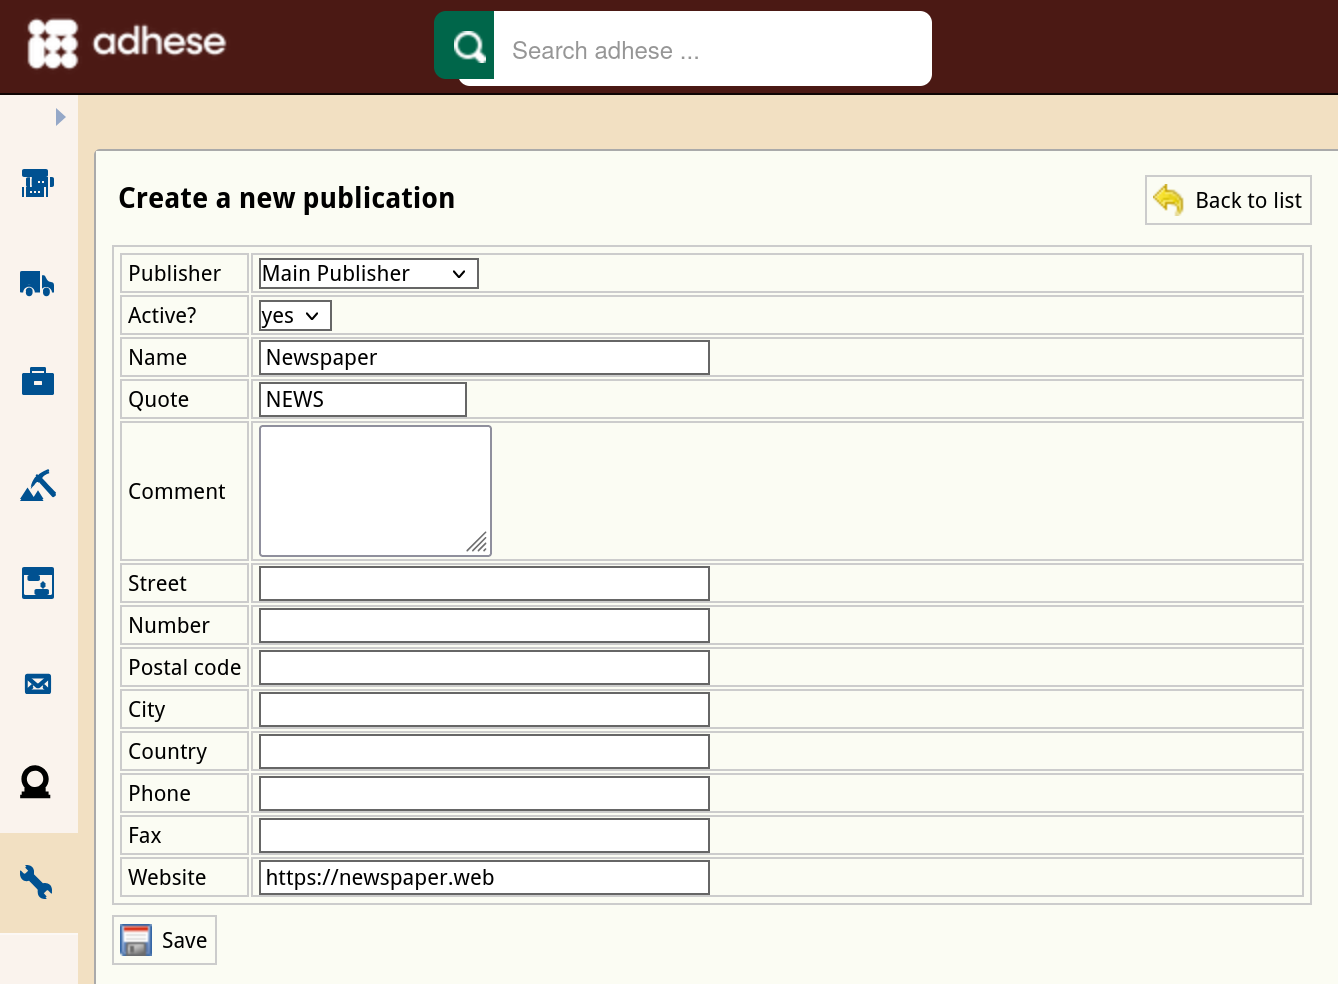
- To preview uploaded creatives in Adhese, provide the URL of the publication's website in the Website field.
- Click the Save button at the bottom of the form to save your new publication.
Make sure to use a full URL (e.g. https://example.com) instead of a short URL (e.g. example.com)
Edit a publication
To edit a publication:
- Go to the Administration screen. Click Admin in the left navigation menu.
- Click Publications.
- In the list of publications, click the name or the edit icon for the publication you want to edit. This opens the Edit publication screen.

- Change any of the publication’s details.
- Click Save.

Deactivate a publication
To deactivate a publication:
- Go to the Administration screen. Click Admin in the left navigation menu.
- Click Publications.
- In the list of publications, click the name of the publication or click the edit icon for the publication you want to deactivate. This opens the Edit a publication screen.
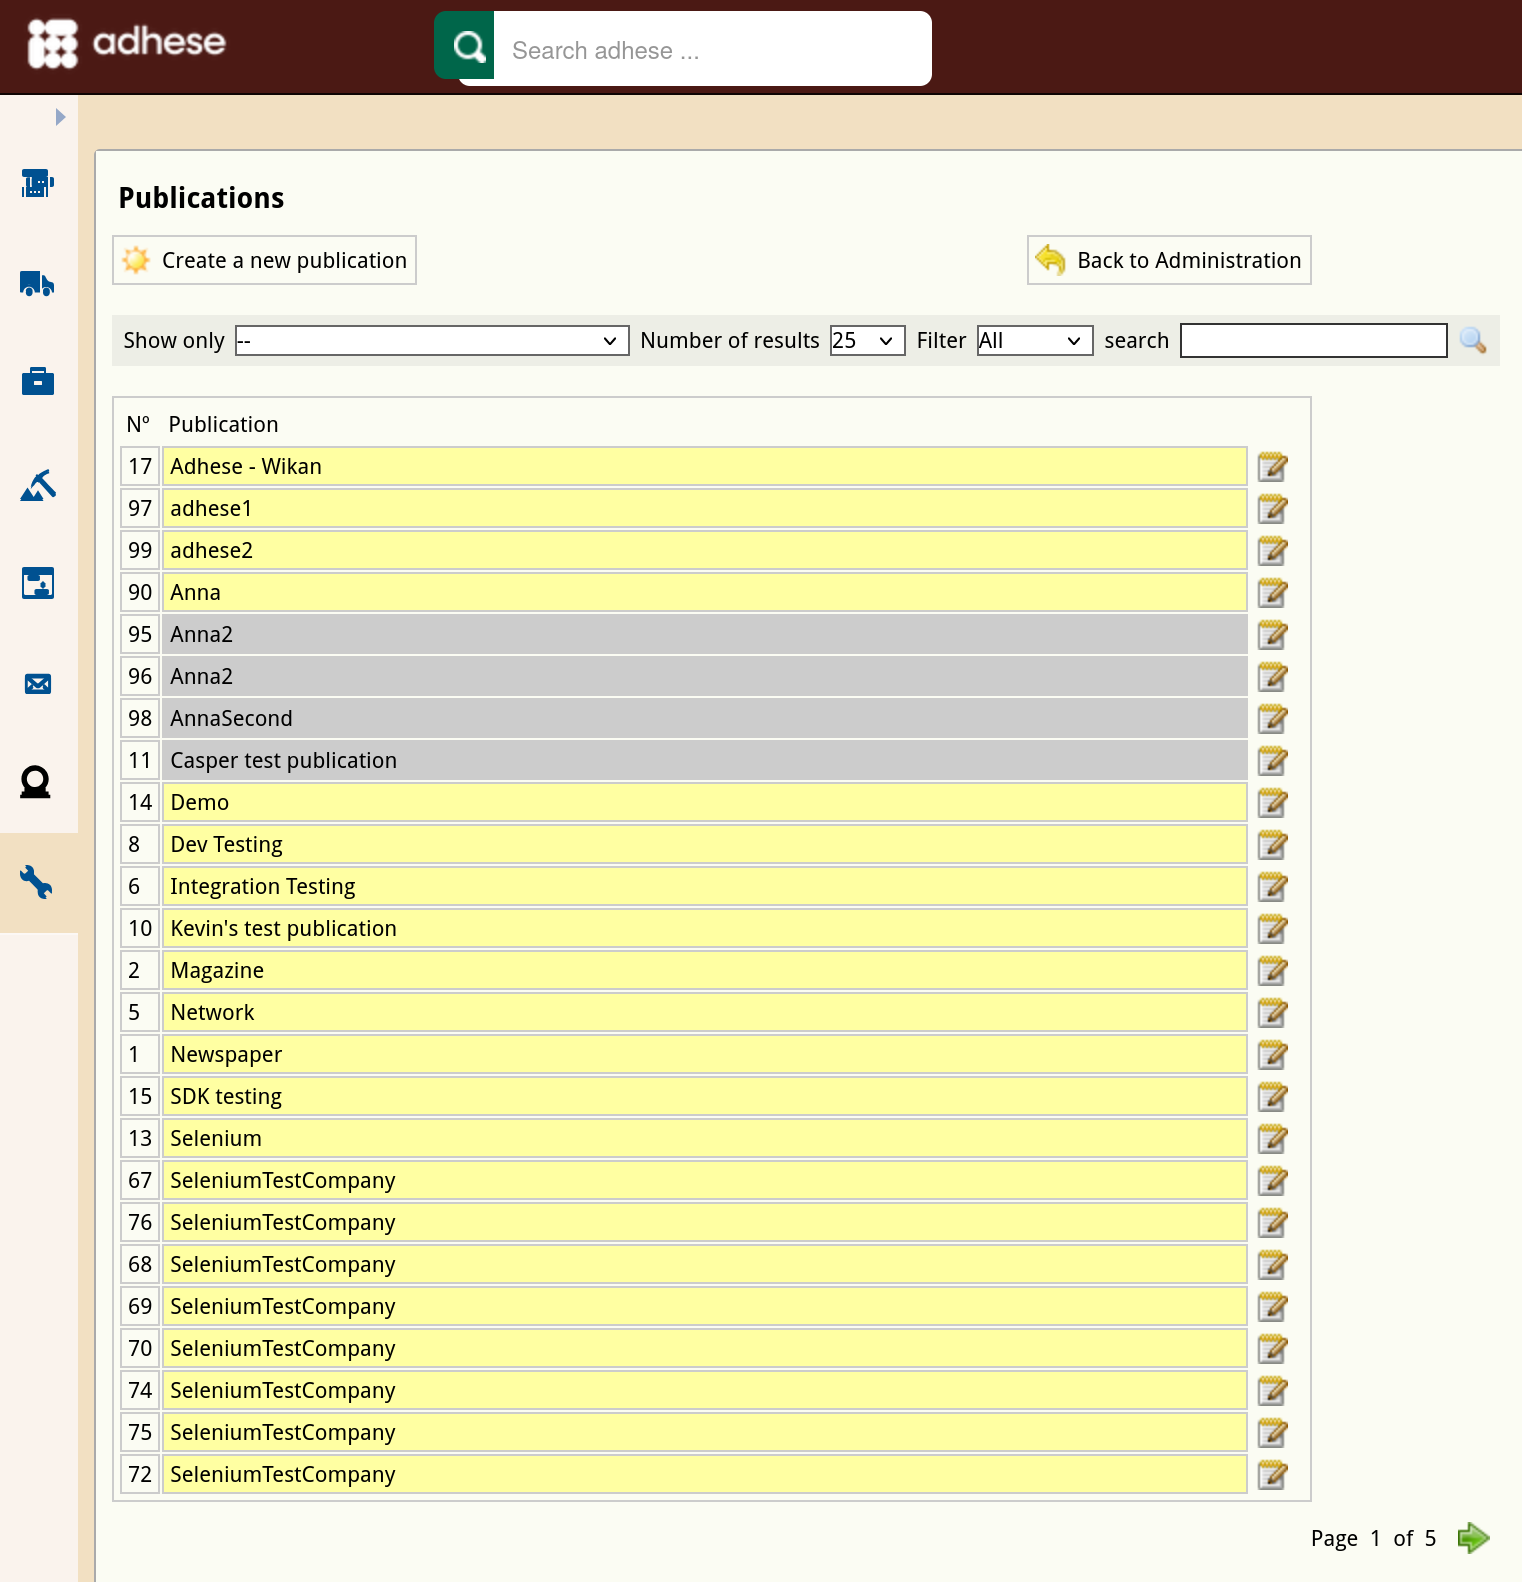
- Change the Active field from yes to no.
- Click Save.

The publication and its positions are no longer available in the Booking header. An inactive publication will be grey (instead of yellow) in the list of publishers.
Deactivating a publication prevents new bookings from being created for it. Running bookings, including bookings where the publication is part of a channel, remain active. The owner of the deactivated publication is responsible for removing all requests to Adhese. To prevent running bookings from delivering on deactivated publications, create a 100% SOV booking coupled with an empty ad on the highest priority. Check that this booking has priority over all other bookings in the competing bookings list and/or the planned daily traffic graph.
Locations
A location is a (sub)section within a publication, such as a home page, the local news or lifestyle section, or the daily newsletter.
Create a new location
To create a new location:
-
Click Admin in the left navigation menu. This opens the Administration screen.
-
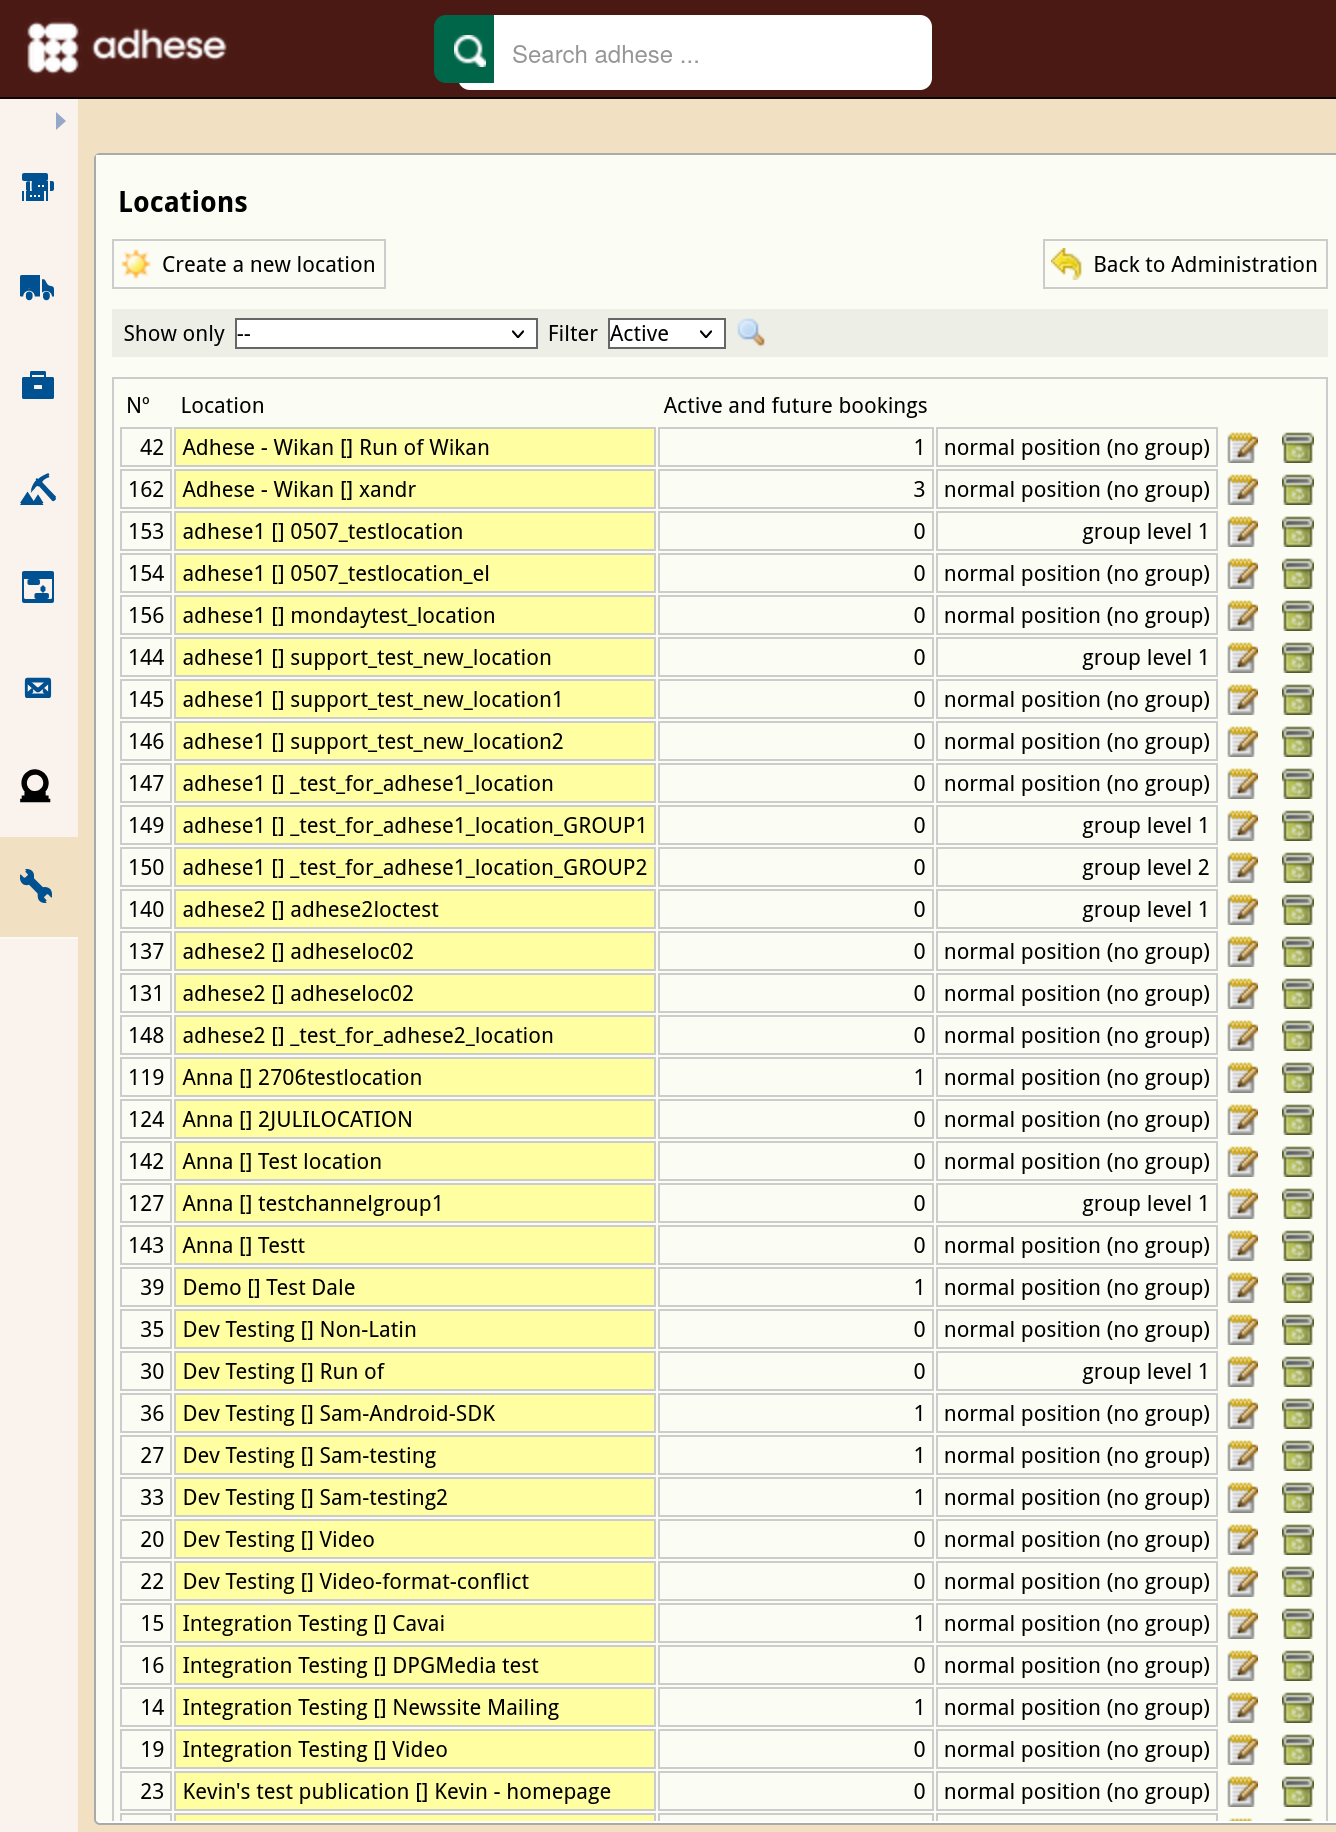
Click Locations. The Locations screen opens:
-
The Locations screen consists of a table with four columns:
- The No column displays the ID of the location.
- The Location column shows the name of the publication and the location.
- The Active and future bookings column indicates the number of bookings that are currently booked on that location.
- The last column details whether the location is a single position or if the location belongs to a channel of positions.
To filter locations belonging to a specific publication, select a publication from the Show only drop-down menu above the list and click the magnifying glass icon

-
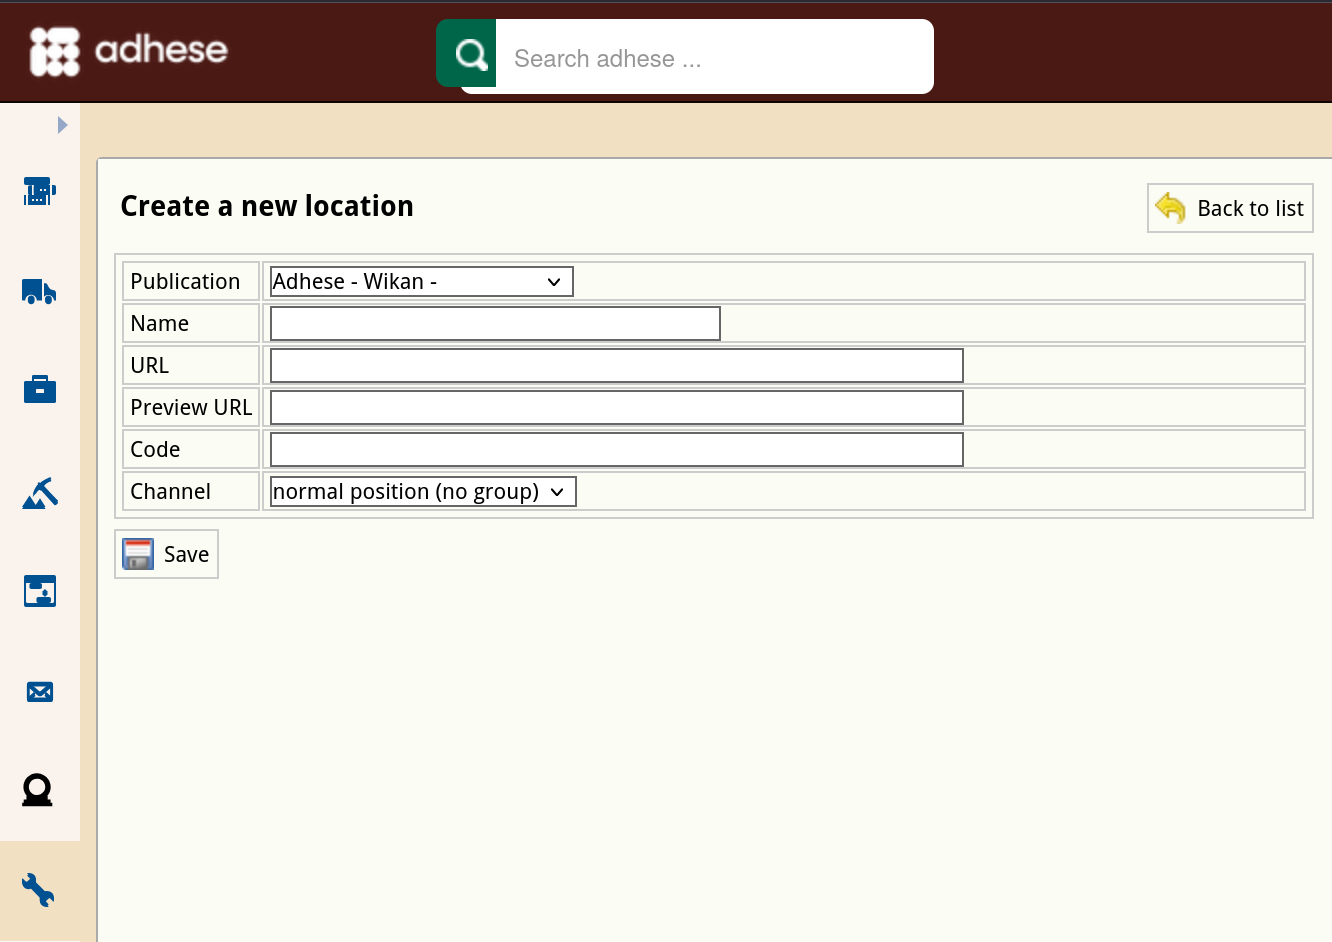
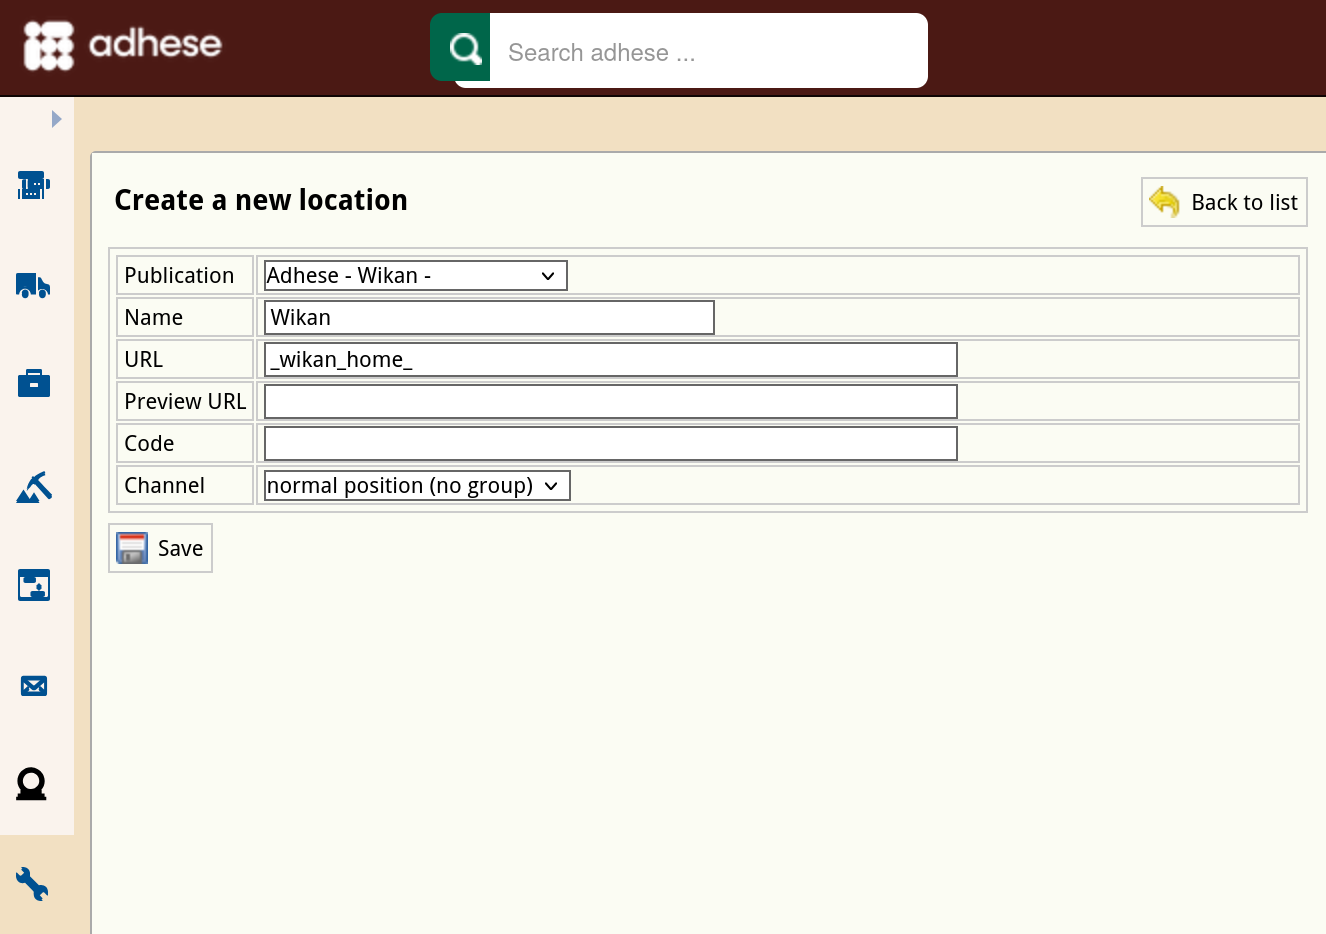
Click the Create a new location button. This opens the Create a new location screen.

-
In the Publication drop-down, select the publication to which the location belongs.
-
Enter the name of the location in the Name field. Choose a clear and logical name, such as magazine home.
-
Define the URL for the location in the URL field. The URL should follow the scheme agreed upon during the setup process. Please note that each location must have a unique URL, and no two locations can share the same URL. Multiple URLs can be defined for a location by separating them with a semicolon (;).
To verify whether a location URL already exists, navigate to the Admin screen and select Positions. Type the URL in the search bar and click the magnifying glass icon. If the URL is already in use, it will be listed on the results page. In some cases, the results page does not display the URL of an existing location. This may be because the URL belongs to an inactive publication. To examine this, click on the Download all positions as spreadsheet button. Open the spreadsheet and check whether the URL belongs to an inactive publication.
If the location refers to a channel, the URL will have no effect. Therefore, we recommend ignoring this property when dealing with channels.
-
(Optional) In the Code field, enter the location code or foreign key if Adhese integrates with your existing CMS.
-
Determine whether the location is a standard location or a channel location by choosing a group level from the Channel drop-down menu:
- If the location is a separate location, select group level 0.
- If the location is a channel, select group level 1 or higher.
-
Click the save button.
The group level sets the priority of a channel and is determined within the database. Here is an example to illustrate the idea. Take the following two channels: Newspaper [News] Sports Football Run Of and Newspaper [News] Sports Run Of. Note that the Sports channel contains all sports positions, including the football positions of the Sports Football channel. The Sports Football channel has a higher priority (and, therefore, a lower group level) than the Sports channel because the Sports Football channel only contains the Football positions.
Edit a location
To edit a location:
- Go to the Administration screen. Click Admin in the left navigation menu.
- Click Locations.
- In the list of locations, click the name of the location you want to modify or click the edit icon
 . The Edit location screen opens:
- Change any of the location’s details.
- Click Save.

Formats
A format specifies the requirements, such as file size and dimensions, that a creative must meet to prevent errors when uploading the creative file. A format does not have to be limited to online banner ads; it can also be a native ad or a video ad. All formats are acceptable as long as they fit within your inventory structure, website design and strategy.
Refer to the Appendix Online advertising formats for a definition of the most important formats and a representation within their environment. The overview is not exhaustive. A publisher can implement custom formats as well.
Create a format
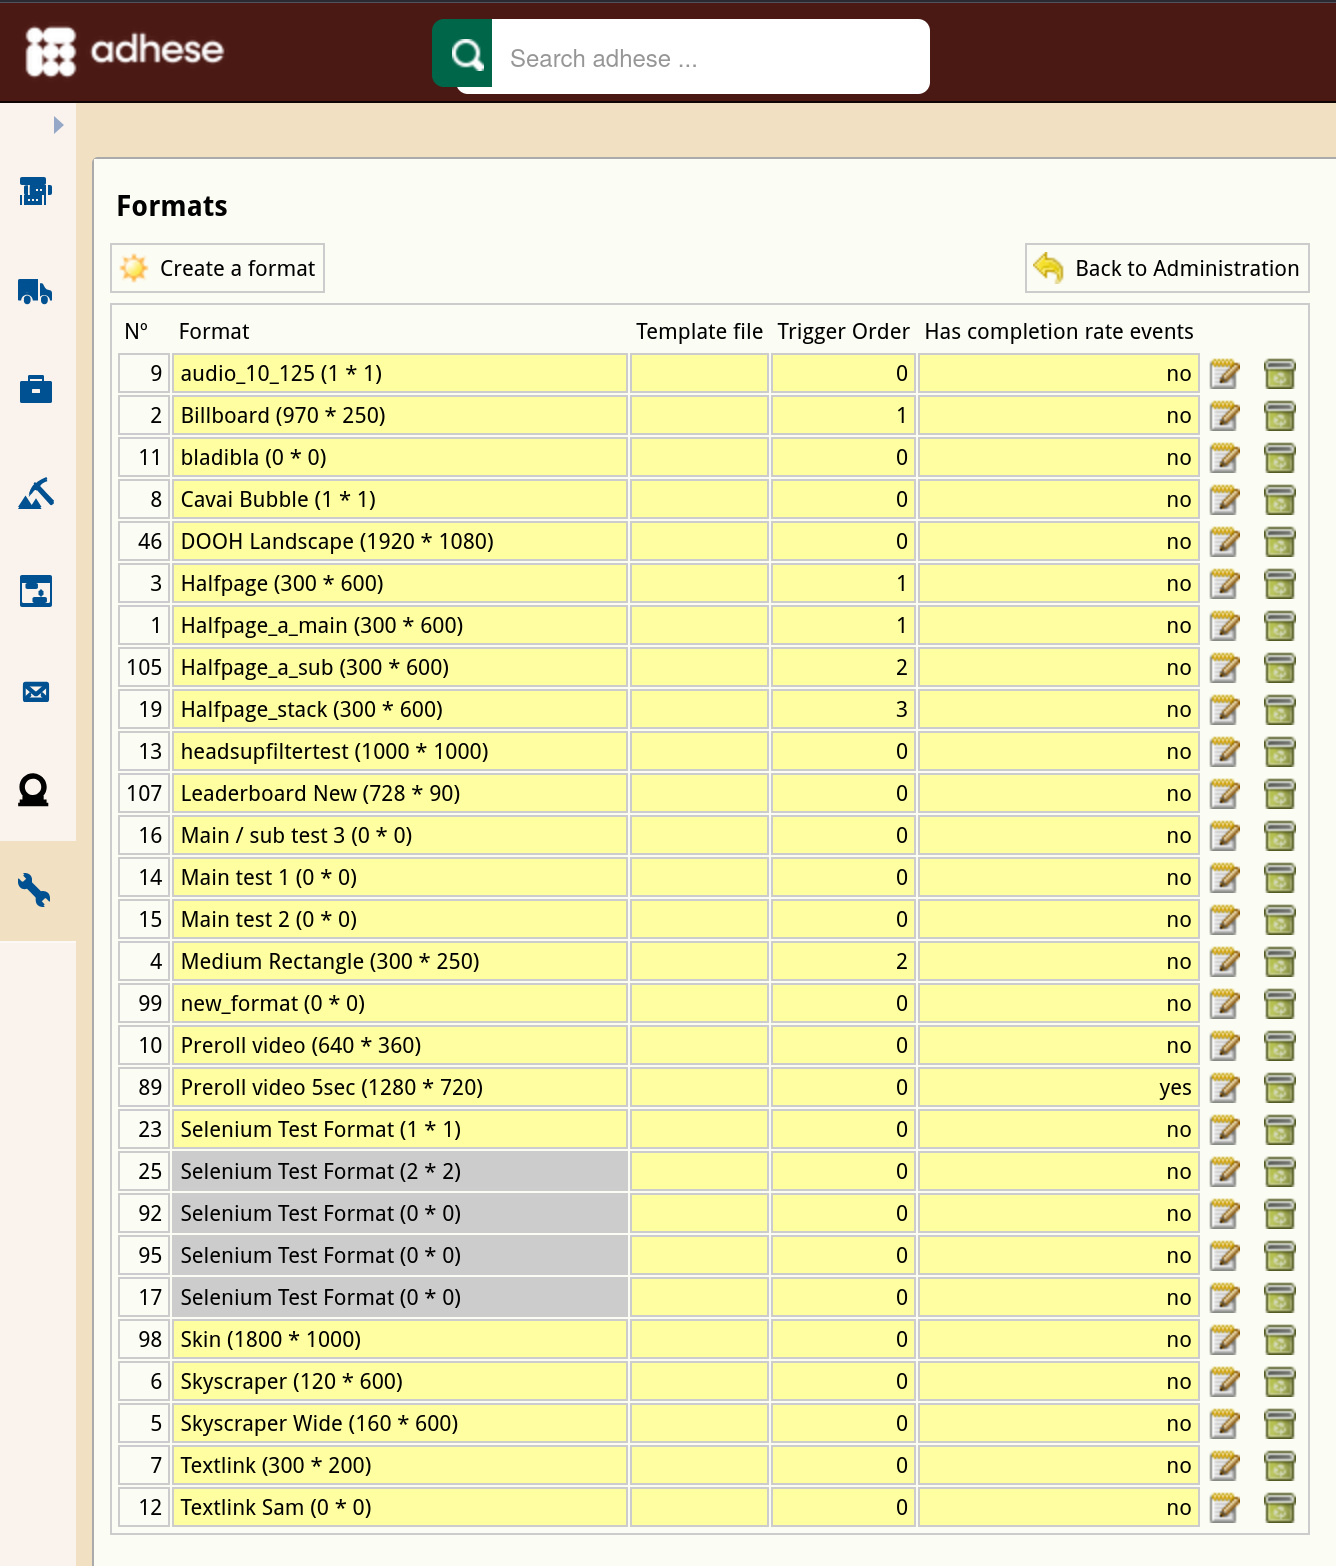
The Formats screen consists of a table with three columns:
- The No column displays the ID of the format.
- The Format column shows the name of the format and its dimensions.
- The Template file column shows the template file that belongs to the format.
To create a new format:
-
Click Admin in the left navigation menu. This opens the Administration screen.
-
Click Formats. The Formats screen opens:

-
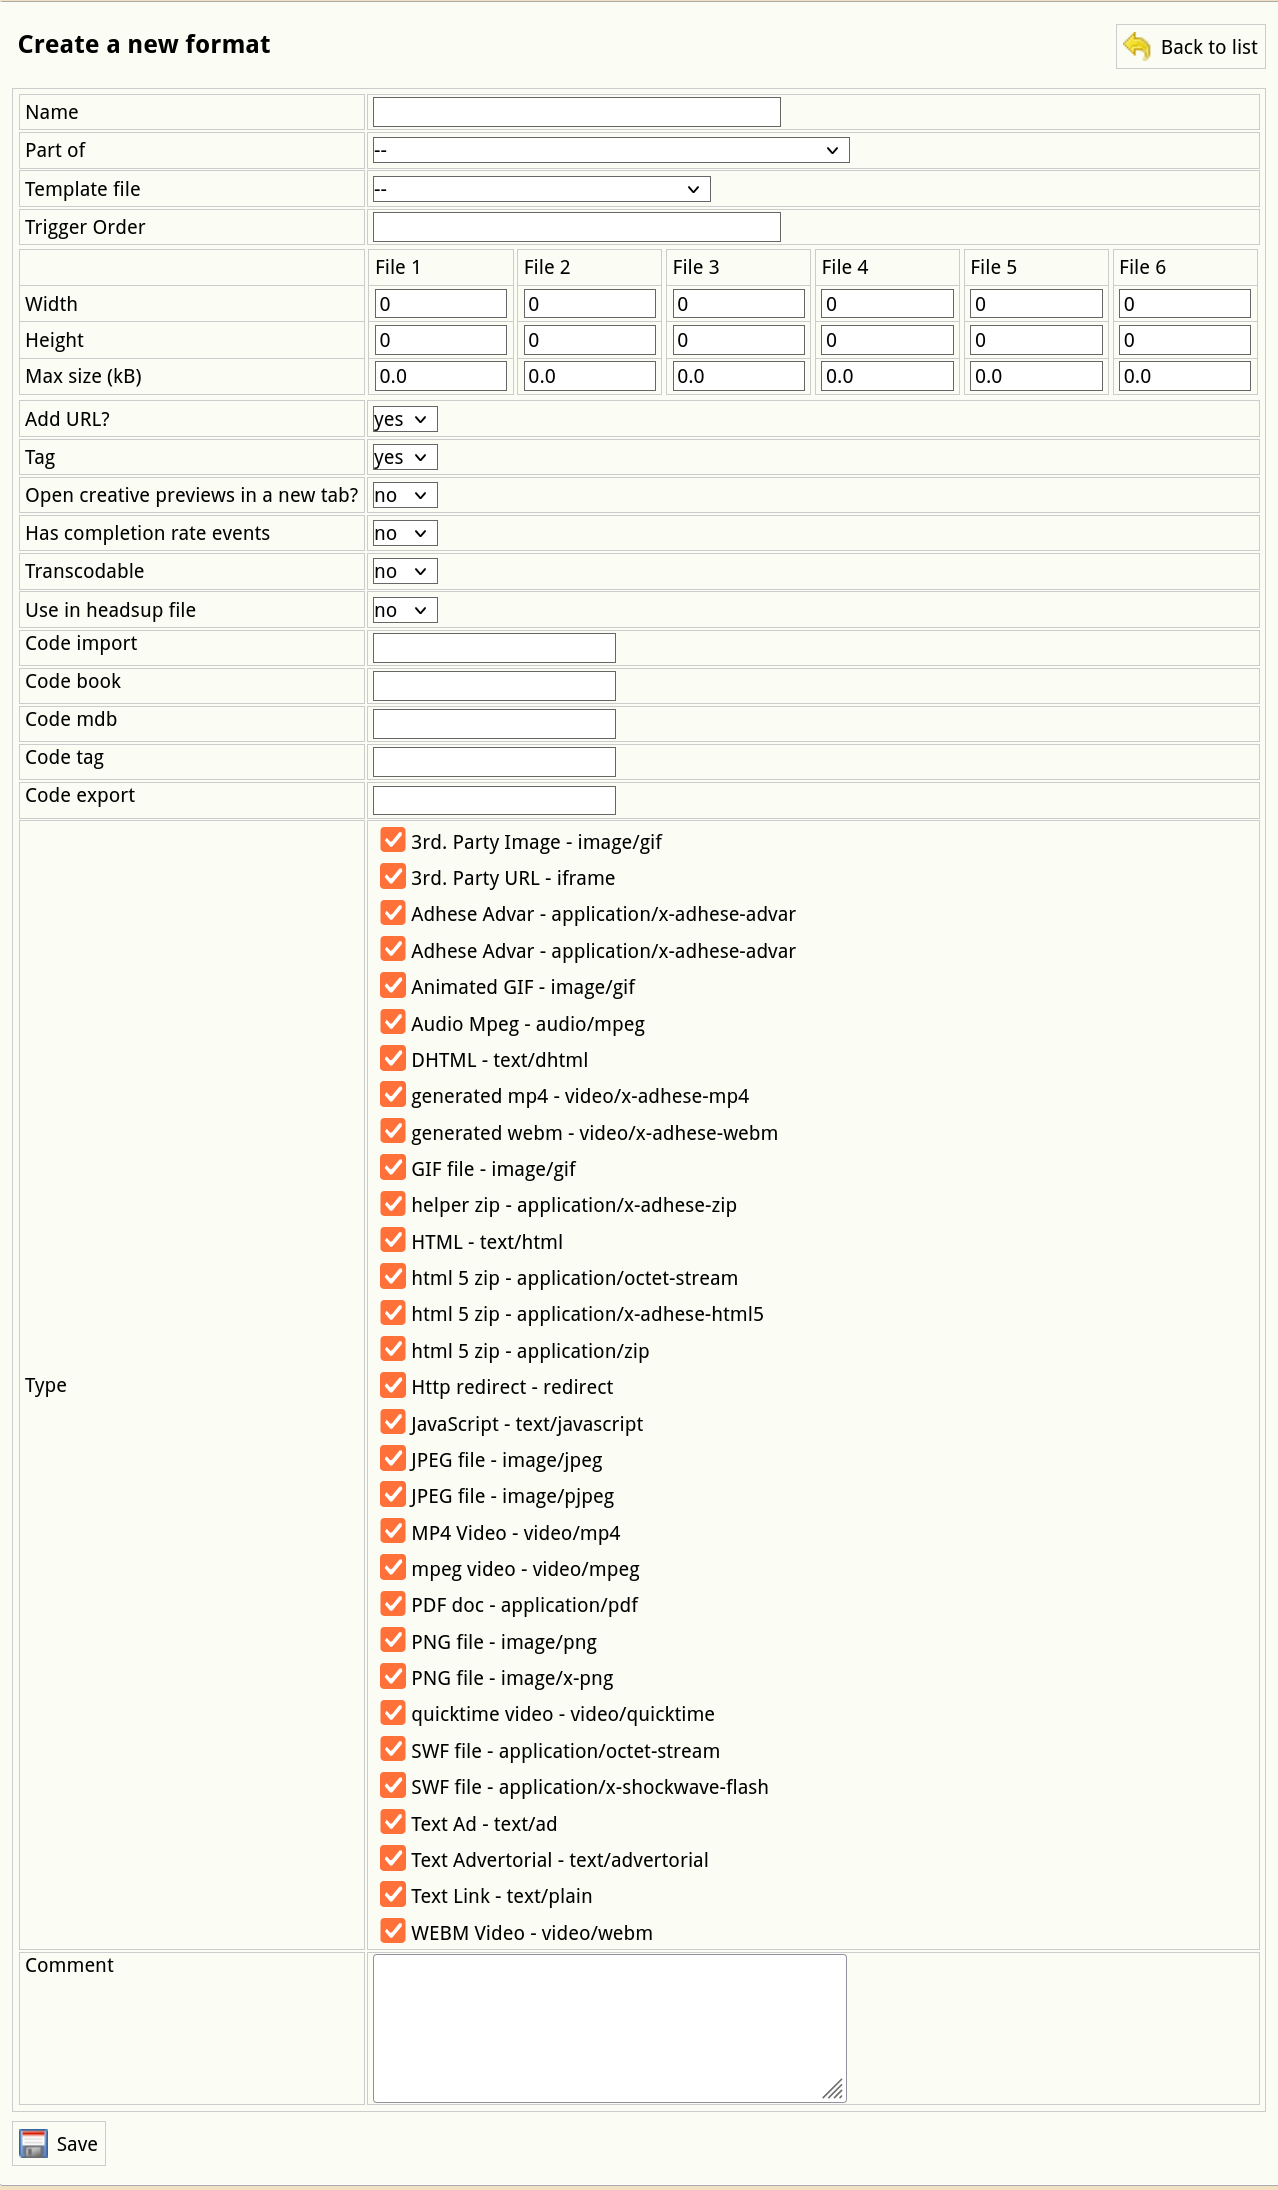
Click the Create a format button. This opens the Create a new format screen.

-
Enter a name in the Name field. Choose a clear and logical name, such as Leaderboard or Interstitial.
-
Determine whether the format is part of a stack from the Part-of drop-down.
A Stack format sends a list of ads that are available for display for that position. A stack is always a client-specific implementation.
-
(Optional) Select a JavaScript template file in the Template file drop-down. Refer to Templates for more information about template files.
-
If you choose to deliver multiple campaign bookings simultaneously (see Delivery multiples), you will need to specify the order of the formats on the web page. In the Trigger Order field, enter a number that indicates the position of the format within the sequence of formats.
-
Enter the dimensions of the format in pixels in the Width and Height fields.
You can configure a format to contain up to six images.
-
Enter the maximum file size of the format in kiloBytes in the Max size (kB) fields.
-
Skip the next property (Add URL?) as it is of no significance anymore.
-
In the Tag drop-down:
-
Select yes if the format is the main format.
Do not forget to enter a code tag in the Code tag field (step 19), as a new tag is necessary for the main format.
-
Select no if the format is a subformat.
Do not forget to refer to the main format in the Code book field (step 17).
-
-
Open creative previews in a new tab? The default setting is no. When set to yes, the preview of a creative is shown in a new tab.
-
Select yes or no from the Has completion rate events drop-down to activate video reporting for the new format.
-
The transcodable option is currently not supported. Leave it on no.
-
If the format will be used in Digital Out of Home (DOOH) positions, assets can be pre-loaded and cached by selecting yes in Use in headsup file (if the headsup endpoint is configured).
-
(Optional) Specify the foreign key of the format in the Code Import field to link Adhese to an existing external CMS.
-
Enter the name of the tag variable in the Code book field. If the format is a subformat, enter the tag code of the main banner. (Optional)
-
The Code MDB field is deprecated
-
Enter the name of the tag variable in the Code tag field. The code tags themselves are usually defined in the setup stage.
A code tag is only required if the format is the main format (step 11). For example, if your main format runs on the BANNER tag, the tag code is BANNER.
-
(Optional) Provide a key in the Code export field to establish a link with an external database.
The following table gives a few examples of completing the Code tag and Code book input fields for main and sub formats.
| Format name | Format type | Code tag | Code book |
| Leaderboard | Main format | leaderboard | leaderboard |
| Homepage takeover (leaderboard + wallpaper) | Sub format | leaderboard | |
| Medium rectangle | Main format | rectangle | rectangle |
| Large rectangle | Sub format | rectangle |
- Specify the Type of the format, such as a third-party URL or image, video, animated GIF, or text ad. As a format can take many forms, you can select more than one type.
- (Optional) Enter a comment in the Comment field.
- Click the Save button beneath the form to save your new format.
You must save the main format again after creating a new subformat. For all existing main format positions, subformat positions will also be available on the booking screen.
Edit a format
To edit a format:
- Go to the Administration screen. Click Admin in the left navigation menu.
- Click Formats.
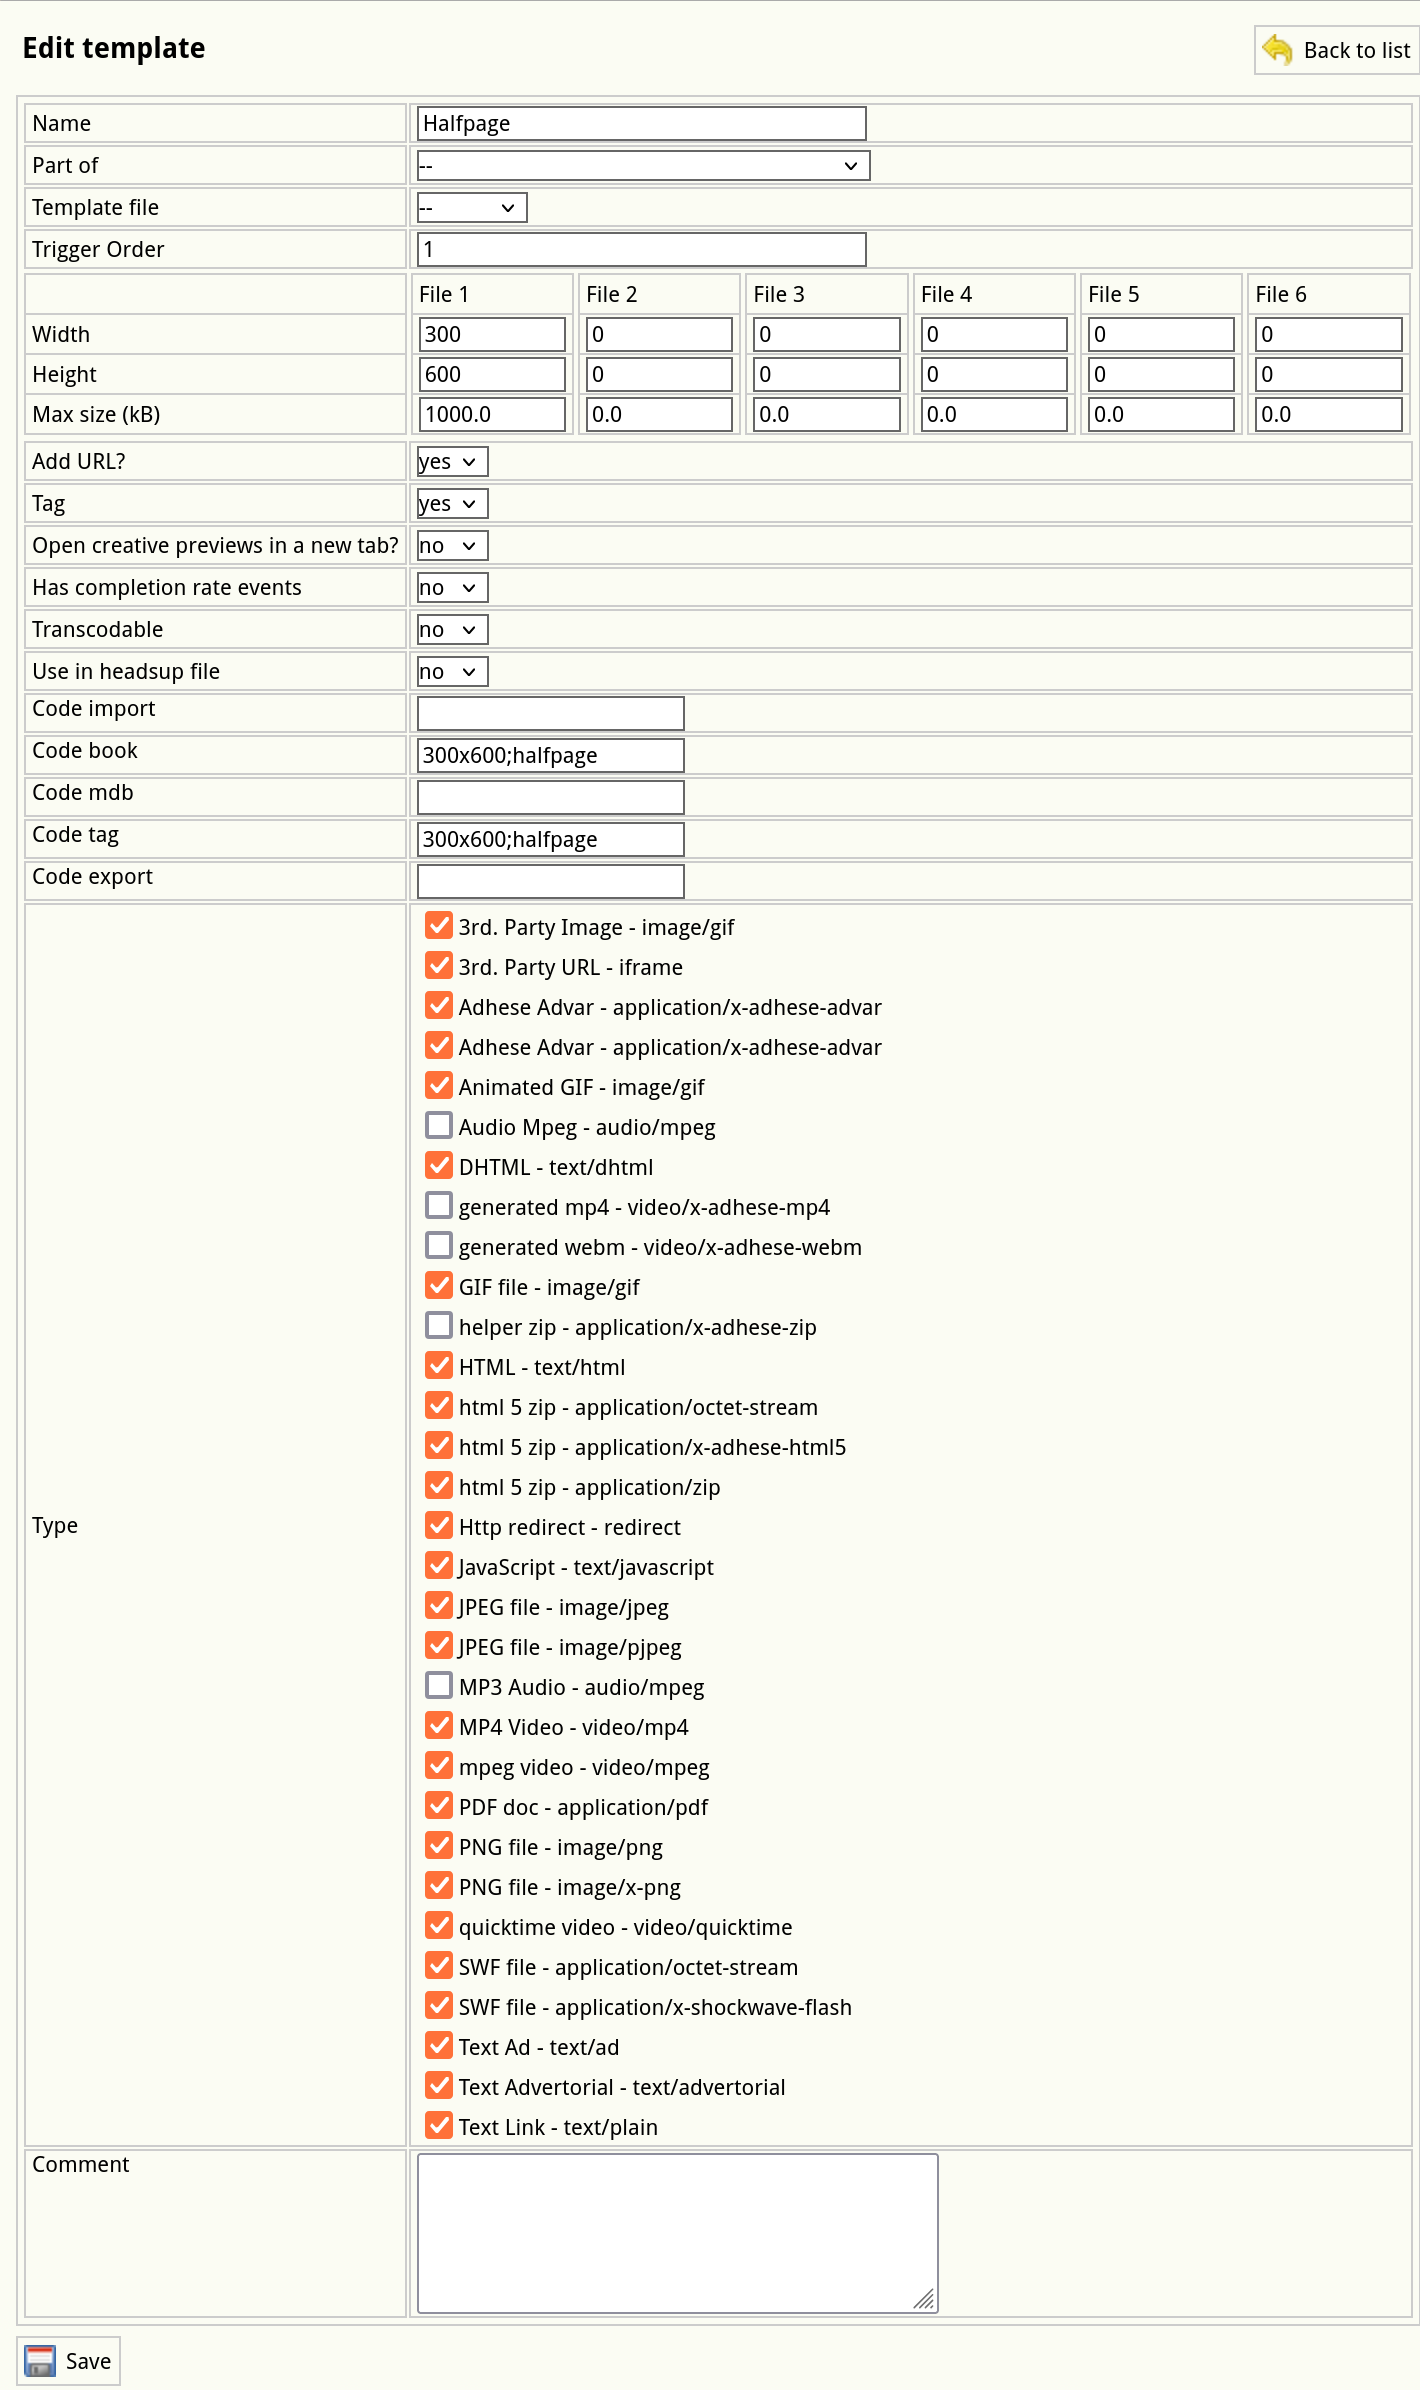
- In the list of formats, click the format's name or click the edit icon for the format you want to edit. The Edit template screen opens:

- Change any of the format’s details.
- Click Save.

Stacked format
A Stack format sends a list of ads available to display for that position. The client (browser) decides which ad(s) to display. An example of a stacked format is a text link ad.
To create a stacked format, add a new format:
- Click Admin in the left navigation menu. This opens the Administration screen.
- Click Formats. The Formats screen opens:
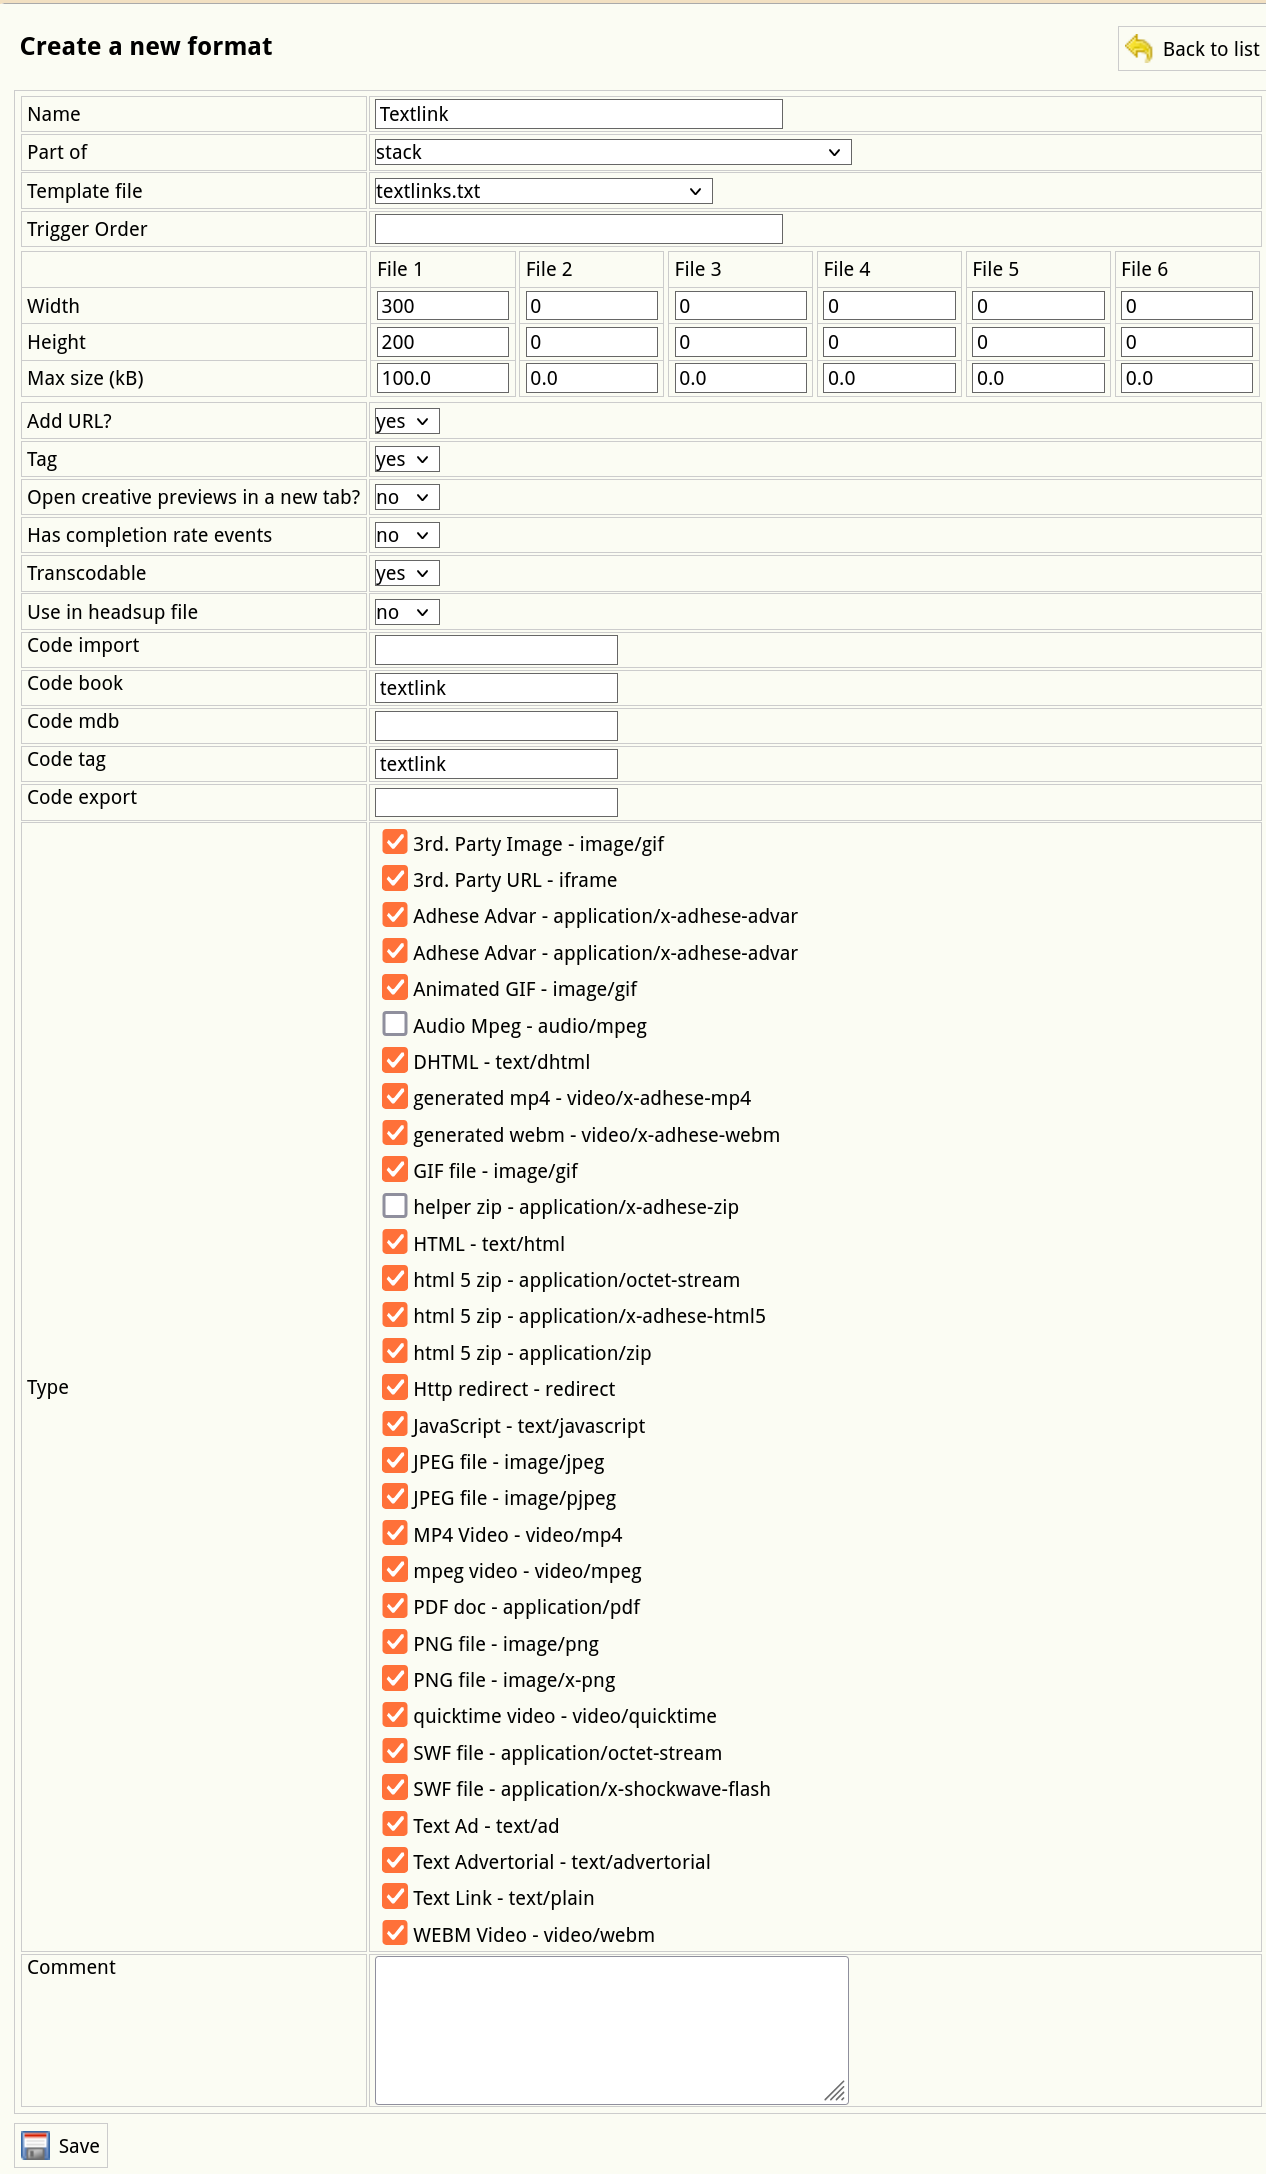
- Click the Create a format button. The Create a new format screen opens:

- Define the following properties that are necessary for the correct implementation of a stacked format:
- From the Part-of drop-down, select Stack to define the format as a stack format.
- Select the correct JSON template from the Template file drop-down. Do not select a template if you plan to use an Advar template to return a JSON object.
- Indicate the Type of the format, such as a third-party URL or image, video, animated GIF, or text ad.
- Click the Save button beneath the form to save your new format.

Positions
All necessary elements of a position, namely the publication, location and format, are available now. In the simplified diagram of the inventory’s structure, we have inserted a subset of the newly created publications, locations and formats:

Create a position
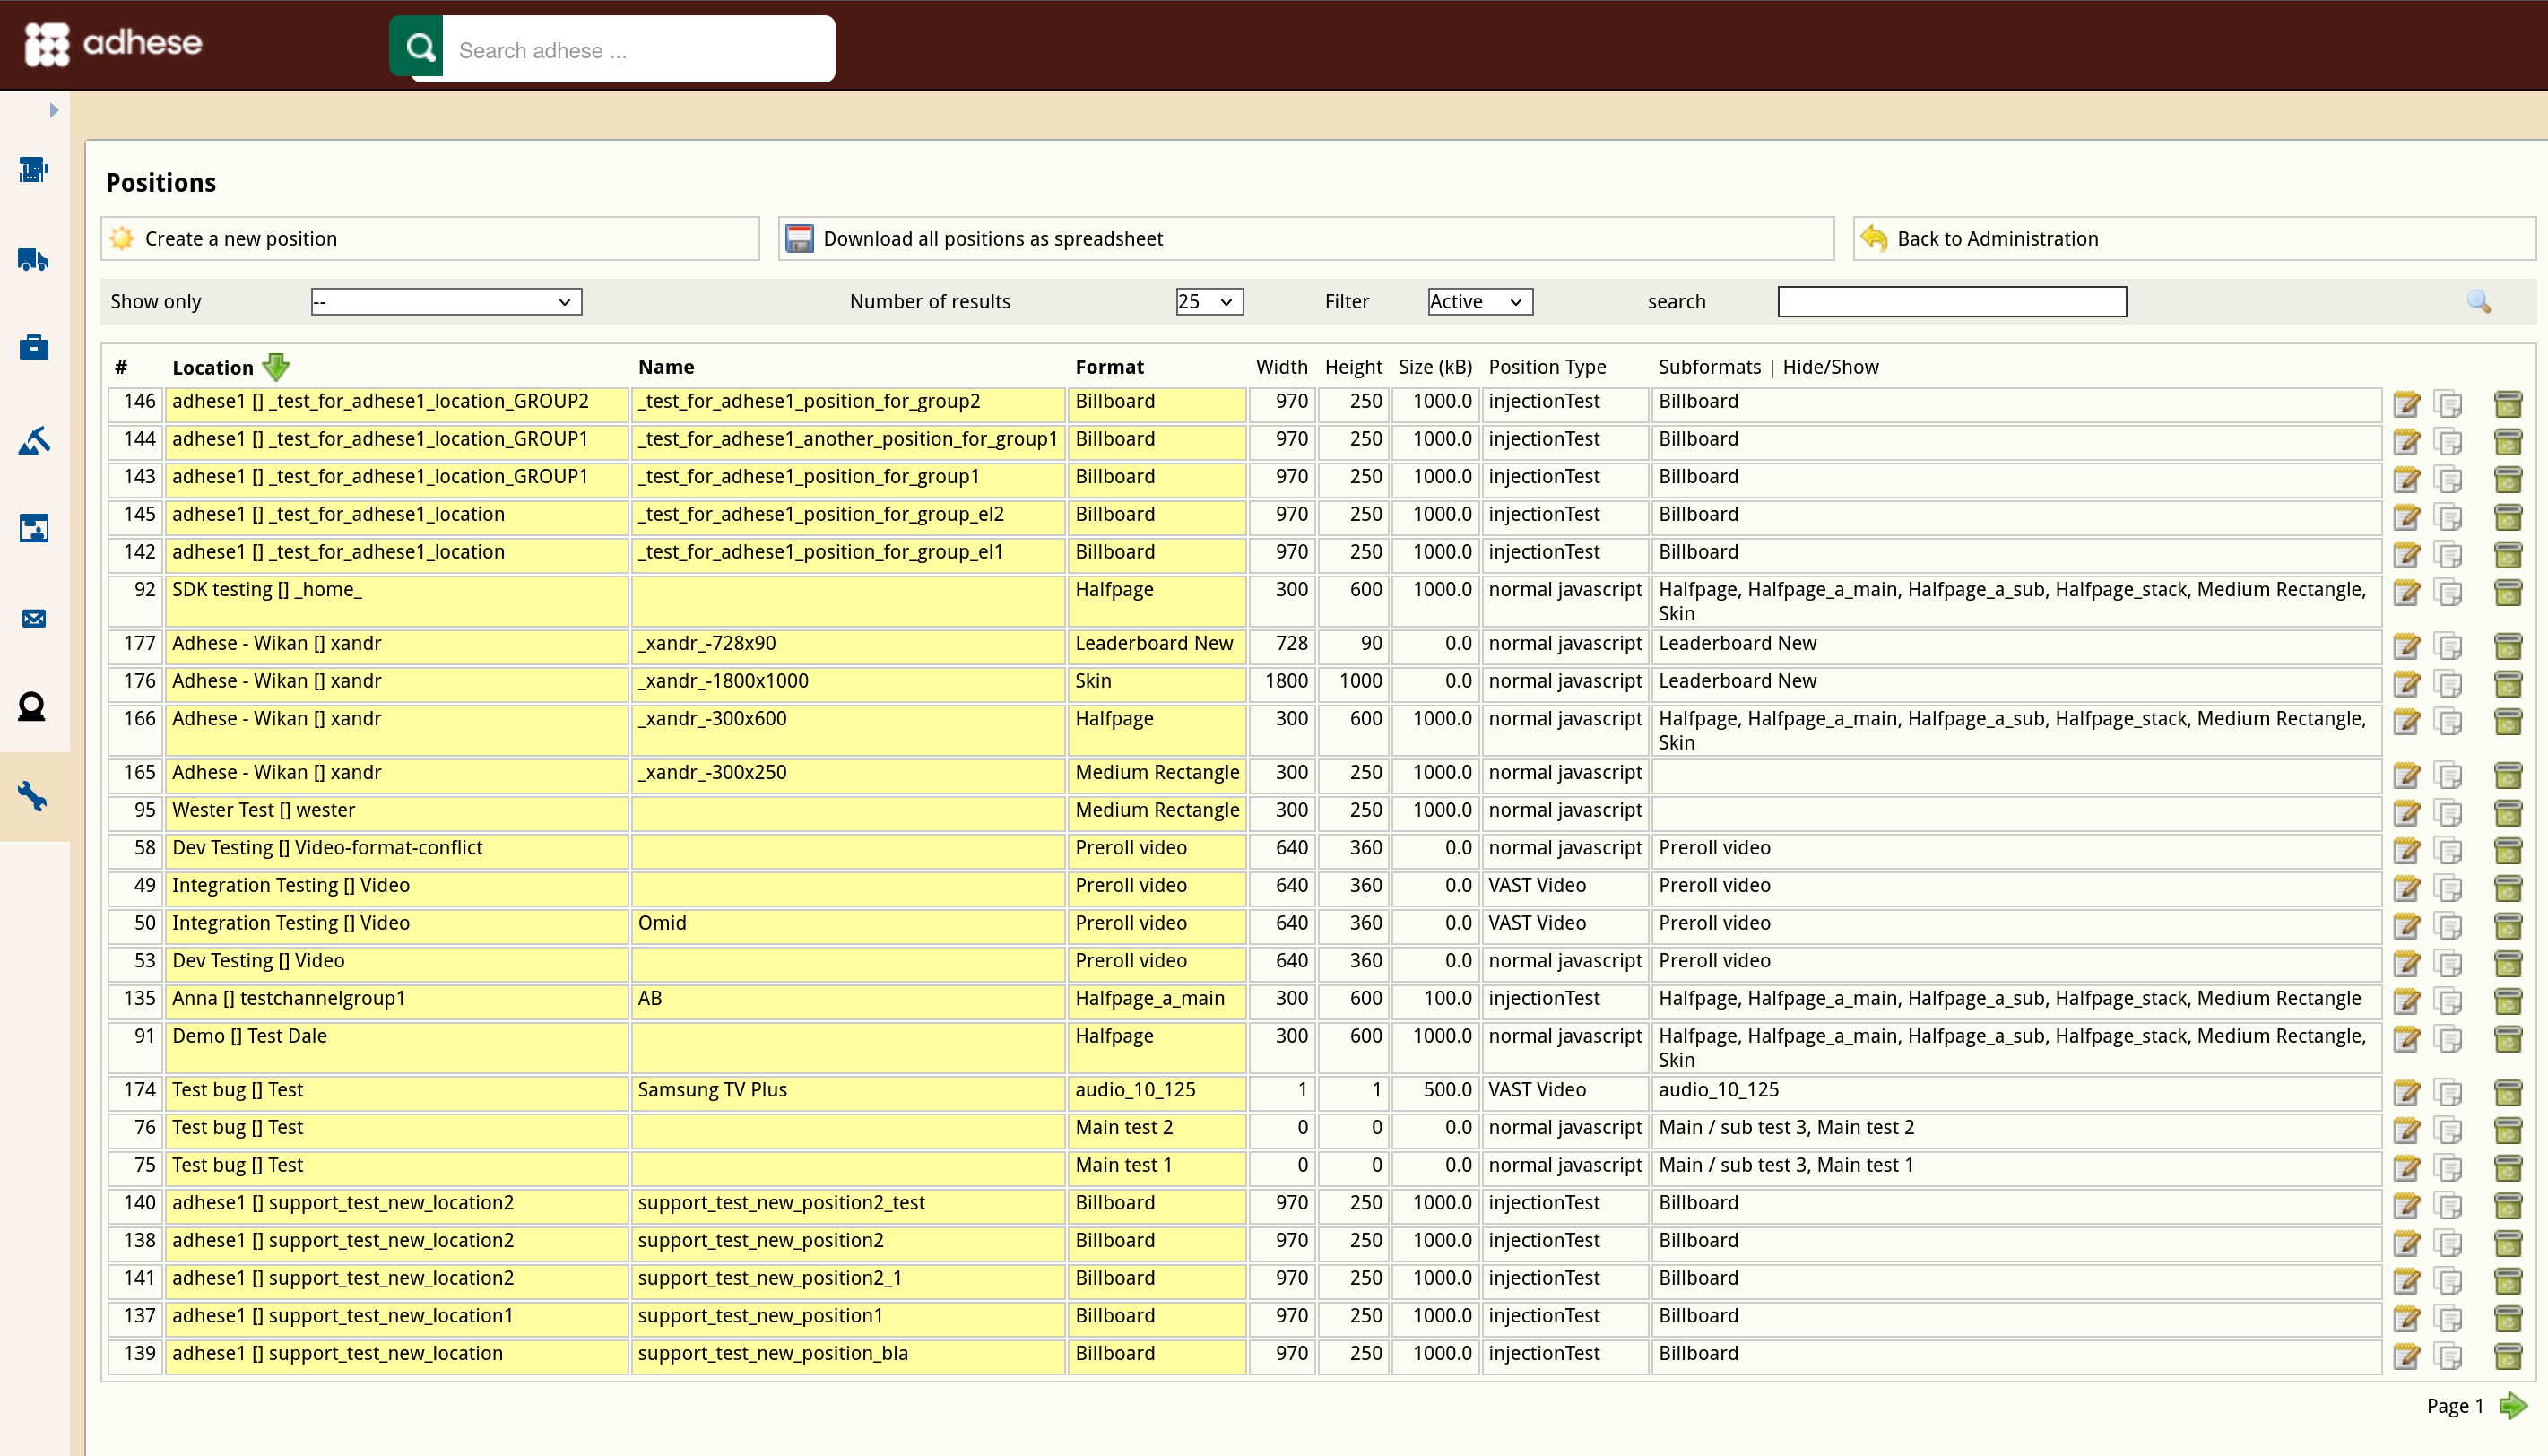
The Positions screen consists of a table with nine columns:
- The # column displays the ID of the location.
- The Location column shows the name of the publication and the location of the position.
- The Name column details the (optional) name of the position.
- The Format column indicates the format of the position.
- The Width column specifies the width of the format.
- The Height column specifies the height of the format.
- The Size (kB) column displays the maximum file size of the format.
- The Position type column details the position type of the position.
- The content of the Subformats column is hidden by default. To display the content, click Show. The Subformats column shows all subformats that belong to the position's format.
To filter the Positions belonging to a specific publication, select a publication from the Show only drop-down menu above the list and click the magnifying glass icon.
You can also filter the Positions screen by the status of a position's connected format using the Filter drop-down menu. Determine the number of results to display from the Number of results drop-down.
Use the search bar to search for specific positions, e.g. by entering a subformat. You can sort the list of positions by location, the name of the position, or the format by clicking the relevant table column's heading.
Download a spreadsheet file that contains a list of all positions by clicking the Download all positions as spreadsheet button.
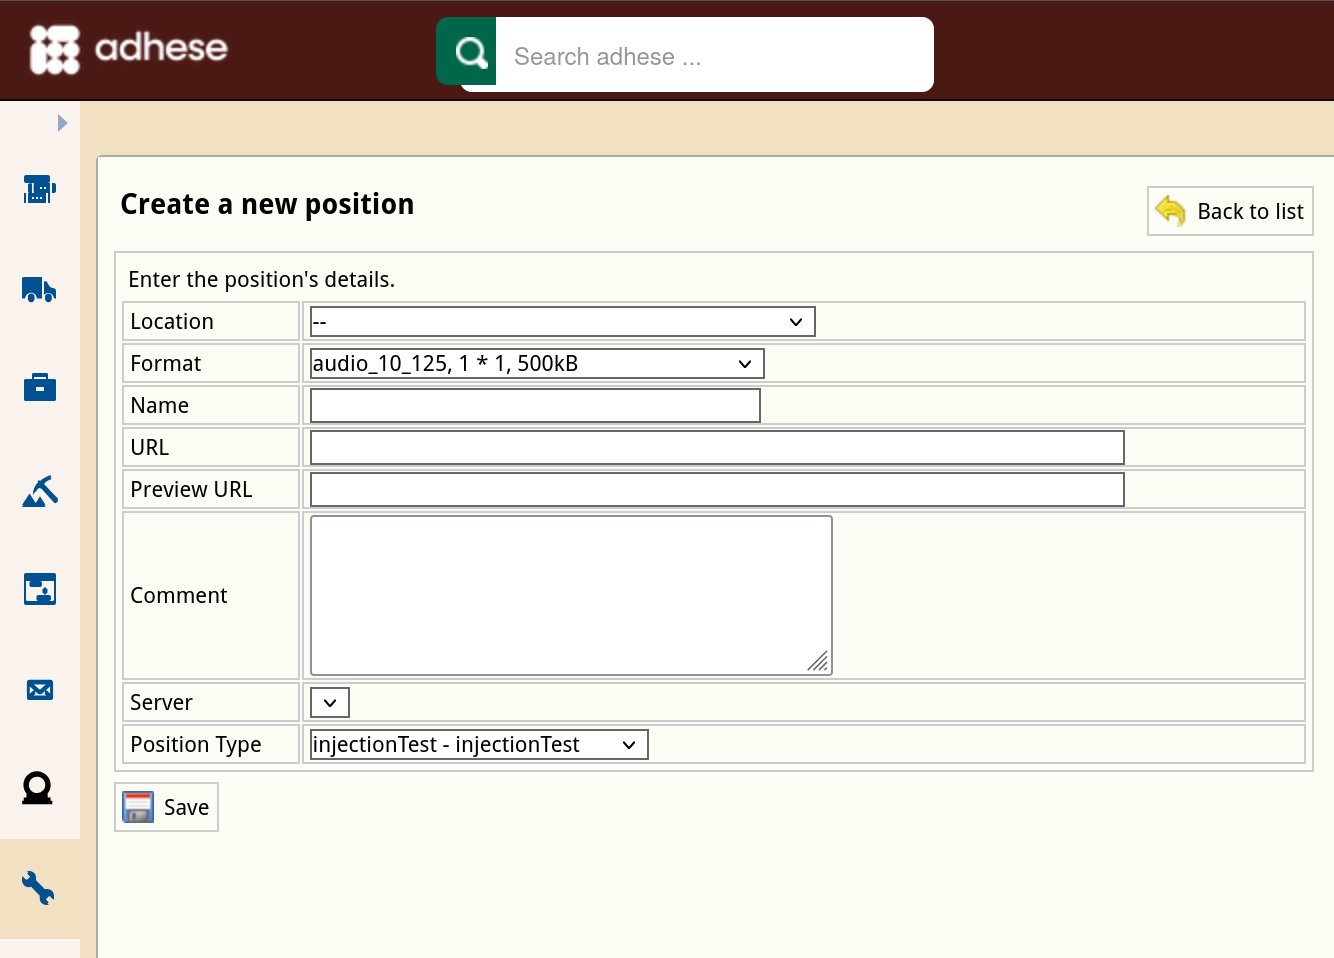
Create a new position
To create a new position for each desired combination of a format and location of a publication:
-
Click Admin in the left navigation menu. This opens the Administration screen.
-
Click Positions. The Positions screen opens:

-
Click the Create a position button. This opens the Create a new position screen.

-
Choose a location from the Location drop-down.
-
Choose a format from the Format drop-down.
-
(Optional) Enter a name for the position in the Name field.
-
If you wish to serve, for example, a leaderboard banner ad in the header and the footer of the homepage, you have two identical formats but at a different position.
To differentiate between positions, enter a unique integer number and/or string of characters in the URL field for each subsequent position. -
(Optional) In the Preview URL field, enter a URL for live previewing a creative. Instead of linking the preview URL to a publication, you can select a specific page where this position will appear.
-
(Optional) Enter a comment in the Comment field.
-
Skip the next property (Server) as it is of no significance anymore.
-
Select a position type from the Position type drop-down. Refer to Position types for a more detailed explanation of this concept.
-
Click the Save button beneath the form to save your new position.
To create a position with similar properties as an existing position, you can copy the existing position.
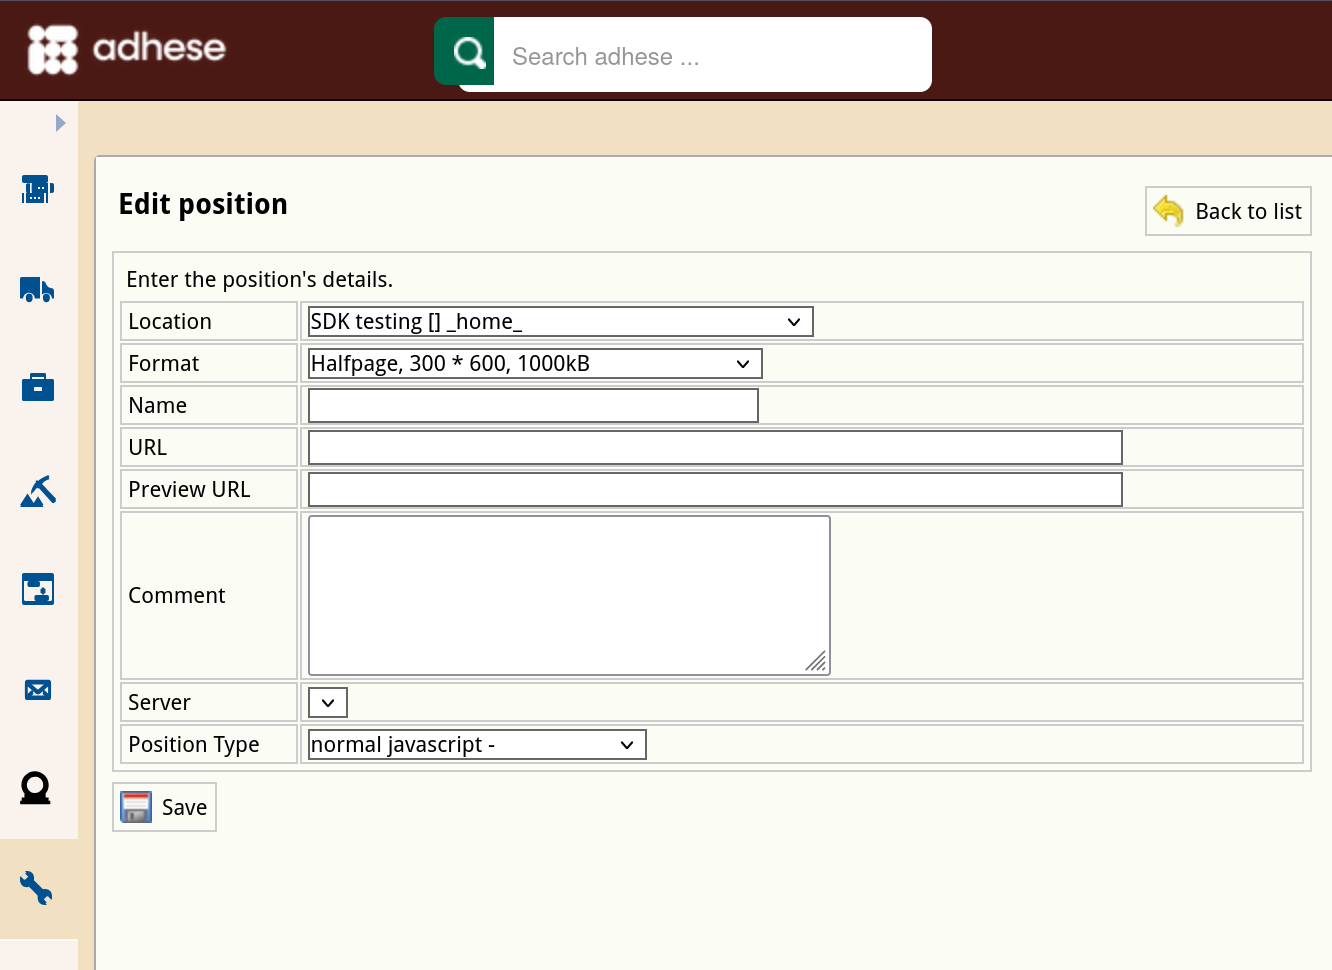
Edit a position
To edit a position:
- Go to the Administration screen. Click Admin in the left navigation menu.
- Click Positions.
- In the list of positions, click the name of the position or click the edit icon for the position you want to edit. The Edit position screen opens:

- Change any of the position’s details.
- Click Save.

Copy a position
Copying a position is a simple method of creating a new position with similar properties to an existing one. To copy a position:
- Go to the Administration screen. Click Admin in the left navigation menu.
- Click Positions.
- Click the copy icon
 for the position you want to copy. The Edit position (this is a copy) screen opens:
- Change any of the position’s details.
- Click Save.


Delete a position
To delete a position:
- Go to the Administration screen. Click Admin in the left navigation menu.
- Click Positions.
- In the list of positions, click the publisher's name or click the trash can icon
 for the position you want to delete.
 - Click the Yes, remove this position button to confirm.

If a position has delivered impressions in the past and is deleted, it will be set to inactive.
Reports stay available after the removal of a position.
Position types
Position types add additional functionality to a position. Their main purpose is to define the MIME type of the response and the possible templates wrapped around the output.
A MIME type or Internet Media Type is used to ensure that the receiver correctly interprets the resource. A MIME type indicates the type of data contained in a file. Web browsers use MIME types to determine how to display files that are not in HTML format.
Position types are client-specific implementations that are defined in the setup stage.
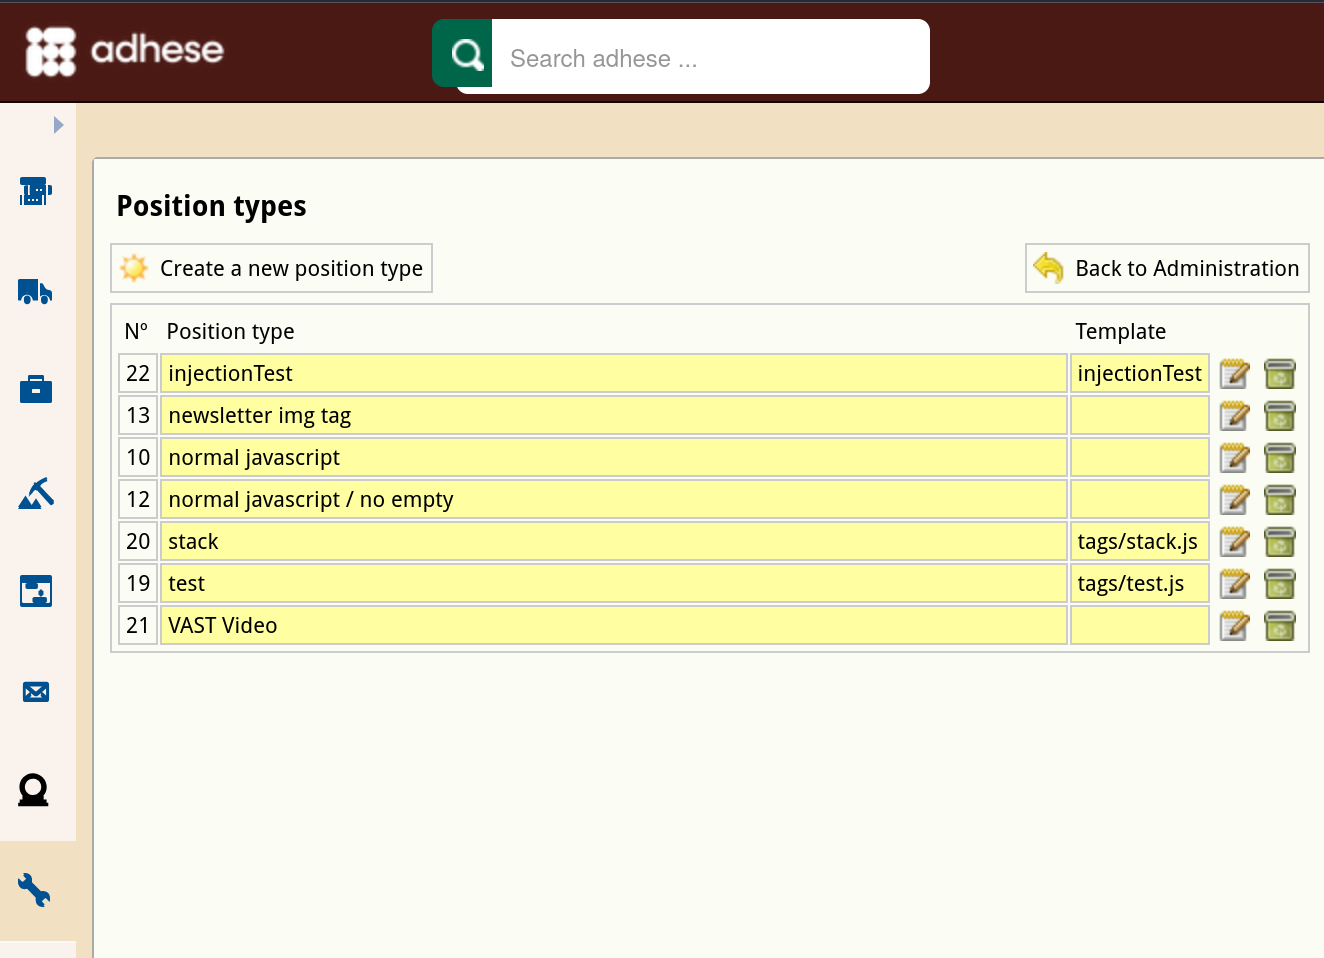
The Position types screen presents a table with three columns:
- The No column displays the ID of the position type.
- The Position type column shows the name of the position type.
- The Template column shows the template that belongs to the position type.
Create a new position type
To add a position type:
- Click Admin in the left navigation menu. This opens the Administration screen.
- Click Position types, the Position types screen opens:

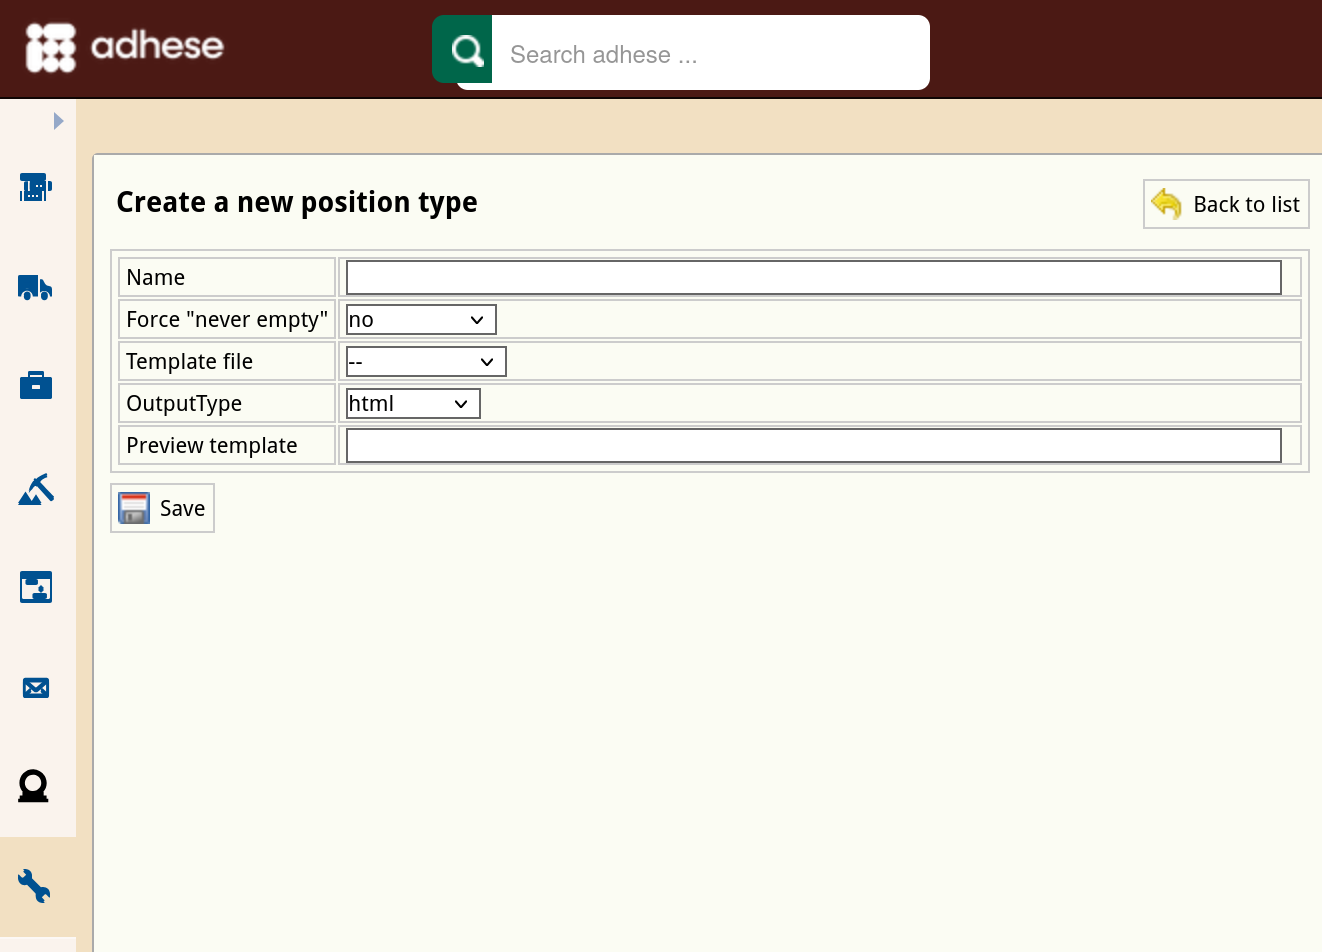
- Click the Create a new position type button. The Create a new position type screen opens:

- Enter a name for the position type in the Name field*.*
- In the Force “Never empty” drop-down, select one of the following:
-
Select Yes to ensure that the position always displays an ad. This is particularly useful when a web page would otherwise break if no ad is available.
-
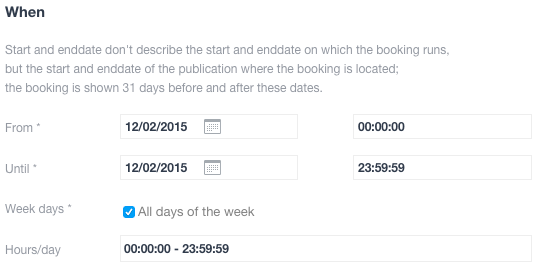
Continuous is a specific option for email campaigns. Select Continuous to equate the delivery period of the booking to the delivery period of the email campaign. The booking will show a configurable number of days before and after the start and end date. If you create a booking for this position, you will receive the following notification:

Make sure the request contains the da (date) parameter.
-
Select No if none of the above options applies.
-
- (Optional) Select a template file from the Template file drop-down. Refer to Templates for more information about template files.
- Select an output type (JavaScript, HTML, filename, or XML) from the Output type drop-down.
- (Optional) In the Preview template field, provide a template if a template is necessary to render the preview correctly.
- Click the Save button.
Edit a position type
To edit a position type:
- Go to the Administration screen. Click Admin in the left navigation menu.
- Click Position types.
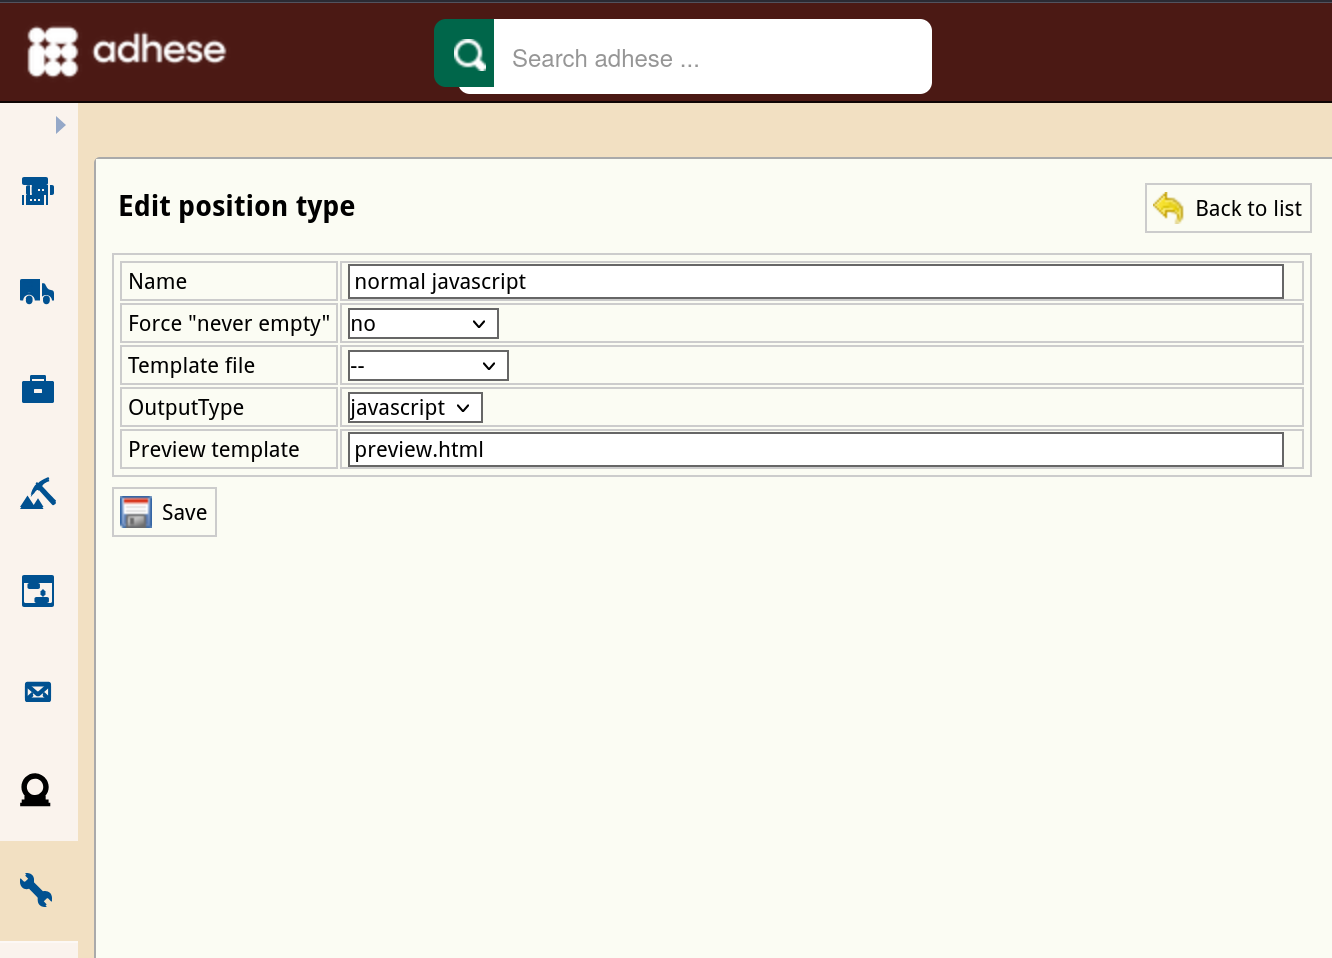
- In the list of position types, click the name of the position type or click the edit icon for the position type you want to edit. The Edit position type screen opens:

- Change any of the position type’s details.
- Click Save.
Channels
Channels are a collection of positions within a publication (e.g. run-of-site) or across your network of publications (e.g. run-of-network). Channels group identical formats across different locations and make it easy to target ads across similar web pages.
All our forecasting options include channels.
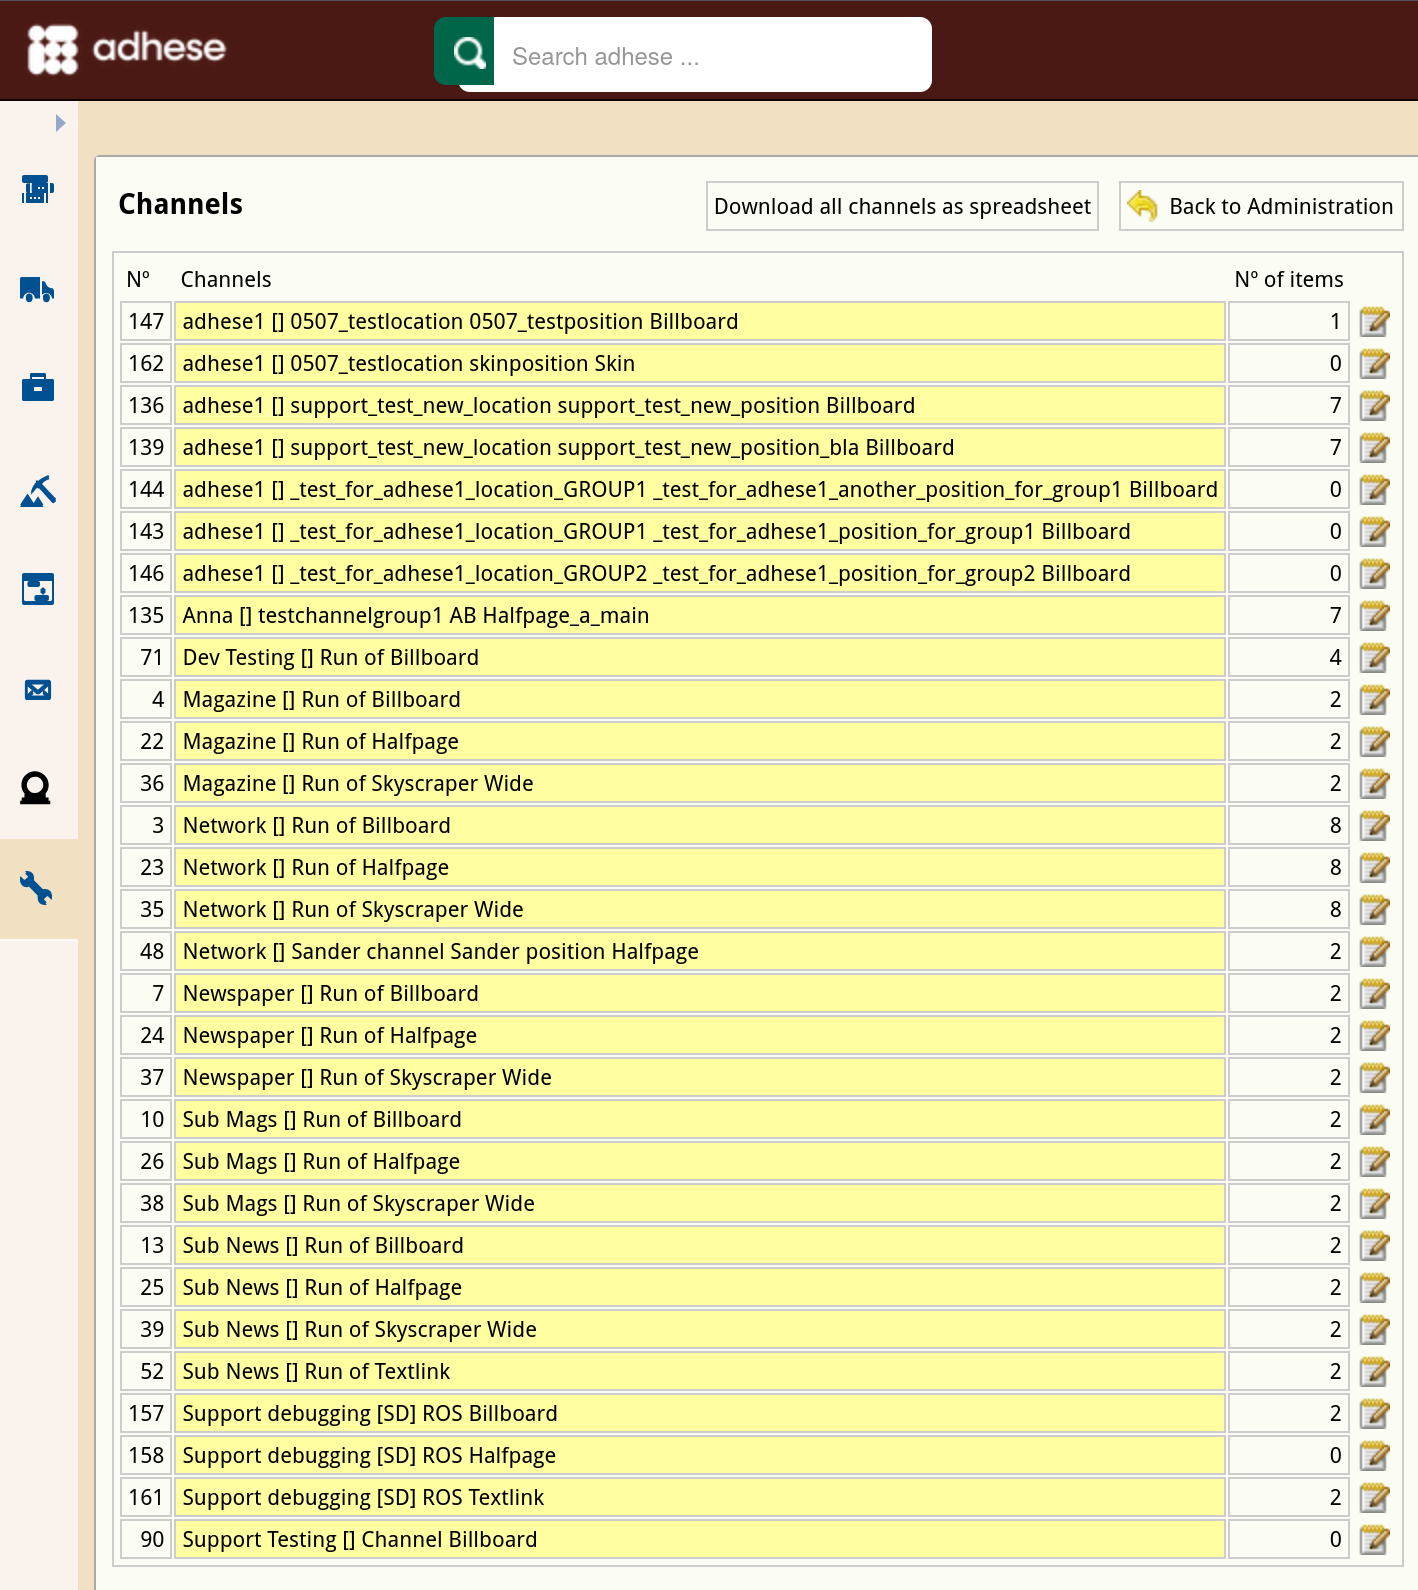
The Channels screen shows a table with three columns:
- The No column displays the ID of the location.
- The Channels column shows the name of the publication, location, and format.
- The No of items column indicates for each channel the number of items it incorporates.
Download a spreadsheet file that contains a list of all channels by clicking the Download all channels as spreadsheet button.
Create a new channel
To create a new channel:
- Create a new location; see Create a new location chapter.
Do not forget to select a group level in the Channel drop-down.
The highest group level is 1. The higher the number the lower the group level. For more information on group levels, see this page. - Create a new position; see Create a new position chapter.
- Click Channels in the Administration screen. The Channels screen opens:

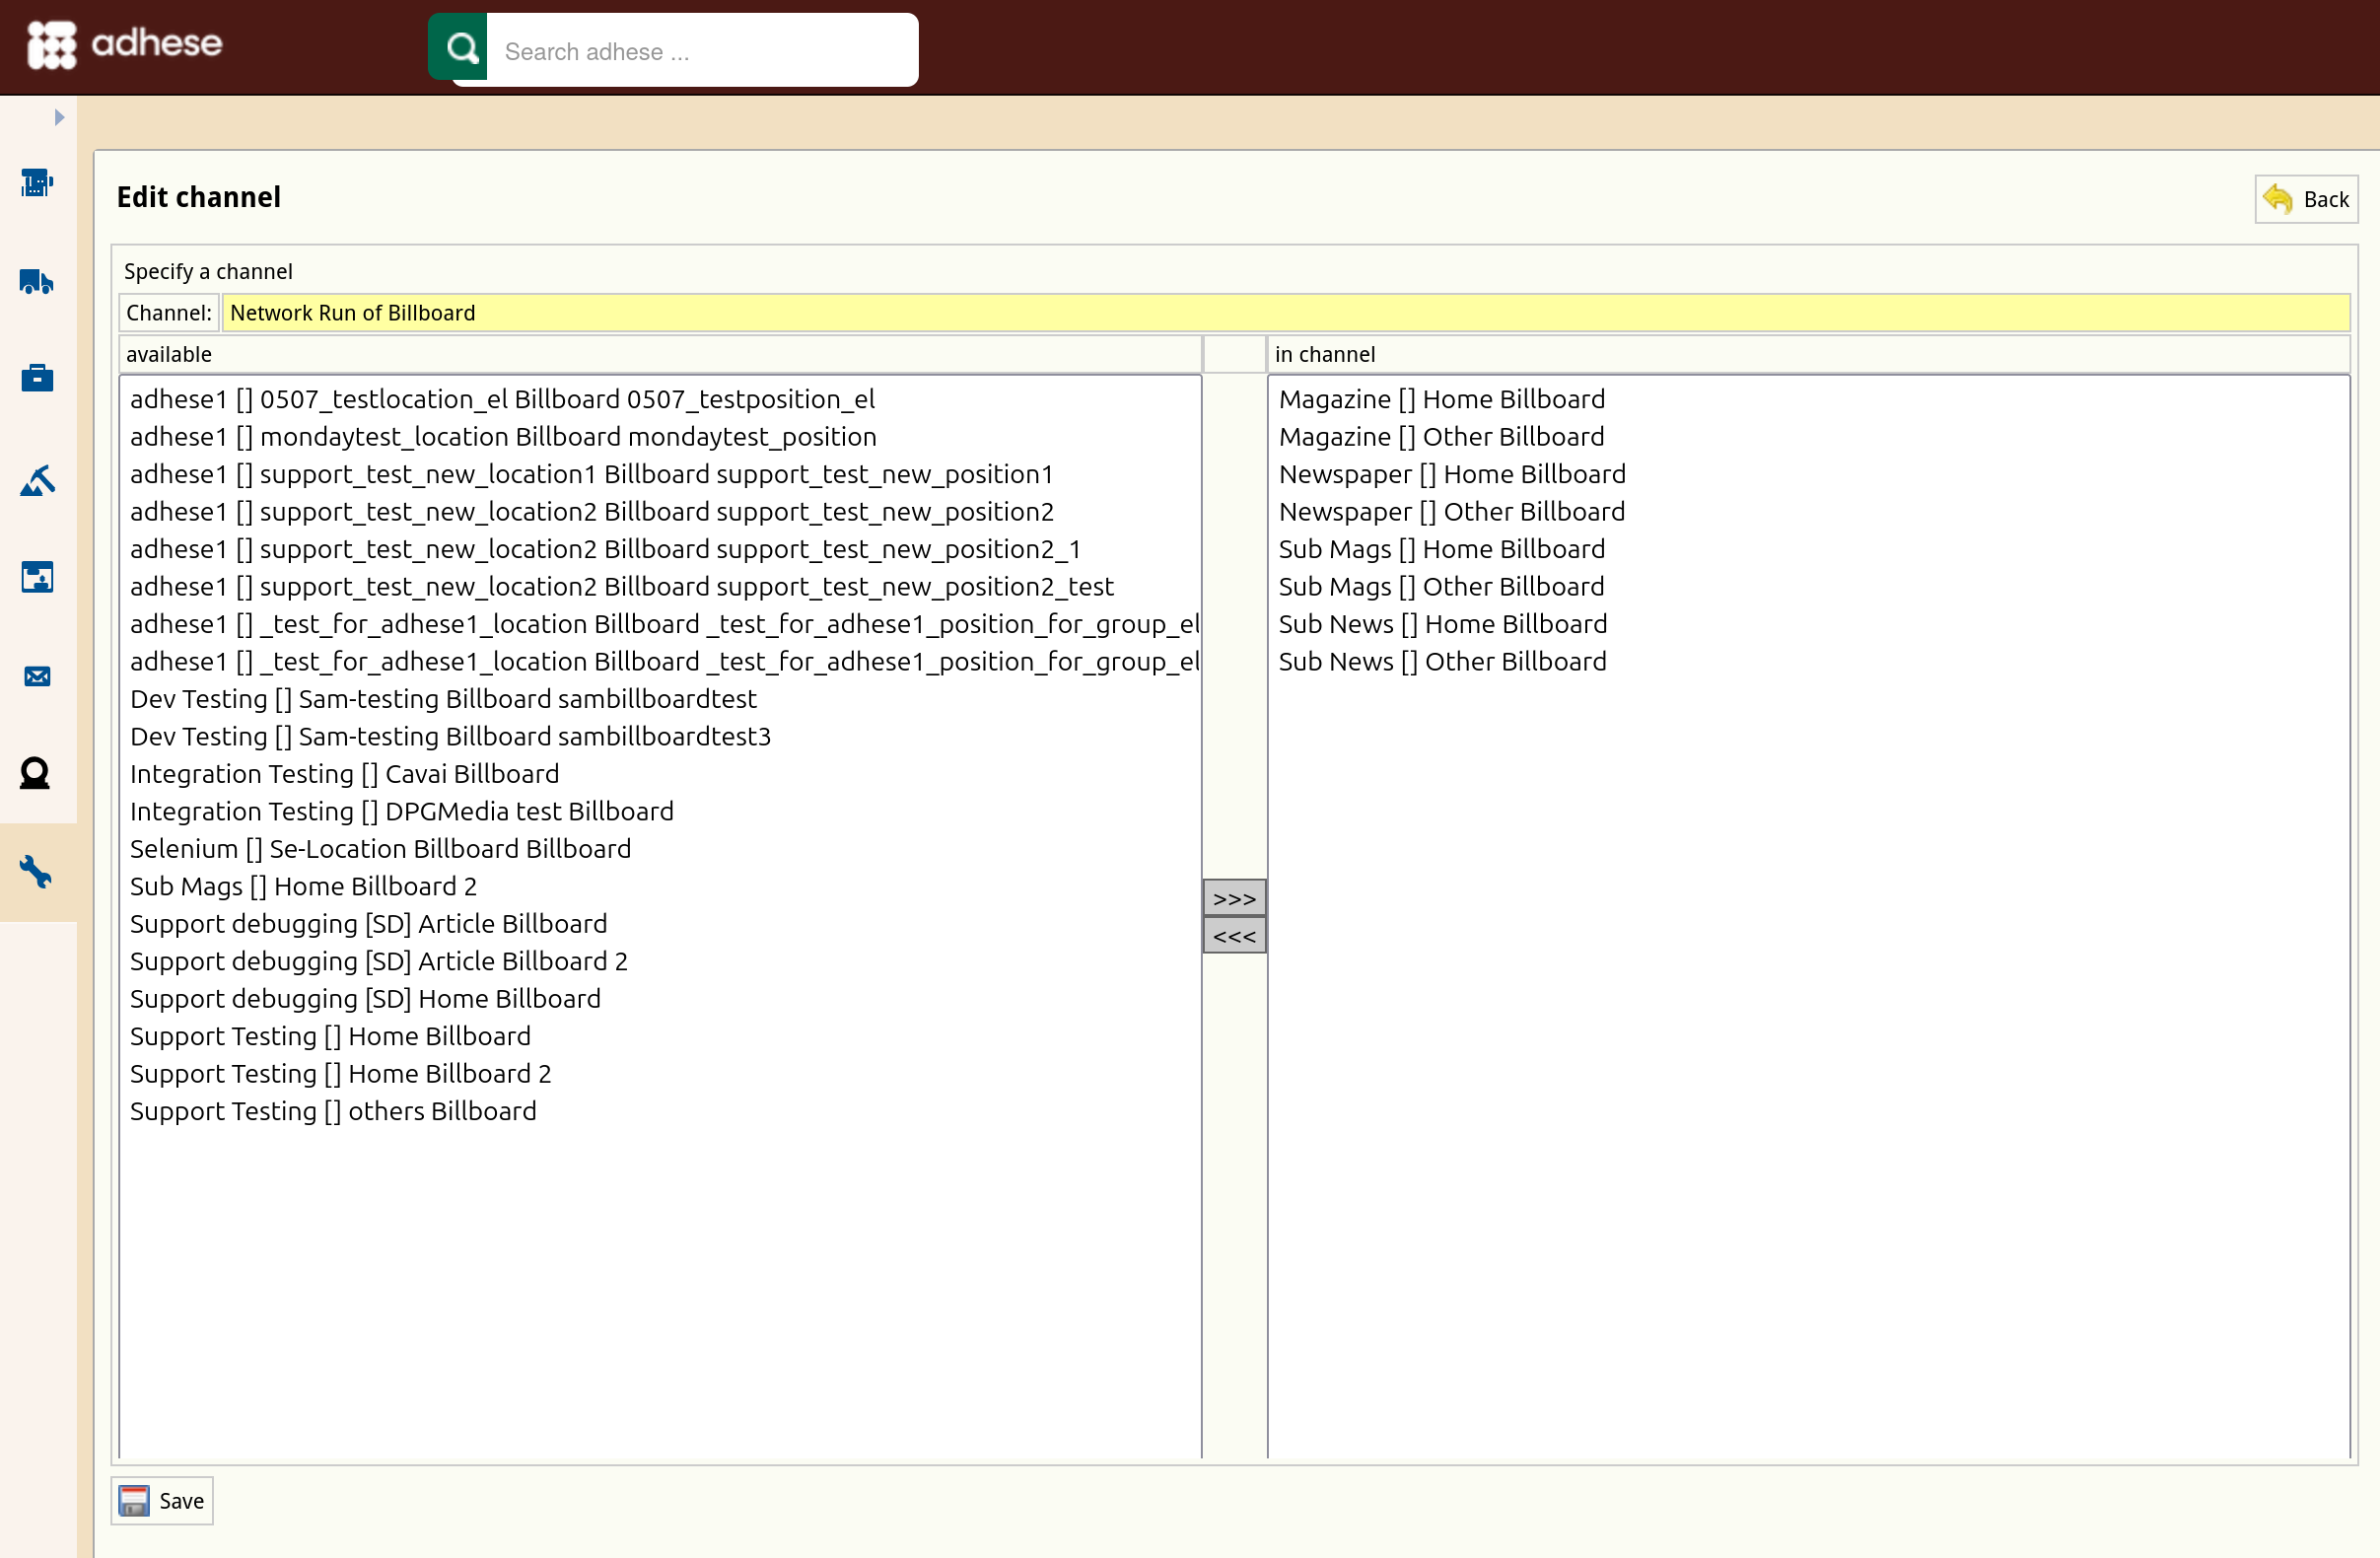
- Click the channel position you have just created. The Edit channel screen opens. Based on the selected format, all available positions across your entire network appear in the left column.

- To add a position to the channel, select a position from the list of available positions on the left and click the >>> button.
- To remove a position from the channel, select a position from the right-hand list of positions in the channel and click the <<< button.
- Click the Save button to finish.
Edit a channel
To edit a channel:
- Go to the Administration screen. Click Admin in the left navigation menu.
- Click Channels. The Channels screen opens.
- On the Channels screen, click the name of the channel you want to modify or use the edit icon . The Edit channel screen opens.
- Change the channel by:
- Including additional positions:
- Select the position from the list on the left, and
- Click the >>> button.
- Excluding positions from the channel:
- Select the position from the list on the right, and
- Click the <<< button.
- Including additional positions:
- Click Save.

List all channels and positions
To obtain a list of all Channels and positions, and a list of all positions that are not currently in a Channel, go to Administration and click Channels. On the Channels screen, click the Download all channels as spreadsheet button.
The spreadsheet contains two tabs:
-
Positions, listing all channels and the positions they currently contain, with the following columns:
- Position ID
- Position publication
- Position location
- Position format
- Channel ID
- Channel publication
- Channel location
- Channel format
- Channel group level
-
Positions not in channels, listing all positions not currently in a channel, with the following columns:
- Position ID
- Position publication
- Position location
- Position format
Request Endpoints
Adhese supports the integration of the Adhese ad server into mobile applications using ad tags.
URL structure
An example of a request URL that contains only the basic (required) parts: https://ads-demo.adhese.com/json/sl_sdk_example_-leaderboard/?t=244.18664863333106
-
https://ads-[account].adhese.com- You can find the value of the account attribute in your Adhese subscription information or through our support portal.
-
/json/- Adding this part to the URL makes sure that the result you receive is JSON formatted.
- JSON has a fixed structure and, therefore, fixed fields. Refer to the List of JSON response structure object fields for an explanatory list of the fields.
-
/sl[location code]-[format code]/ -
?t=[timestamp] - It is necessary to add a timestamp to avoid caching issues.
Additional parameters
The request URL can contain additional parameters for Targeting.
An URL that contains targeting will look like this: https://ads-demo.adhese.com/json/sl_sdk_example_-leaderboard/brChrome;OSX/dtdesktop/incars?t=244.18664863333106
A 2-letter combination (e.g. br, dt or in) prefixes every target parameter and the actual target(s) comes after. If a parameter contains more than one target, use a semicolon to separate the different values.
The configuration of your Adhese account determines the available targeting parameters and their prefixes. Please get in touch with our Support team for more details.
Every account contains the following default parameters:
-
/br: brands or data about the browser and operating system; -
/dt: device type, such as phone, tablet, desktop or unknown; -
/in: interests, this parameter is user-defined. -
/tl: consent indicator, valuesnone|all, default isnone
Response structure
The request returns a JSON object with the fields described in the List of JSON response structure object fields. Adhese returns an empty JSON object (just two curly brackets) if it cannot deliver a suitable ad for the request.
Clients
Add a client
In the Header tab of a campaign, you can add several parties or companies in the Client part.
To add a new company to your account:
-
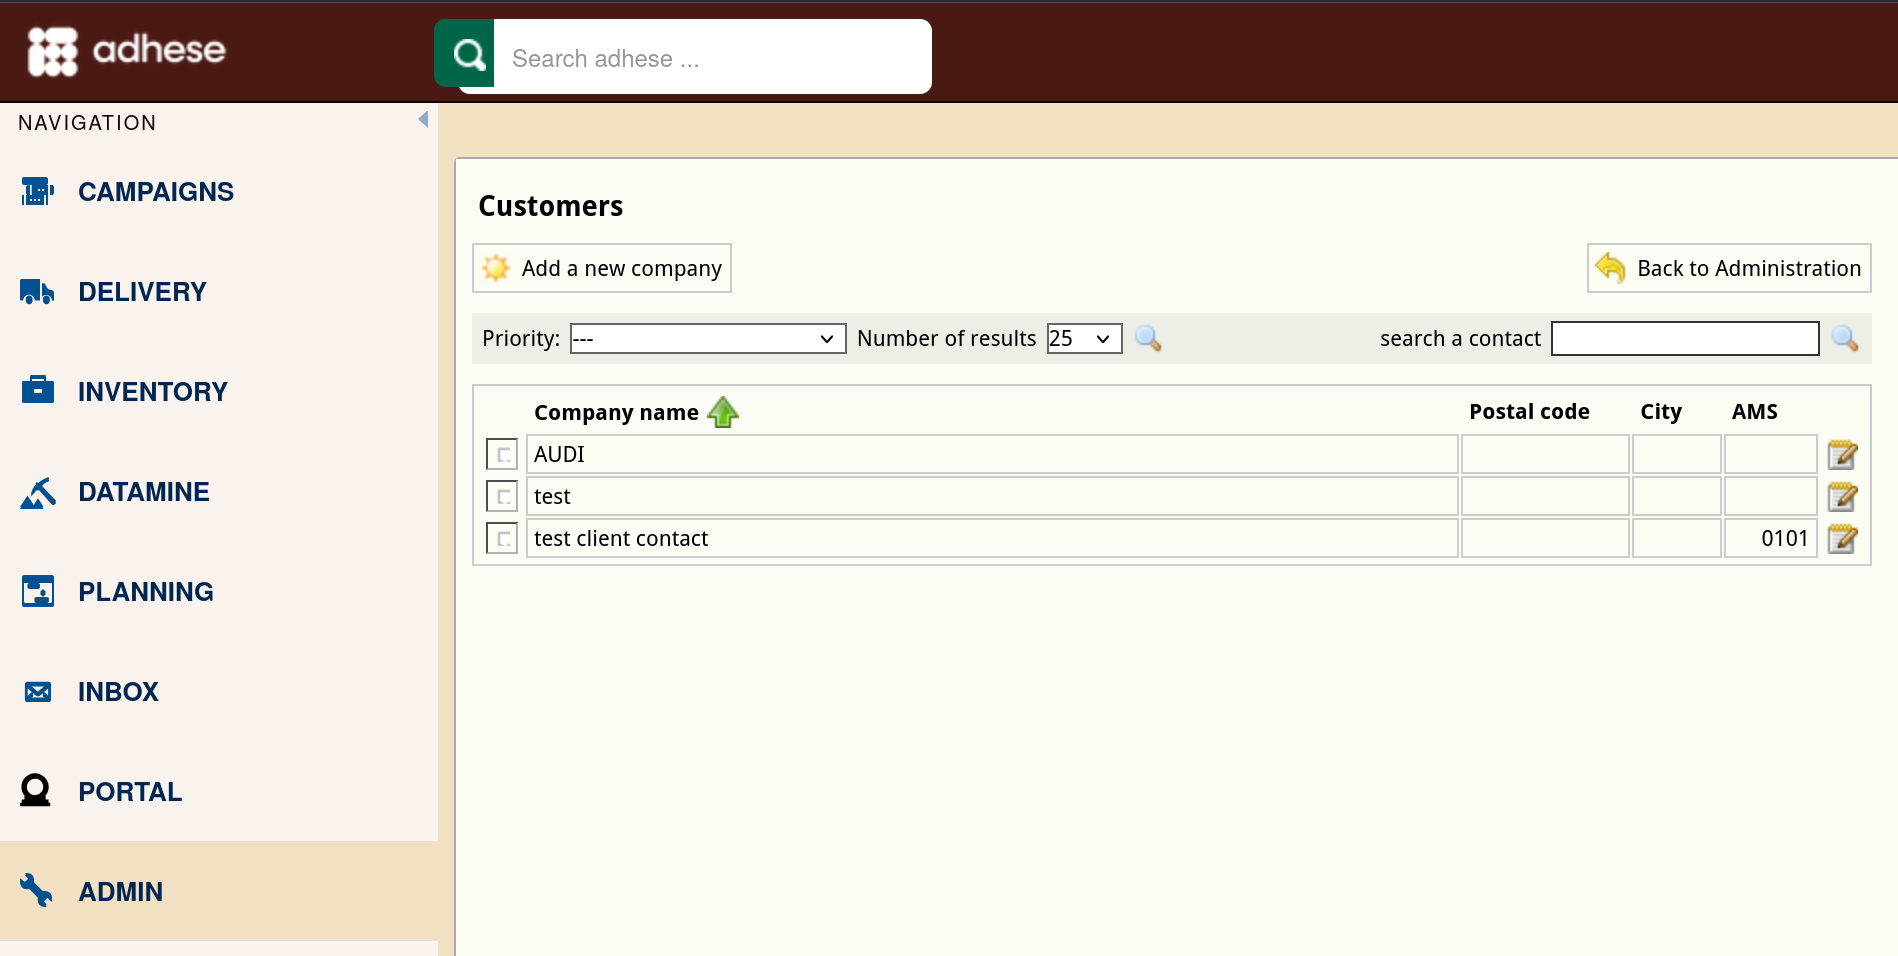
Click Customers on the Administration screen. The Customers screen opens:

For more information about the Customers screen, refer to Customers.
-
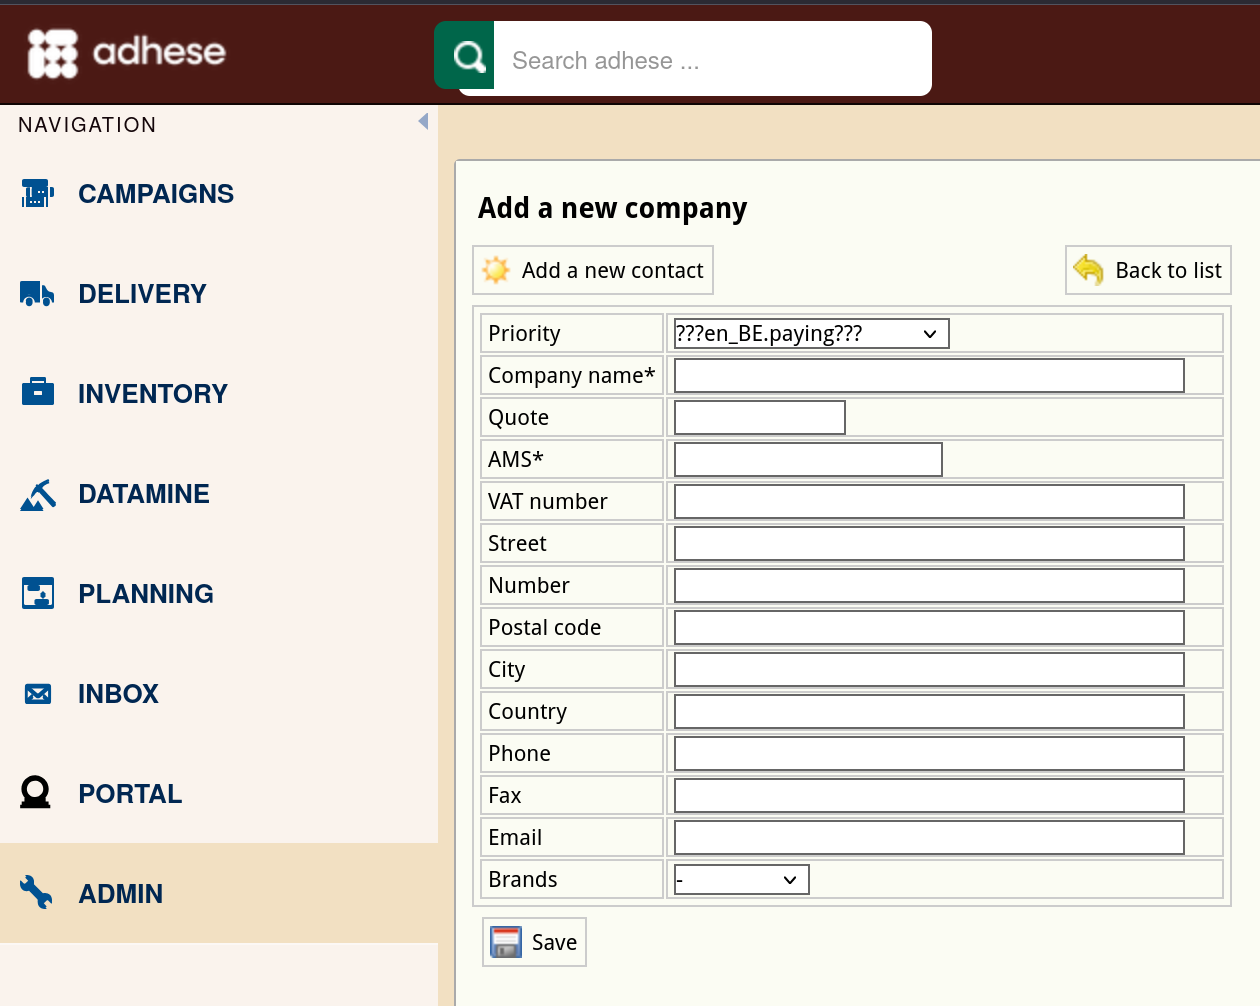
To add a new client or company, click the Add a new company button. The Add a new company screen opens:

-
Define the following details:
-
(Optional) Select a billing method for the company from the Invoice type drop-down.
-
Enter the name of the company in the Company name field.
-
(Optional) Enter an abbreviated company name in the Quote field.
-
Enter the AMS ID of the company in the AMD field.
-
(Optional) Enter the VAT number of the company in the VAT number field.
-
(Optional) Enter the name of the street of the company's address in the Street field.
-
(Optional) Enter the number of the company's address in the Number field.
-
(Optional) Enter the postal code of the company's address in the Postal code field.
-
(Optional) Enter the city of the company's address in the City field.
-
(Optional) Enter the country of the company's address in the Country field.
-
(Optional) Enter the telephone number of the company in the Phone field.
-
(Optional) Enter the fax number of the company in the Fax field.
-
(Optional) Enter the email address of the company in the Email field.
-
Click the Save button.
Add a new contact
To add a contact to a company:
- Click Customers on the Administration screen. The Customers screen opens.
- Click the company's name or click the edit icon for the company you want to add a client to.
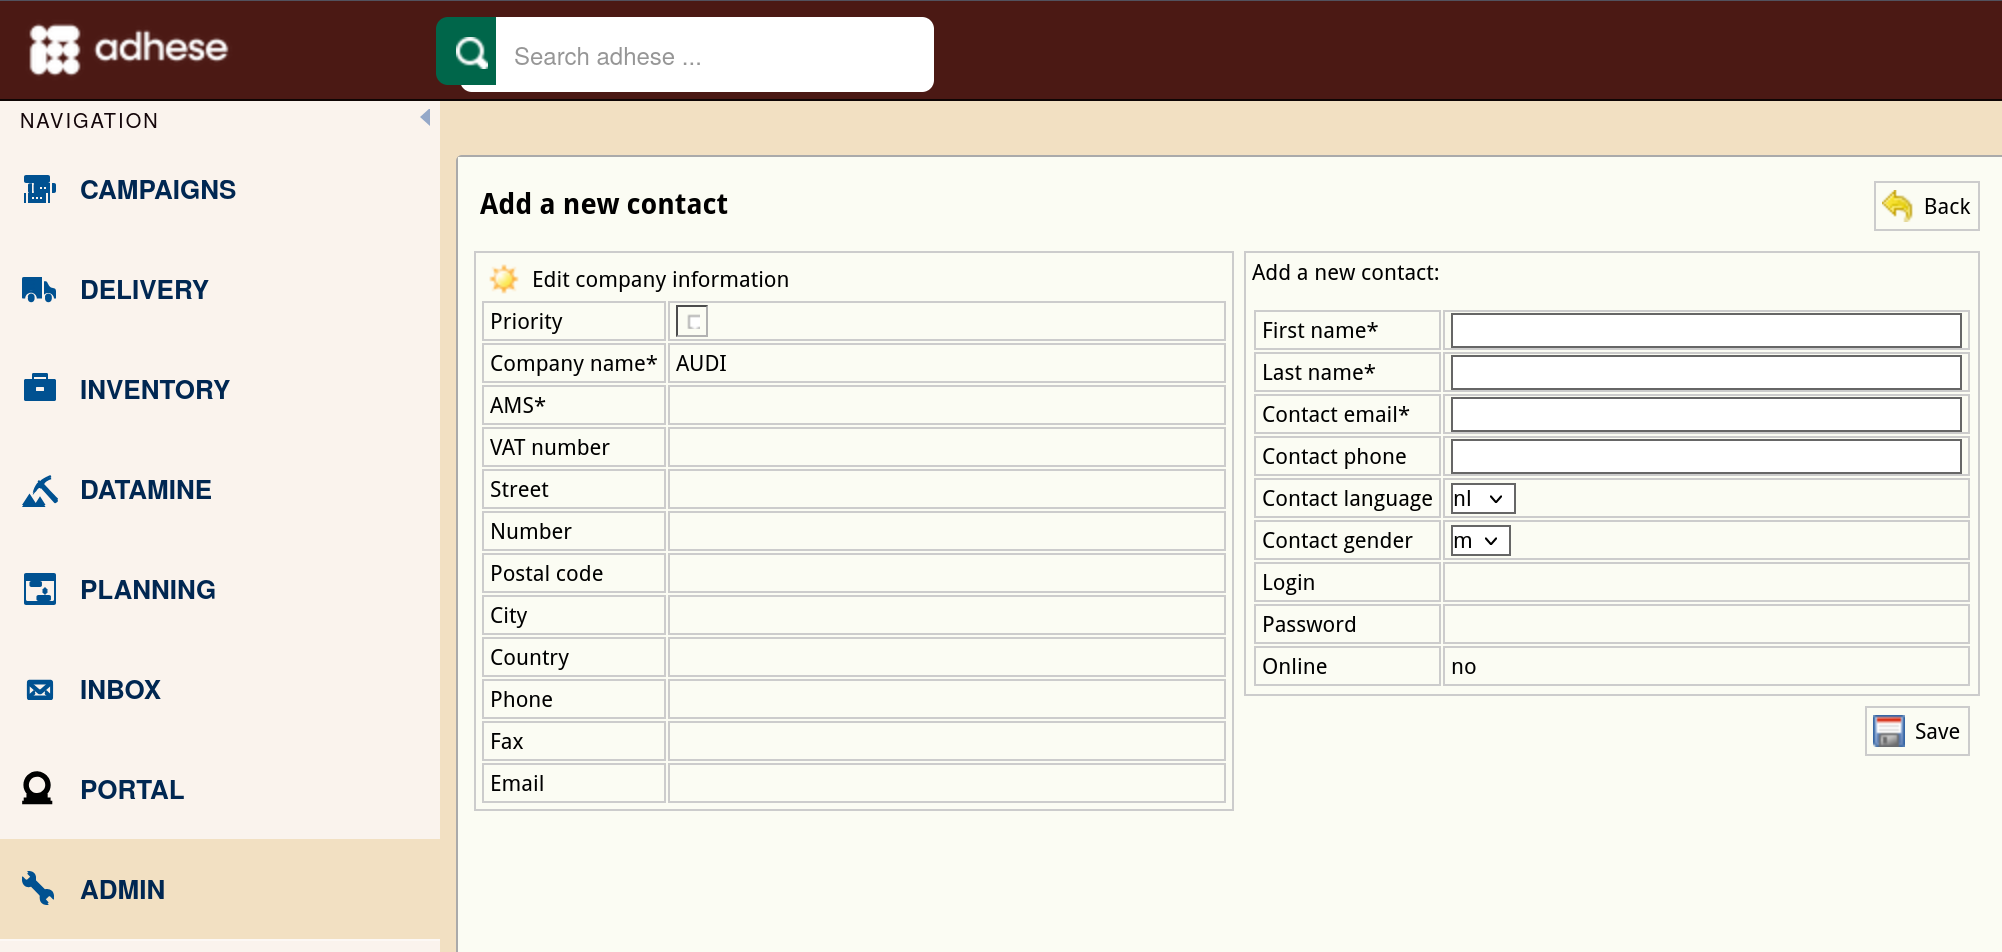
- Above the form, click the Add a new contact button. The Add a new contact screen opens:

- Define the following details:
- Enter the name of the contact in the First name field.
- Enter the surname of the contact in the Last name field.
- Enter the email address of the contact in the Contact email field.
- (Optional) Enter the phone number of the contact in the Contact phone field.
- (Optional) Choose a language from the Contact language drop-down.
- (Optional) Select a gender from the Contact gender drop-down.
- Click the Save button.
Edit a client
To edit a client or customer:
- Click Customers on the Administration screen. This opens the Customers screen.
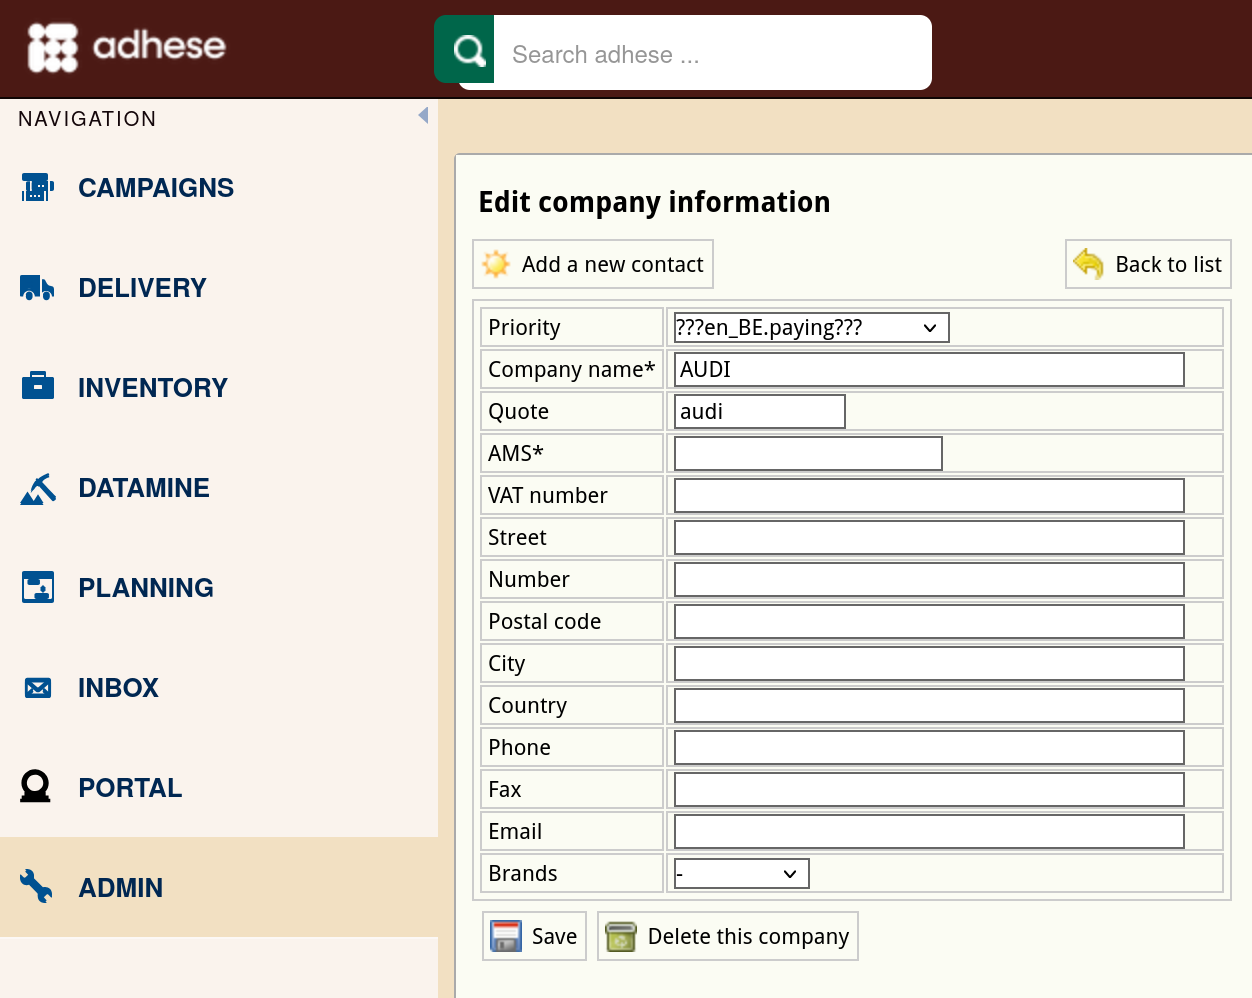
- To edit a client or company, click the company's name you want to modify or click the edit icon . The Edit company information screen opens:

- Change any of the details.
- Click the Save button.

Delete a client
To delete a client:
- Click Customers on the Administration screen. The Customers screen opens.
- To delete a company, click the company's name you want to delete or click the edit icon . The Edit company information screen opens.
- Beneath the form, click the Delete this company button.

3rd party tags through 3PAS
Google accepted Adhese as a certified third-party server. This certification allows clients to upload third-party tags of Adhese to Google.
The syntax of these certified tags is as follows:
<div data-adhese-account="demo" data-adhese-slot="sl_google_banner_html5_js_-imu" data-adhese-click="">
<script src="https://pool-demo.adhese.com/tag/adhese_3pas.js" type="text/javascript"></script>
</div>
It consists of HTML markup containing three data fields:
- data-adhese-account (required): the name of your Adhese account
- data-adhese-slot (required): the full code of the Adhese position you want to create a tag for
- data-adhese-click (optional): click macro that will allow you to count clicks in the adserver
The adhese_3pas script is not available by default. Contact Adhese support if it is the first time integrating 3PAS tags on your account.
Composing the slot code
The full slot code consists of a few values that can be located within the admin UI of your Adhese account: sl[location code][position code]-[format code]
- The
slprefix (required) - The location code: matches the URL code of the corresponding Adhese location. (required)
- The position code: matches the URL code of the corresponding Adhese position. (optional)*
- The format code: matches the code tag of the format you wish to request. (required)
*The position code is optional, as this field can be left empty when creating a position in Adhese
The implementation of the Adhese ad tags
This information refers to the old Adhese SDK, for current information on setting up the inventory and slots, see: Typescript SDK
Once you have mapped the structure of your inventory and created the appropriate positions, it is time to create and implement the ad tags. Ad tags are the foundation of our technology. They allow us to deliver and measure targeted campaigns.
How to get started with Adhese
-
Load the following piece of JavaScript code in the
<head>of the page:<script type="text/javascript" src="adhese.min.js"></script> -
Provide a local function that returns the content identification:
<script type="text/javascript"> function getLocation() { return "_demo_test_"; } </script> -
Initialize the Adhese instance:
varadhese = newAdhese(); adhese.init({debug:true, account:"demo", location: getLocation }); // value of the account attribute can be found in your Adhese subscription information or through our support portal.
Implementation of the Adhese ad tag
Legacy requests
Legacy requests are implemented as a script fragment inside the <div> container where they will be visualized. The client executes the request and inserts the response in the <div> container with a document.write statement. However, this implementation method is not recommended if you want to take advantage of viewable tracking and forecasting. It also has performance drawbacks, as the client's document builder is blocked while requesting an online ad.
For each ad you want to serve on a web page, you should create a <div> container with a unique ID that matches the requested format, and then make a call to the adhese.tag function.
<div id="leaderboard">
<script type="text/javascript" charset="utf-8">
var ad = adhese.tag("leaderboard", { write: true });
</script>
</div>
Asynchronous JSON and JSONP requests
Asynchronous requests allow you to make a request first and visualise the response later. The implementing client is responsible for correct reporting.
The JSON or JSONP implementation method allows all ads to be bundled into a single request and the creative to be visualised in the right place. With this method, it is easy to take into account the moment when the creative has a real change to be seen, better known as viewability or in-view. This implementation method is the most suitable and favourable method to use in a responsive environment.
A tracker URL that is passed in the response should be requested when visualizing the ad. The code can be built with an extra AJAX request handler. If you plan to implement in a client that is already capable of performing asynchronous requests, you can omit this part of the SDK from the dist file by running 'make noajax'.
The next piece of code is a basic ad tag that tells the client to continue loading everything else on the page while it waits for the leaderboard ad creative request. This ad tag needs to be pasted between the HTML <body> tags, in the position where you want the leaderboard ad to be served.
adhese.tag("leaderboard", {async:true;});
If the client has to request data from a different domain than your own, you’ll need to implement the next JavaScript tag:
<script src="http://ads.adhese.com/ad/jsonp/callback/sl_homepage_-leadboard/sl_homepage_-banner/sl_homepage_-skyscraper"></script>
The above script allows you to simultaneously load all your ad creatives at once: the leaderboard, banner and skyscraper ad. Next to this code, you still need a code that puts the ads in the right position.
IAB Safeframe
Adhese used to support SafeFrame by default. To turn it off, initialize your Adhese instance with the safeframe option set to false.
var adhese = newAdhese();
adhese.init({ debug: true, account: "demo", location: getLocation, safeframe: false });
Safeframe used to be on by default, but this is no longer the case with the new SDK and doesn't need to be disabled anymore when using the Typescript SDK.
System-wide over-delivery
An over-delivery percentage can be configured. For example, if set to 2%, each campaign will deliver 2% more impressions than initially booked. An over-delivery percentage is applied to prevent minimal under-delivery of third-party ads in the event of reporting discrepancies
Don't hesitate to contact support if you want to increase or decrease your system-wide over-delivery percentage.
The default overdelivery value is 5%
How to deal with responsive web pages
The increasing use of various devices such as smartphones, phablets, tablets, and laptops highlights the importance for publishers and advertisers to adopt a responsive strategy.
The design of a responsive website adjusts to the size of the device's browser screen. In contrast, the website's content's readability or interface's usability is not compromised.
The technology of Adhese can deliver the same creative across multiple devices. You only need to determine the display resolution in which the creative dimensions will adequately fit. An ad will only be displayed (and counted as an impression) if the ad request is sent from a device that can guarantee the correct delivery of the ad. So, you don't need to create a booking or upload a creative for each different kind of device, manufacturer or browser you'd like to target. However, advertisers can still deliver an optimised creative for each device they want to target separately.