It is necessary to enter a quote for the publisher to make sure an XML order upload succeeds. The quote should be used in the <company> field.
- (Optional) Enter the address for the publisher in the **Street**, **Number**, **Postal Code**, **City**, and **Country** fields. - (Optional) Enter means of contact for the publisher in the **Phone**, **Fax**, **Website**, and **Email** fields. - (Optional) Enter a bank account number in the **Bank Account** field. - (Optional) Enter a VAT number in the **VAT** field. - Tick the **Active?** checkbox to declare that the status of the publisher is active. 7. All fields under the *Contact* header are optional. However, data entered here can be of importance as the reports publish it. - (Optional) Enter the name of the publisher’s contact person in the **First name** and **Last name** fields. - (Optional) Enter the address of the publisher's contact person in the **Street**, **Number**, **Postal** **Code**, **City**, and **Country** fields. - (Optional) Enter a means of contact for the publisher's contact person in the **Phone**, **Fax**, **Website**, and **Email** fields. 8. Click the *Save* button at the bottom of the *Create a new publisher* form to save your new publisher. # Edit a publisher To edit a publisher: 1. Go to the *Administration* screen. Click *Admin* in the left navigation menu. 2. Click *Publishers*. 3. In the list of publishers, click the publisher's name you want to modify or click the edit icon [](https://documentation.adhese.org/uploads/images/gallery/2024-06/ELSRpIaUKkqb8tMG-deactivate-a-publisher1.png). This opens the *Edit publisher* screen. [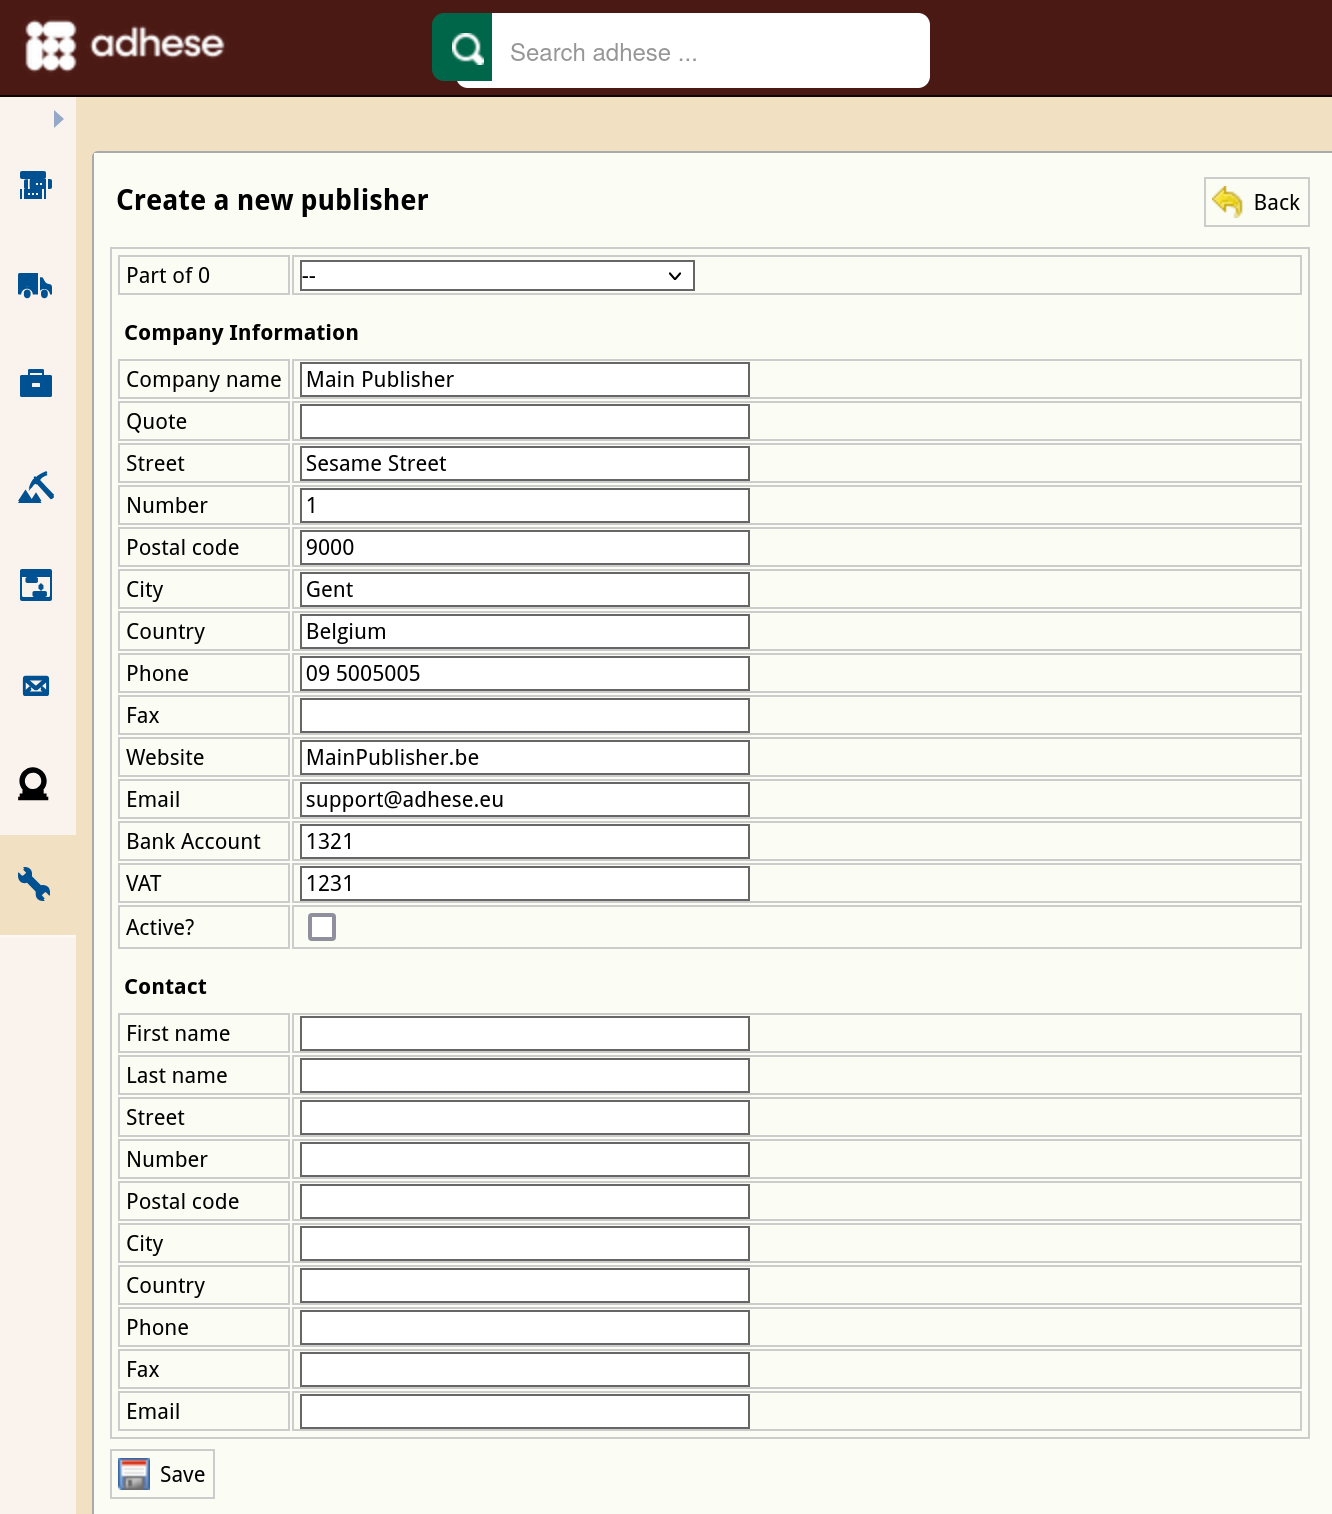](https://documentation.adhese.org/uploads/images/gallery/2024-10/jcuvAvFmCNQux8JT-schermafdruk-van-2024-10-18-14-49-58.png) 4. Change any of the publisher’s details. 5. Click *Save*. # Deactivate a publisher To deactivate a publisher: 1. Go to the *Administration* screen. Click *Admin* in the left navigation menu. 2. Click *Publishers*. 3. In the list of publishers, click the publisher's name or the edit icon [](https://documentation.adhese.org/uploads/images/gallery/2024-06/aUHDpmE90hebytHR-deactivate-a-publisher1.png) for the publisher you want to deactivate. This opens the Edit a publisher screen. 4. Deselect the radio button in the **Active?** field to deactivate the publisher. 5. Click *Save*. An inactive publisher will be grey (instead of yellow) in the list of publishers. # Publications A publisher maintains online **publications** such as a website, blog, video channel, newsletter, smartphone app, or webshop. Adhese is platform-agnostic: it can support any type of publication. You can filter the *Publications* screen by publisher and select a publisher from the **Show only** drop-down menu above the list. You can filter the *Publications* screen by publication status using the **Filter** drop-down menu. Determine the number of results to display from the **Number of results** drop-down. Use the *search* bar to search for a specific publication. # Create a new publication To add a new publication: 1. Click *Admin* in the left navigation menu. This opens the *Administration* screen. 2. Click *Publications*. The *Publications* screen opens: [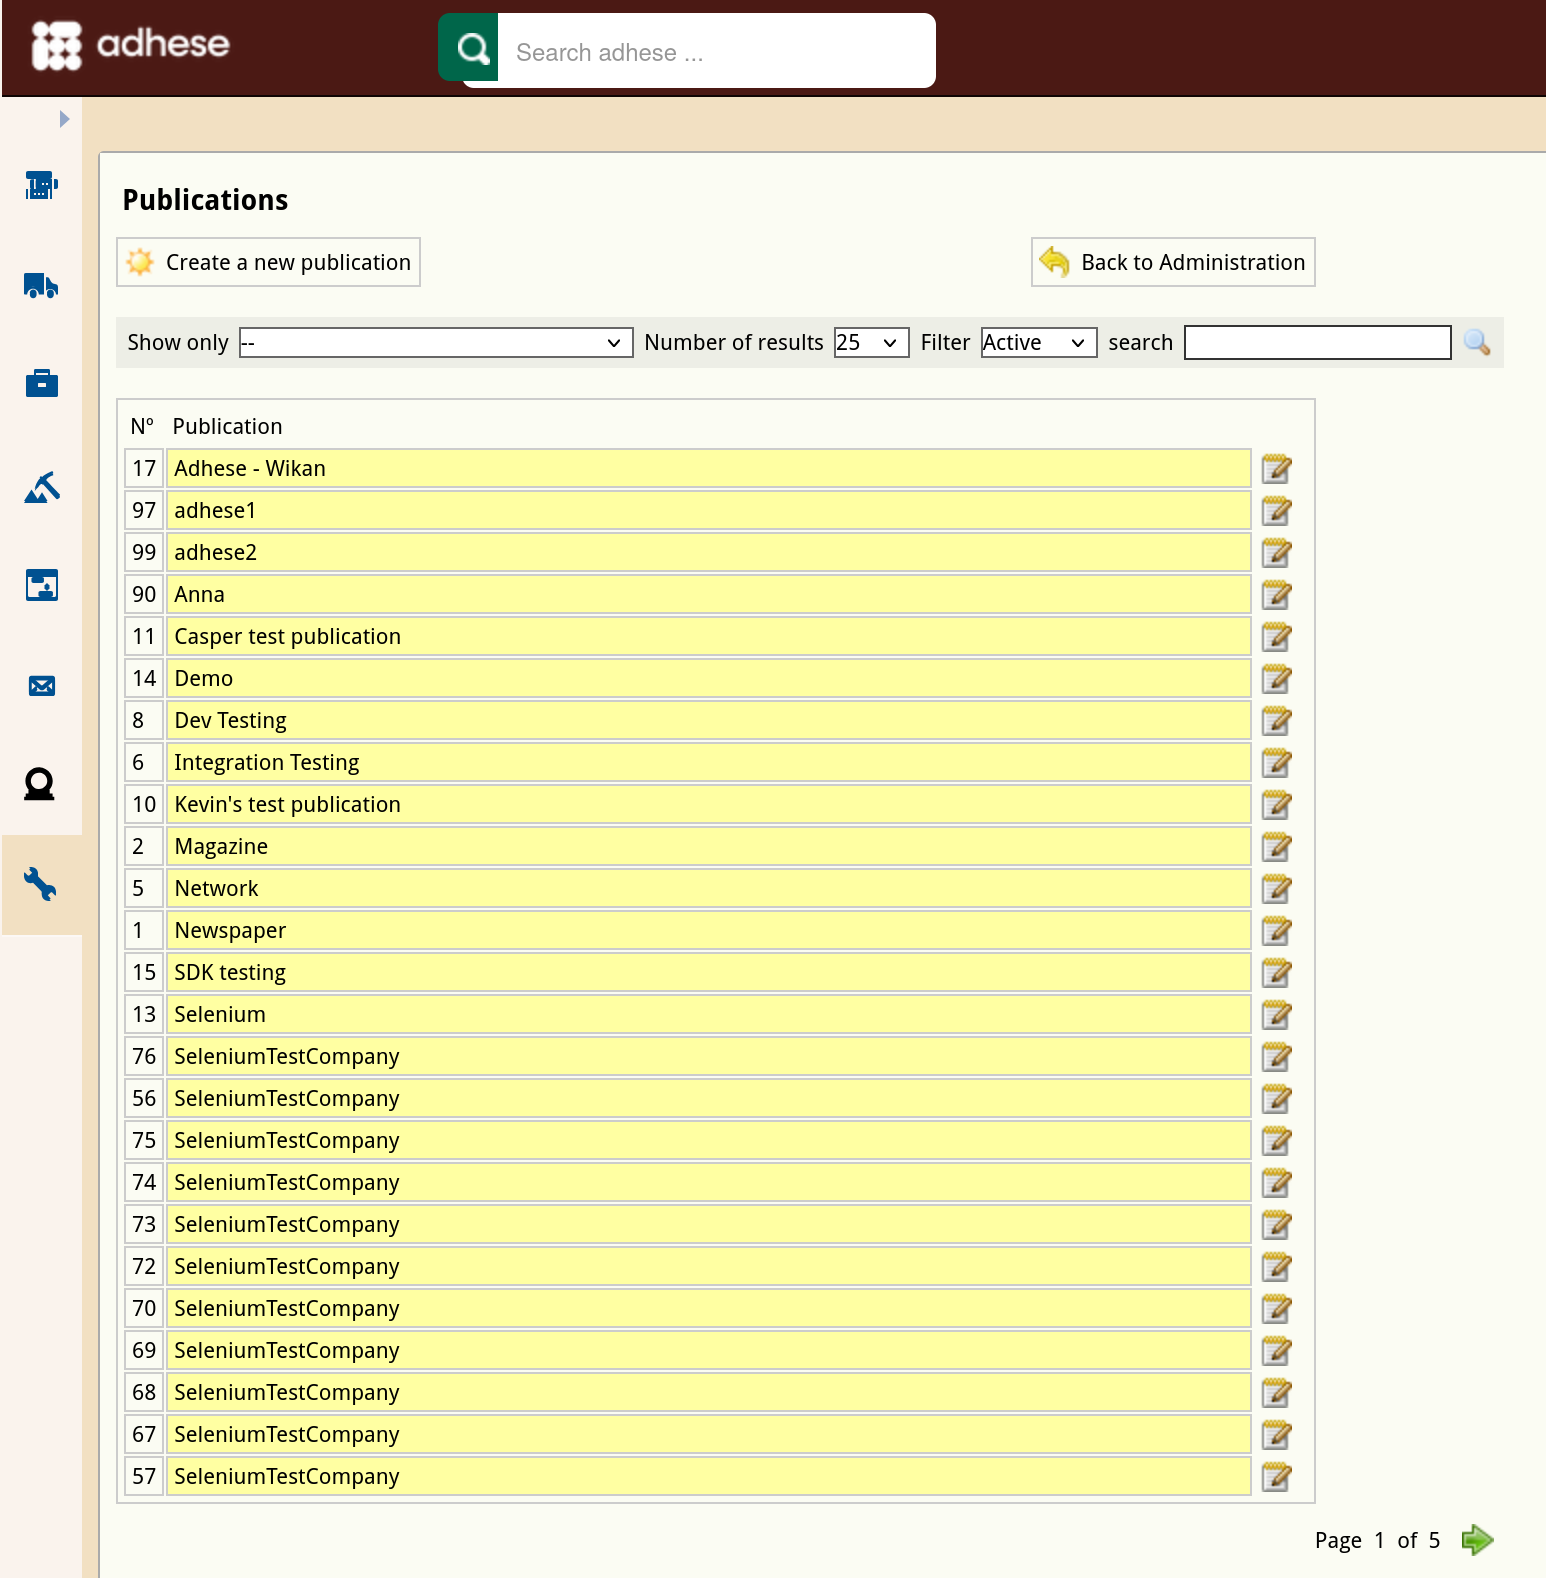](https://documentation.adhese.org/uploads/images/gallery/2024-10/8ryYdNJC5cB9B3bZ-schermafdruk-van-2024-10-18-14-58-37.png) 3. Click the *Create a new publication* button. This opens the *Create New Publication* screen, where you enter the new publication details. [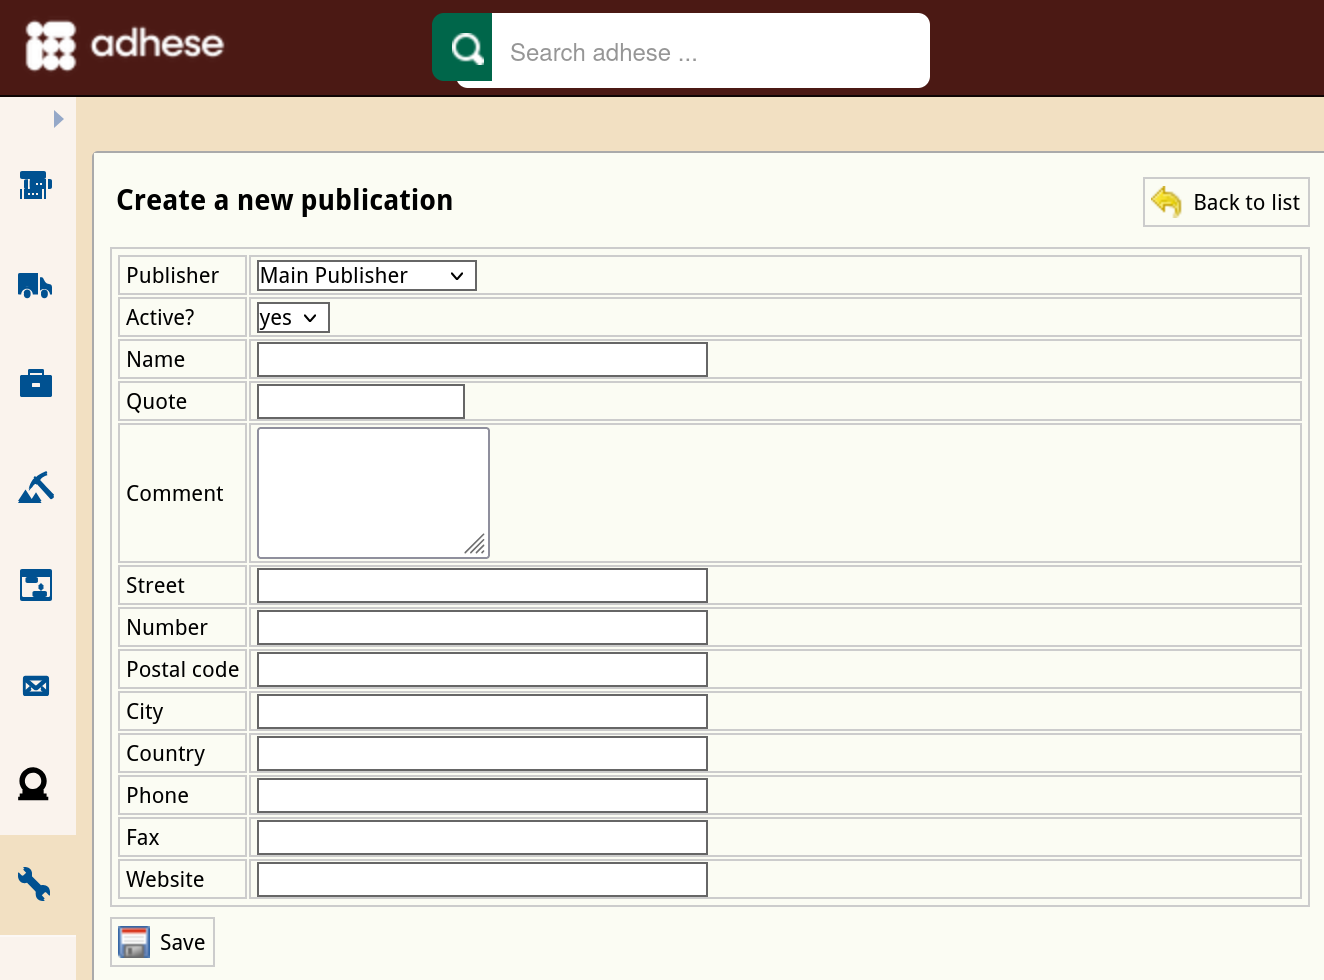](https://documentation.adhese.org/uploads/images/gallery/2024-10/wqAhHRuCTgBJUJJJ-schermafdruk-van-2024-10-18-14-59-09.png) 4. In the **Publisher** drop-down, select the publisher to which the publication belongs. 5. Select *yes* or *no* to determine whether the status of the publication is active or not in the **Active?** drop-down. By default, a new publication is active. If a publication is set to inactive, you will not be able to use it to serve ads. 6. Enter a name for the publication in the **Name** field. 7. (Optional) Enter a short name for the publication in the **Quote** field. Adhese uses the quote as a short notation for the publication and displays it in the list of locations (see [Create a new location](https://documentation.adhese.org/books/inventory-setup/page/locations#bkmrk-create-a-new-locatio)). 8. (Optional) Enter the publisher’s contact details in the **Street**, **Number**, **Postal code**, **City**, **Country**, **Phone**, and **Fax** field 9. To preview uploaded creatives in Adhese, provide the URL of the publication's website in the **Website** field. 10. Click the *Save* button at the bottom of the form to save your new publication.Make sure to use a full URL (e.g. https://example.com) instead of a short URL (e.g. example.com)
# Edit a publication To edit a publication: 1. Go to the *Administration* screen. Click *Admin* in the left navigation menu. 2. Click *Publications*. 3. In the list of publications, click the name or the edit icon [](https://documentation.adhese.org/uploads/images/gallery/2024-06/0oasbva32UbrG3zS-deactivate-a-publisher1.png) for the publication you want to edit. This opens the *Edit publication* screen. [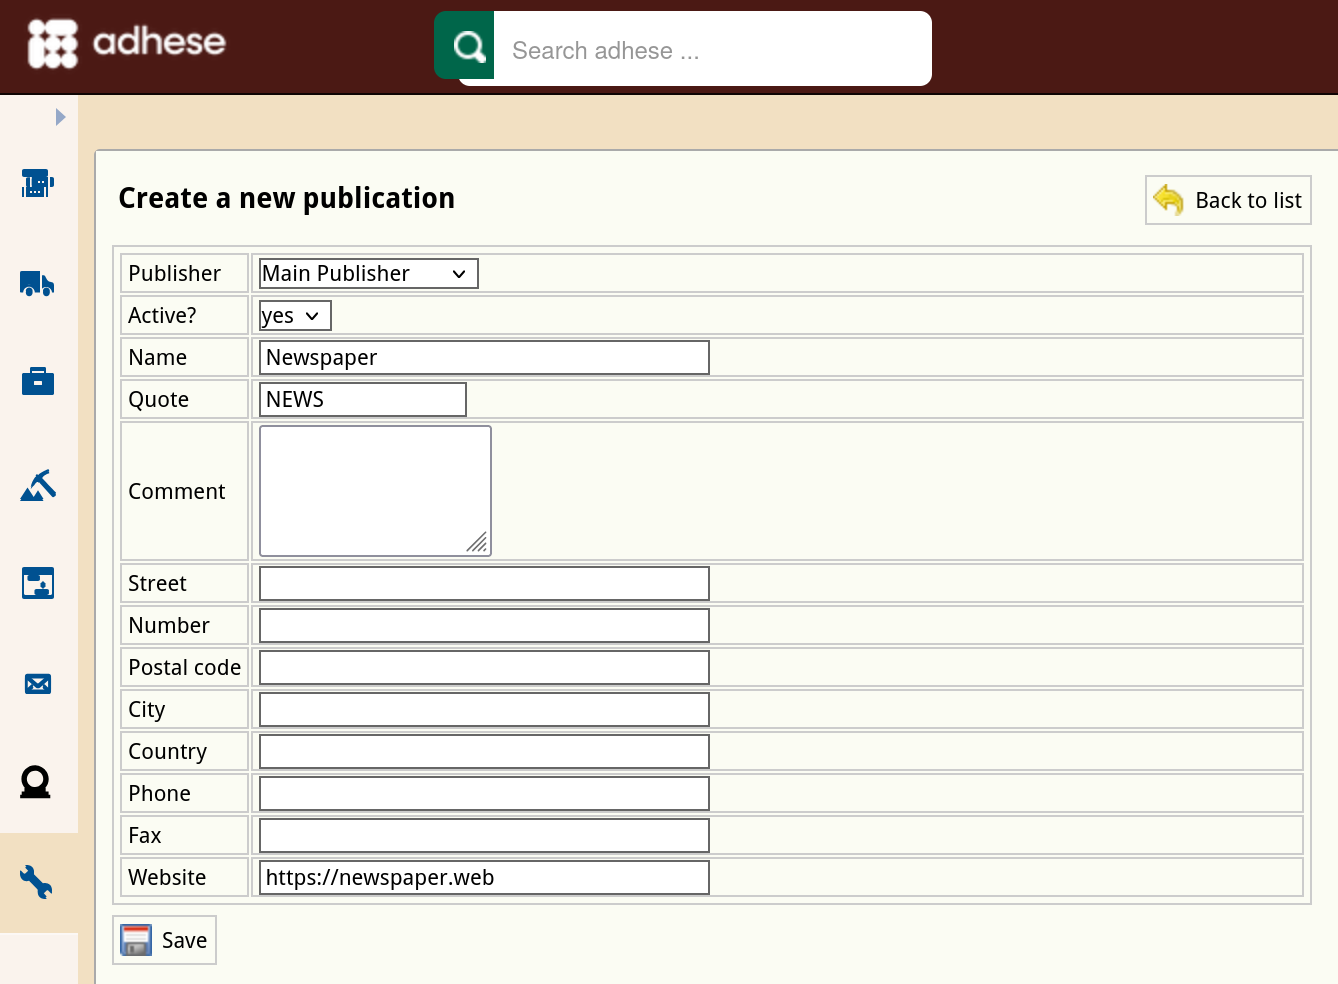](https://documentation.adhese.org/uploads/images/gallery/2024-10/fXSq4CjTp9hV1K3D-schermafdruk-van-2024-10-18-15-00-41.png) 4. Change any of the publication’s details. 5. Click *Save*. # Deactivate a publication To deactivate a publication: 1. Go to the *Administration* screen. Click *Admin* in the left navigation menu. 2. Click *Publications*. 3. In the list of publications, click the name of the publication or click the edit icon [](https://documentation.adhese.org/uploads/images/gallery/2024-06/J9AnPXGXzkkIjUtX-deactivate-a-publisher1.png) for the publication you want to deactivate. This opens the Edit a publication screen. 4. Change the **Active** field from *yes* to *no*. 5. Click *Save*. The publication and its positions are no longer available in the *Booking* header. An inactive publication will be grey (instead of yellow) in the list of publishers. [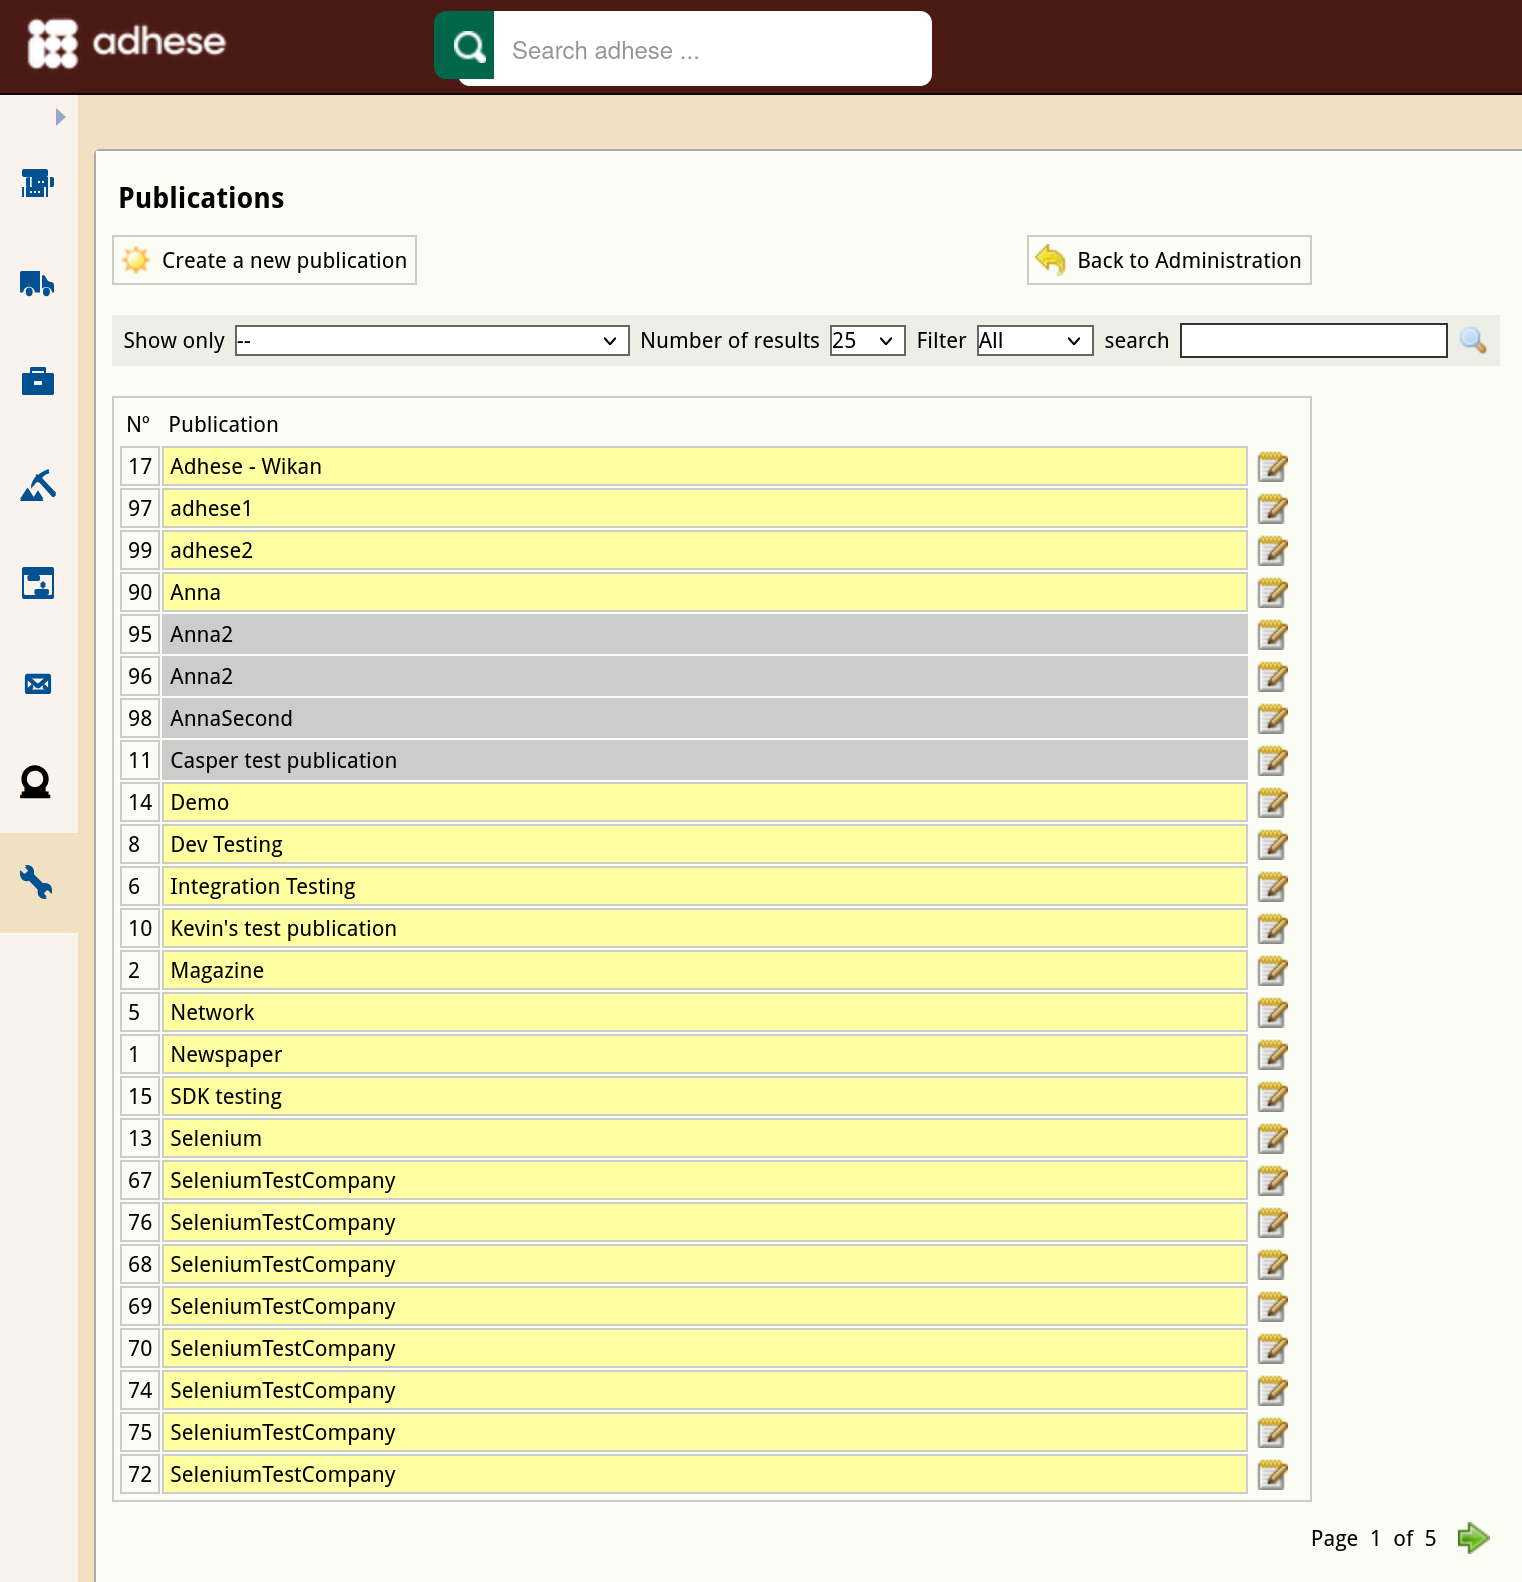](https://documentation.adhese.org/uploads/images/gallery/2024-10/dWT2qabJLhNZ9UA6-schermafdruk-van-2024-10-18-15-02-44.png)Deactivating a publication prevents new bookings from being created for it. Running bookings, including bookings where the publication is part of a channel, remain active. The owner of the deactivated publication is responsible for removing all requests to Adhese. To prevent running bookings from delivering on deactivated publications, create a 100% SOV booking coupled with an empty ad on the highest priority. Check that this booking has priority over all other bookings in the competing bookings list and/or the planned daily traffic graph.
# Locations A **location** is a (sub)section within a publication, such as a home page, the local news or lifestyle section, or the daily newsletter. # Create a new location To create a new location: 1. Click *Admin* in the left navigation menu. This opens the *Administration* screen. 2. Click *Locations*. The *Locations* screen opens: 3. The *Locations* screen consists of a table with four columns: 1. The *No* column displays the ID of the location. 2. The *Location* column shows the name of the publication and the location. 3. The *Active and future bookings* column indicates the number of bookings that are currently booked on that location. 4. The last column details whether the location is a single position or if the location belongs to a [channel](https://documentation.adhese.org/books/inventory-management/page/channels) of positions. To filter locations belonging to a specific publication, select a publication from the **Show only** drop-down menu above the list and click the magnifying glass icon [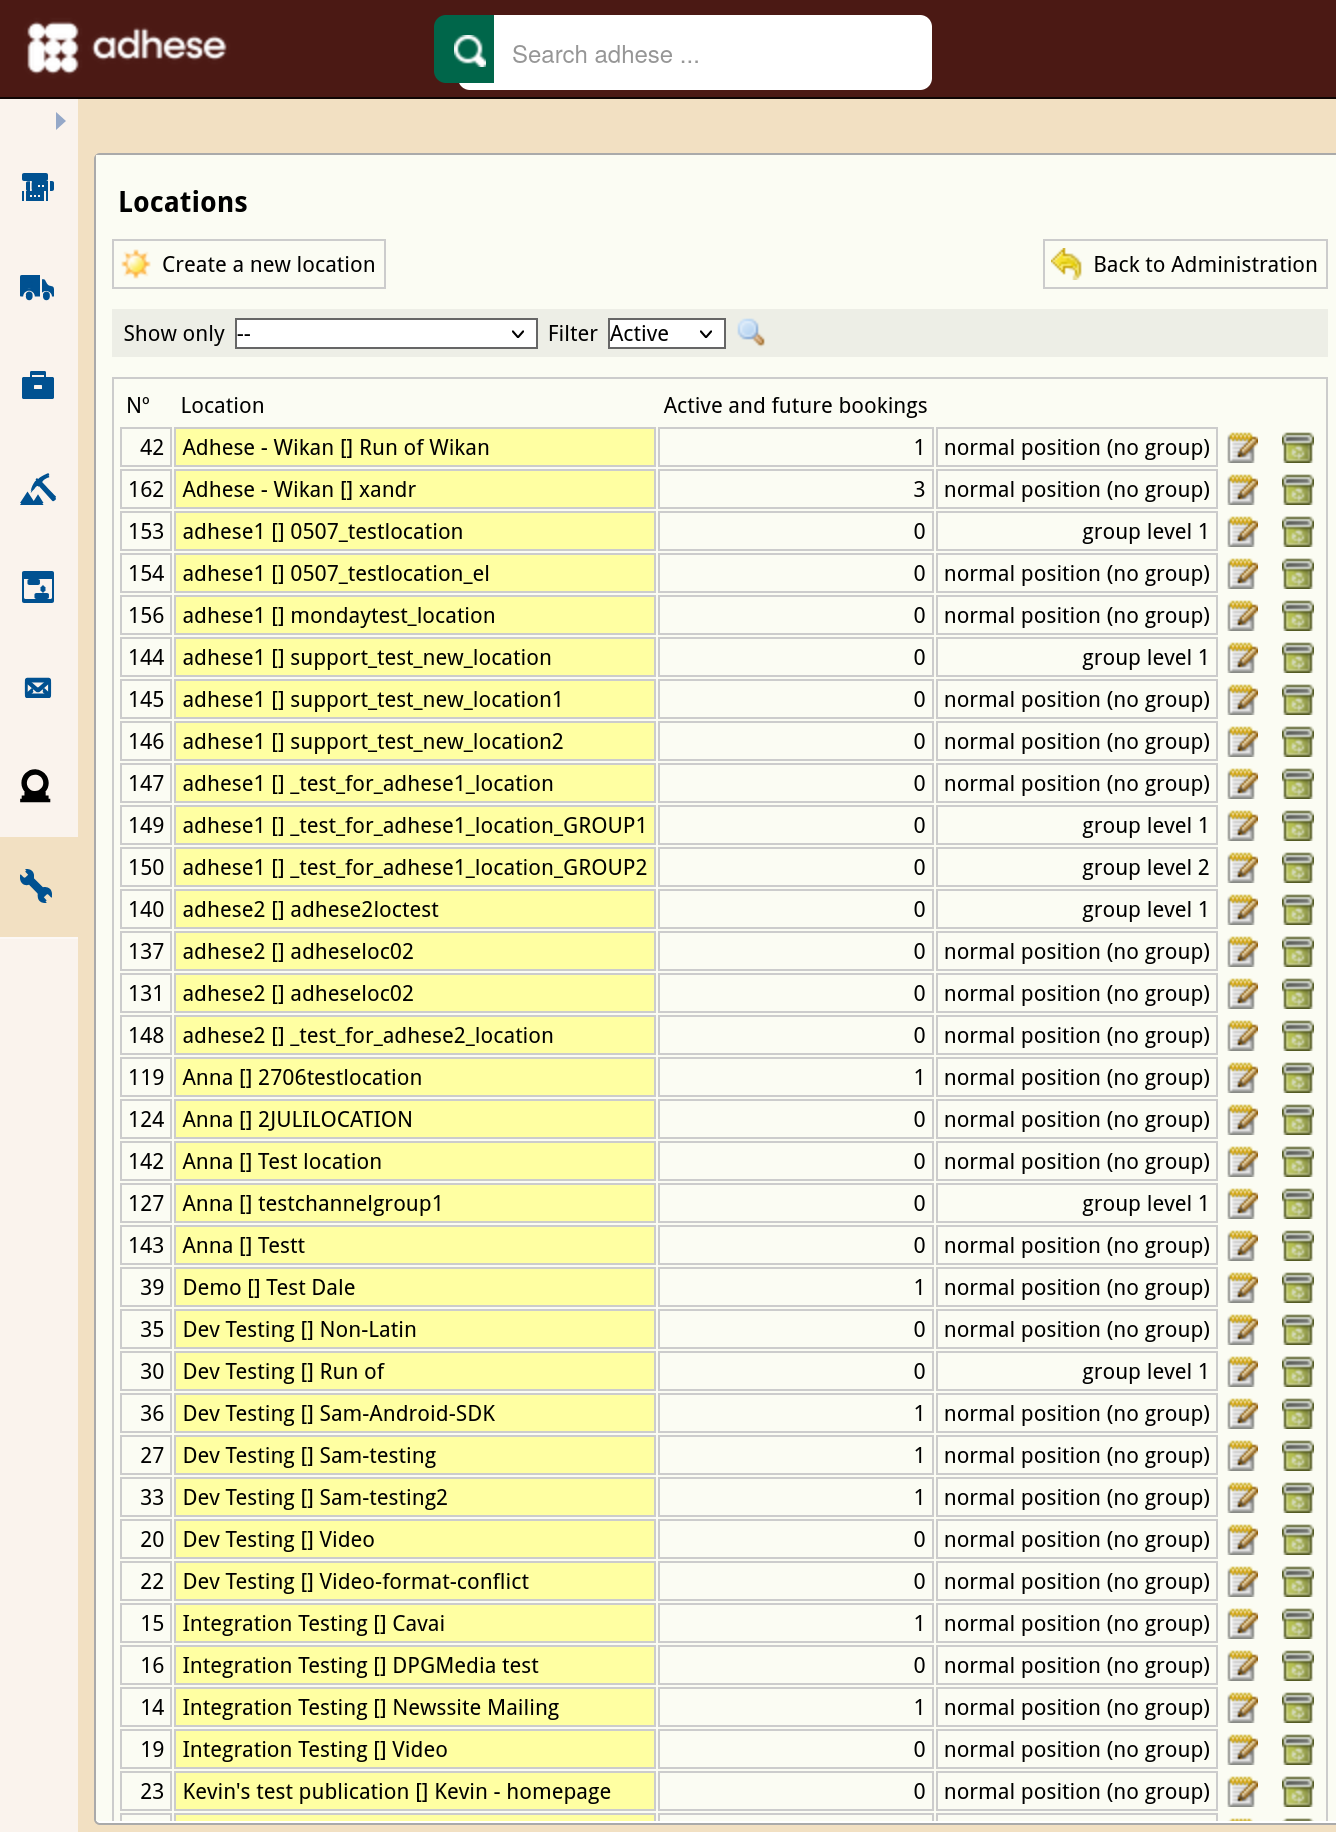](https://documentation.adhese.org/uploads/images/gallery/2024-10/AoD5uondALq4gtO1-schermafdruk-van-2024-10-18-15-28-58.png) 4. Click the *Create a new location* button. This opens the *Create a new location* screen. [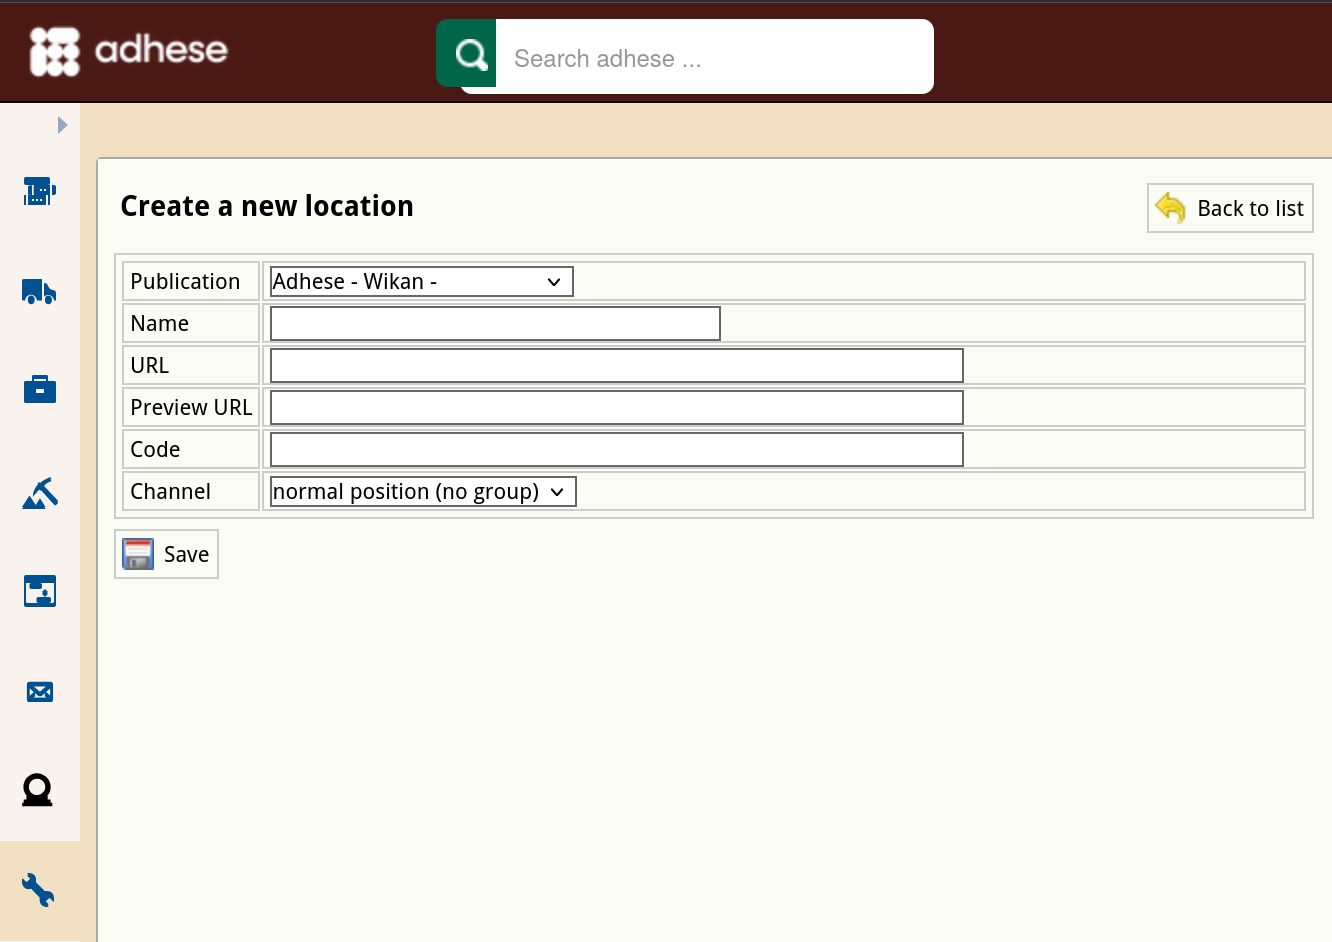](https://documentation.adhese.org/uploads/images/gallery/2024-10/yM0LMMGF4OALBDBw-schermafdruk-van-2024-10-18-15-29-41.png) 5. In the **Publication** drop-down, select the publication to which the location belongs. 6. Enter the name of the location in the **Name** field. Choose a clear and logical name, such as *magazine home*. 7. Define the URL for the location in the **URL** field. The URL should follow the scheme agreed upon during the setup process. Please note that each location must have a unique URL, and no two locations can share the same URL. Multiple URLs can be defined for a location by separating them with a semicolon (;).To verify whether a location URL already exists, navigate to the *Admin* screen and select *Positions*. Type the URL in the search bar and click the magnifying glass icon. If the URL is already in use, it will be listed on the results page. In some cases, the results page does not display the URL of an existing location. This may be because the URL belongs to an inactive publication. To examine this, click on the *Download all positions as spreadsheet* button. Open the spreadsheet and check whether the URL belongs to an inactive publication.
If the location refers to a channel, the URL will have no effect. Therefore, we recommend ignoring this property when dealing with channels.
8. (Optional) In the **Code** field, enter the location code or foreign key if Adhese integrates with your existing CMS. 9. Determine whether the location is a standard location or a channel location by choosing a group level from the **Channel** drop-down menu: - If the location is a separate location, select *group level 0*. - If the location is a channel, select *group level 1* or higher. 10. Click the save button.The **group level** sets the priority of a channel and is determined within the database. Here is an example to illustrate the idea. Take the following two channels: *Newspaper \[News\] Sports Football Run Of* and *Newspaper \[News\] Sports Run Of.* Note that the *Sports* channel contains all sports positions, including the football positions of the *Sports Football* channel. The *Sports Football* channel has a higher priority (and, therefore, a lower group level) than the *Sports* channel because the *Sports Football* channel only contains the *Football* positions.
# Edit a location To edit a location: 1. Go to the *Administration* screen. Click *Admin* in the left navigation menu. 2. Click *Locations*. 3. In the list of locations, click the name of the location you want to modify or click the edit icon [](https://documentation.adhese.org/uploads/images/gallery/2024-06/zQxKceXDreQdwfQ0-afbeelding.png). The *Edit location* screen opens: [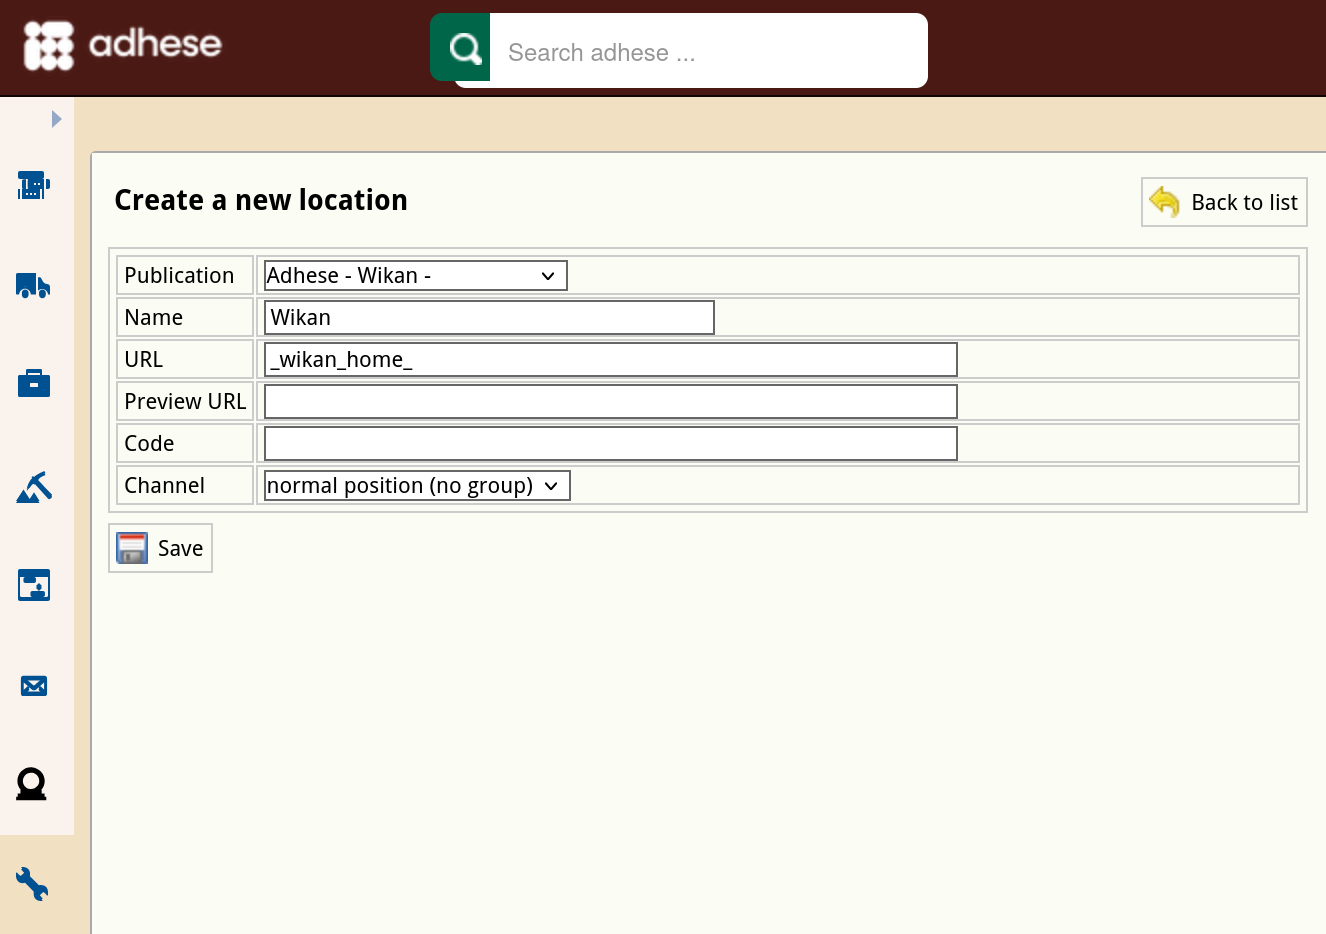](https://documentation.adhese.org/uploads/images/gallery/2024-10/YzRwqASHJqOjSQ2j-schermafdruk-van-2024-10-18-15-49-11.png) 4. Change any of the location’s details. 5. Click *Save*. # Formats A **format** specifies the requirements, such as file size and dimensions, that a creative must meet to prevent errors when uploading the creative file. A format does not have to be limited to online banner ads; it can also be a native ad or a video ad. All formats are acceptable as long as they fit within your inventory structure, website design and strategy. Refer to the Appendix [Online advertising formats](https://documentation.adhese.org/books/integrations-and-delivery/page/online-advertising-formats) for a definition of the most important formats and a representation within their environment. The overview is not exhaustive. A publisher can implement custom formats as well. # Create a format The *Formats* screen consists of a table with three columns: 1. The *N**o* column displays the ID of the format. 2. The *Format* column shows the name of the format and its dimensions. 3. The *Template file* column shows the template file that belongs to the format. To create a new format: 1. Click *Admin* in the left navigation menu. This opens the *Administration* screen. 2. Click *Formats*. The *Formats* screen opens: [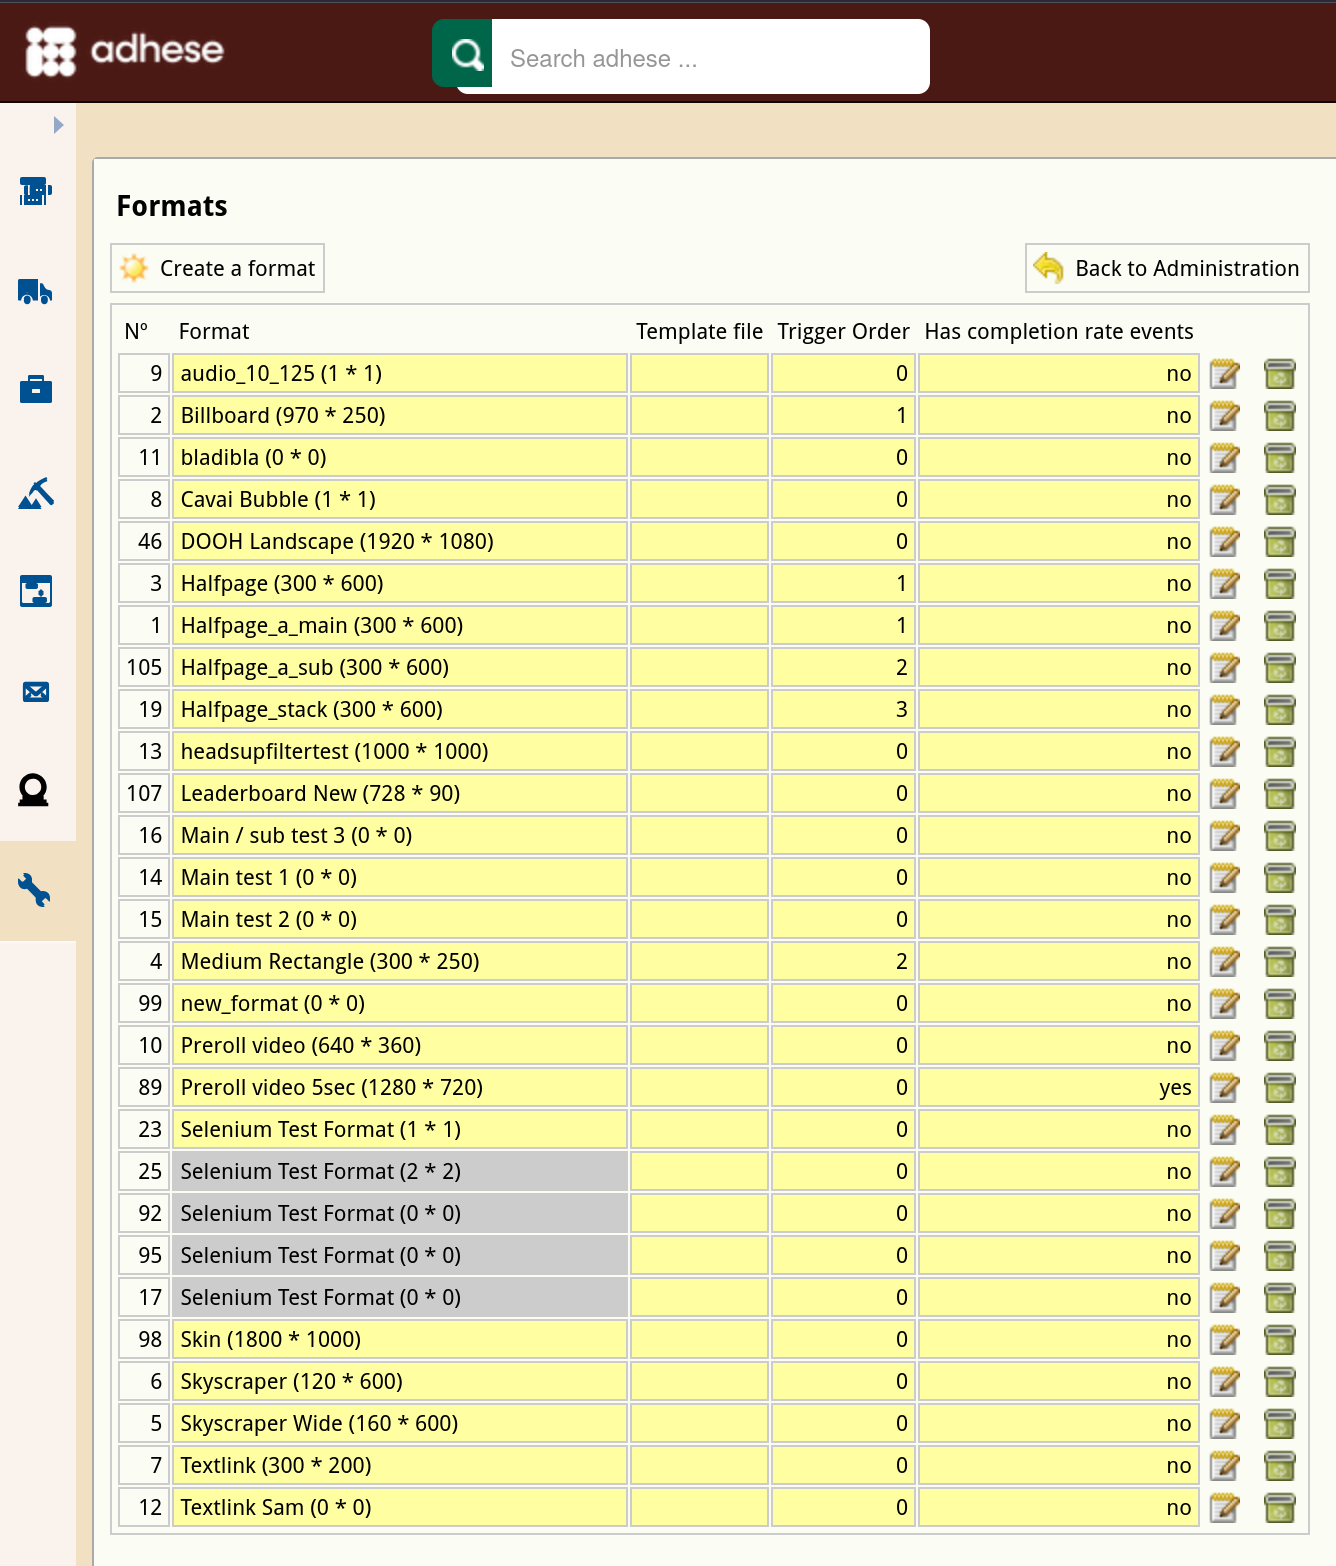](https://documentation.adhese.org/uploads/images/gallery/2024-10/p1f2jCYAaOnf4gSq-schermafdruk-van-2024-10-21-13-51-38.png) 3. Click the *Create a format* button. This opens the *Create a new format* screen. [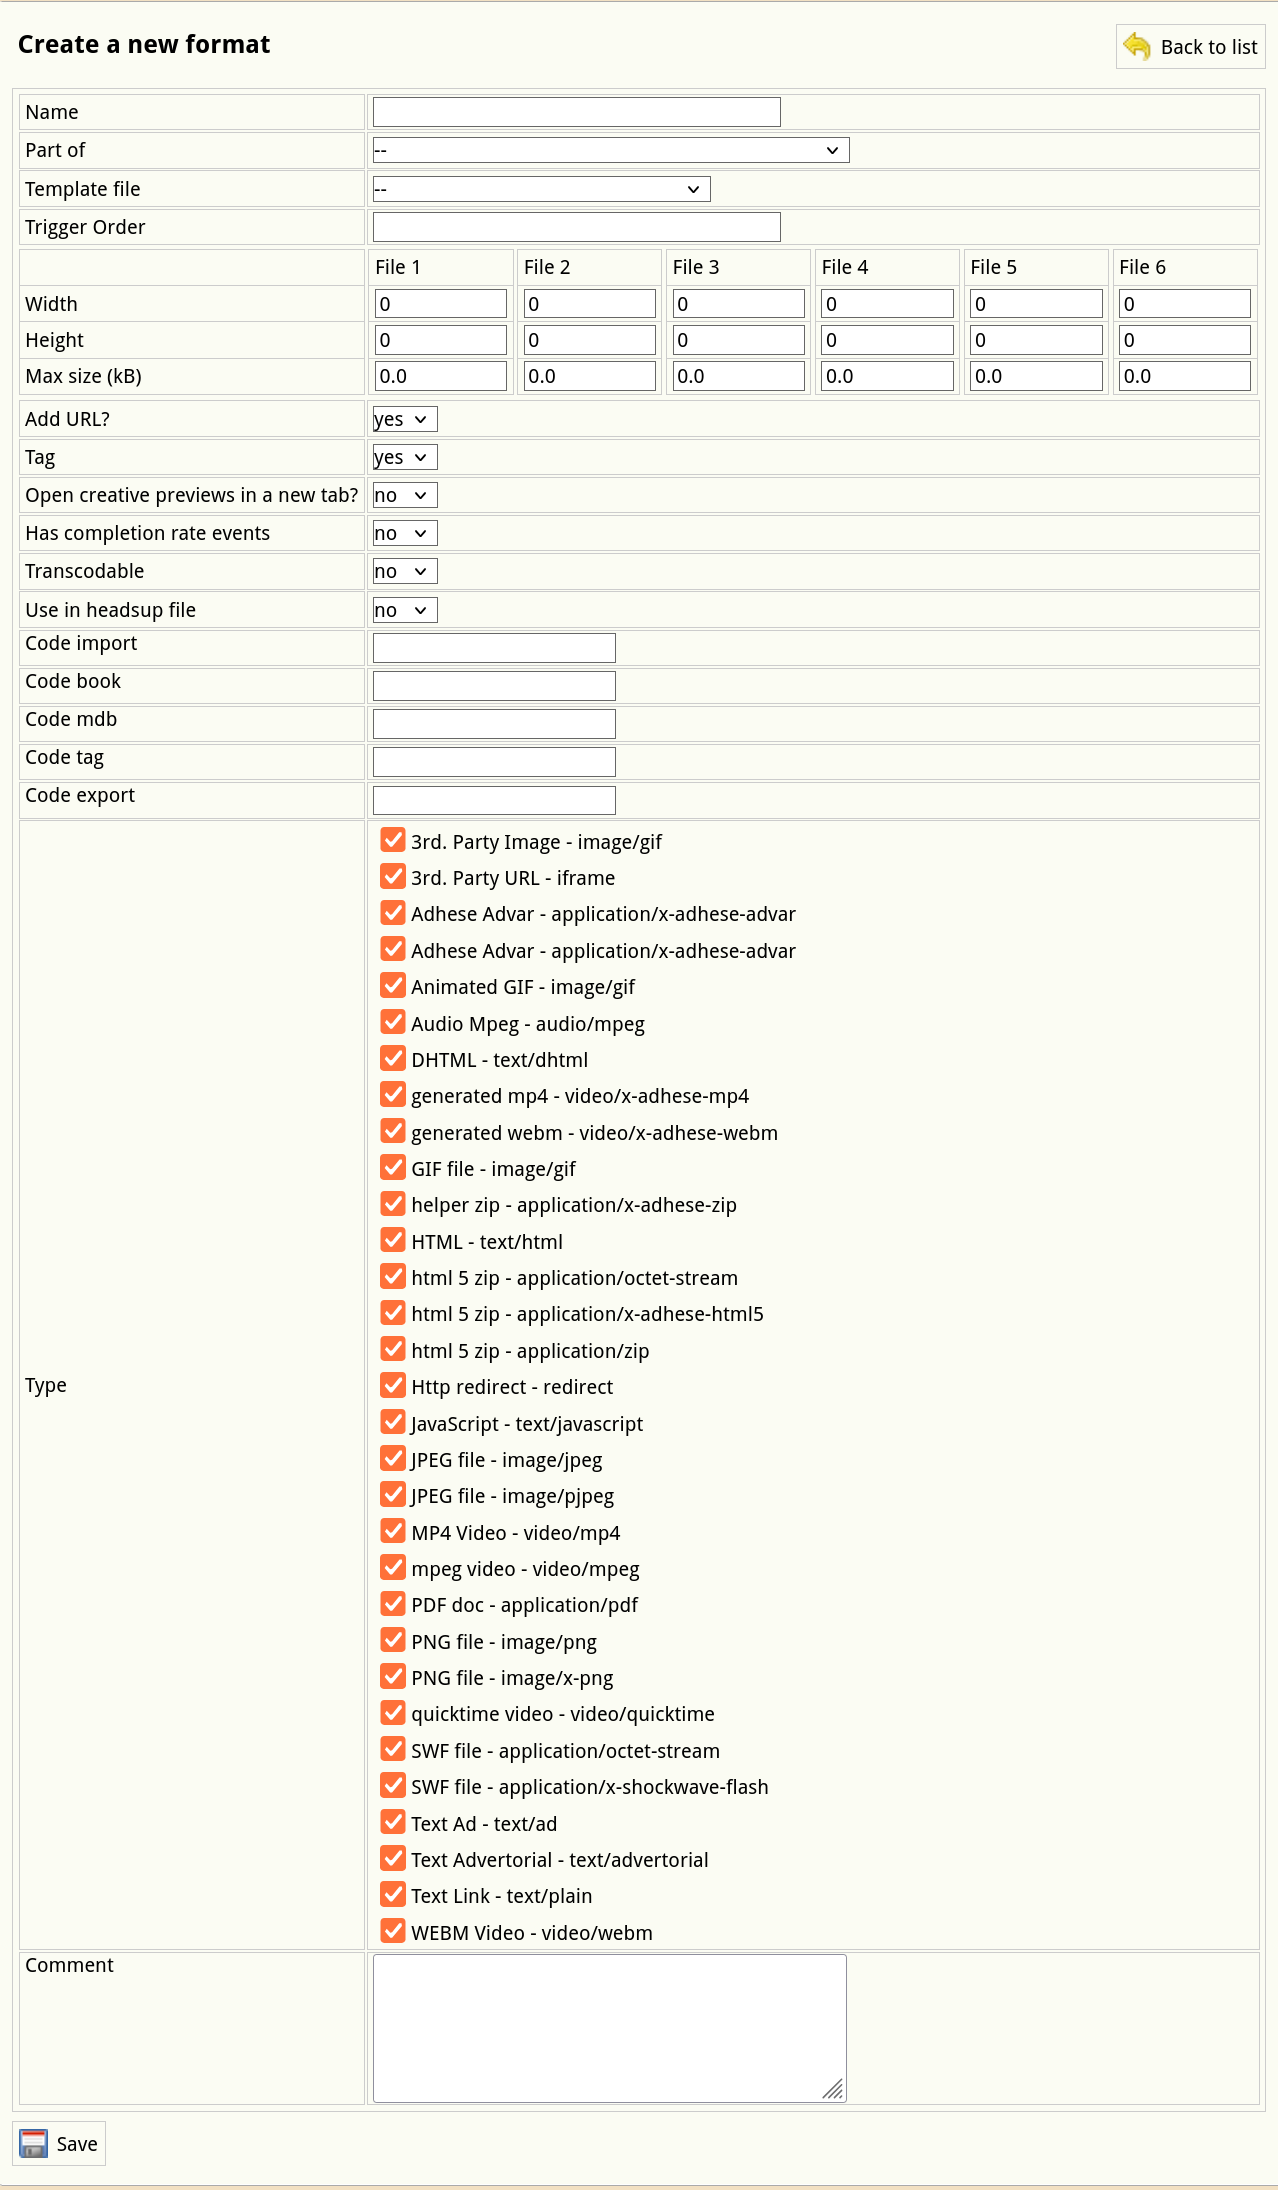](https://documentation.adhese.org/uploads/images/gallery/2024-10/VcLodriDWdcp8RIi-schermafdruk-van-2024-10-21-14-30-18.png) 4. Enter a name in the **Name** field. Choose a clear and logical name, such as Leaderboard or Interstitial. 5. Determine whether the format is part of a stack from the **Part-of** drop-down.A Stack format sends a list of ads that are available for display for that position. A stack is always a client-specific implementation.
6. (Optional) Select a JavaScript template file in the **Template file** drop-down. Refer to [Templates](https://documentation.adhese.org/books/adhese-ui/page/the-administration-screen#bkmrk-formats-and-template) for more information about template files. 7. If you choose to deliver multiple campaign bookings simultaneously (see [Delivery multiples](https://documentation.adhese.org/books/campaign-management/page/bookings#bkmrk-combination-or-deliv)), you will need to specify the order of the formats on the web page. In the **Trigger Order** field, enter a number that indicates the position of the format within the sequence of formats. 8. Enter the dimensions of the format in pixels in the **Width** and **Height** fields.You can configure a format to contain up to six images.
9. Enter the maximum file size of the format in kiloBytes in the **Max size (kB)** fields. 10. Skip the next property (Add URL?) as it is of no significance anymore. 11. In the **Tag** drop-down: - Select *yes* if the format is the main format.Do not forget to enter a code tag in the **Code tag** field (step 19), as a new tag is necessary for the main format.
- Select *no* if the format is a subformat.Do not forget to refer to the main format in the **Code book** field (step 17).
12. **Open creative previews in a new tab?** The default setting is *no*. When set to yes, the preview of a creative is shown in a new tab. 13. Select *yes* or *no* from the **Has completion rate events** drop-down to activate video reporting for the new format. 14.The transcodable option is currently not supported. Leave it on *no*.
15. If the format will be used in [Digital Out of Home (DOOH)](https://documentation.adhese.org/books/integration-setup/page/dooh-endpoints) positions, assets can be pre-loaded and cached by selecting *yes* in **Use in headsup file** (if the headsup endpoint is configured). 16. (Optional) Specify the foreign key of the format in the **Code Import** field to link Adhese to an existing external CMS. 17. Enter the name of the tag variable in the **Code book** field. If the format is a subformat, enter the tag code of the main banner. (Optional) 18. The Code MDB field is deprecated 19. Enter the name of the tag variable in the **Code tag** field. The code tags themselves are usually defined in the setup stage.A code tag is only required if the format is the main format (step 11). For example, if your main format runs on the BANNER tag, the tag code is BANNER.
20. (Optional) Provide a key in the **Code export** field to establish a link with an external database. The following table gives a few examples of completing the *Code tag* and *Code book* input fields for main and sub formats.| **Format name** | **Format type** | **Code tag** | **Code book** |
| Leaderboard | Main format | leaderboard | leaderboard |
| Homepage takeover (leaderboard + wallpaper) | Sub format | leaderboard | |
| Medium rectangle | Main format | rectangle | rectangle |
| Large rectangle | Sub format | rectangle |
You must save the main format again after creating a new subformat. For all existing main format positions, subformat positions will also be available on the booking screen.
# Edit a format To edit a format: 1. Go to the *Administration* screen. Click *Admin* in the left navigation menu. 2. Click *Formats*. 3. In the list of formats, click the format's name or click the edit icon [](https://documentation.adhese.org/uploads/images/gallery/2024-06/bVIyxmJCeT34tq7o-afbeelding.png) for the format you want to edit. The *Edit template* screen opens: [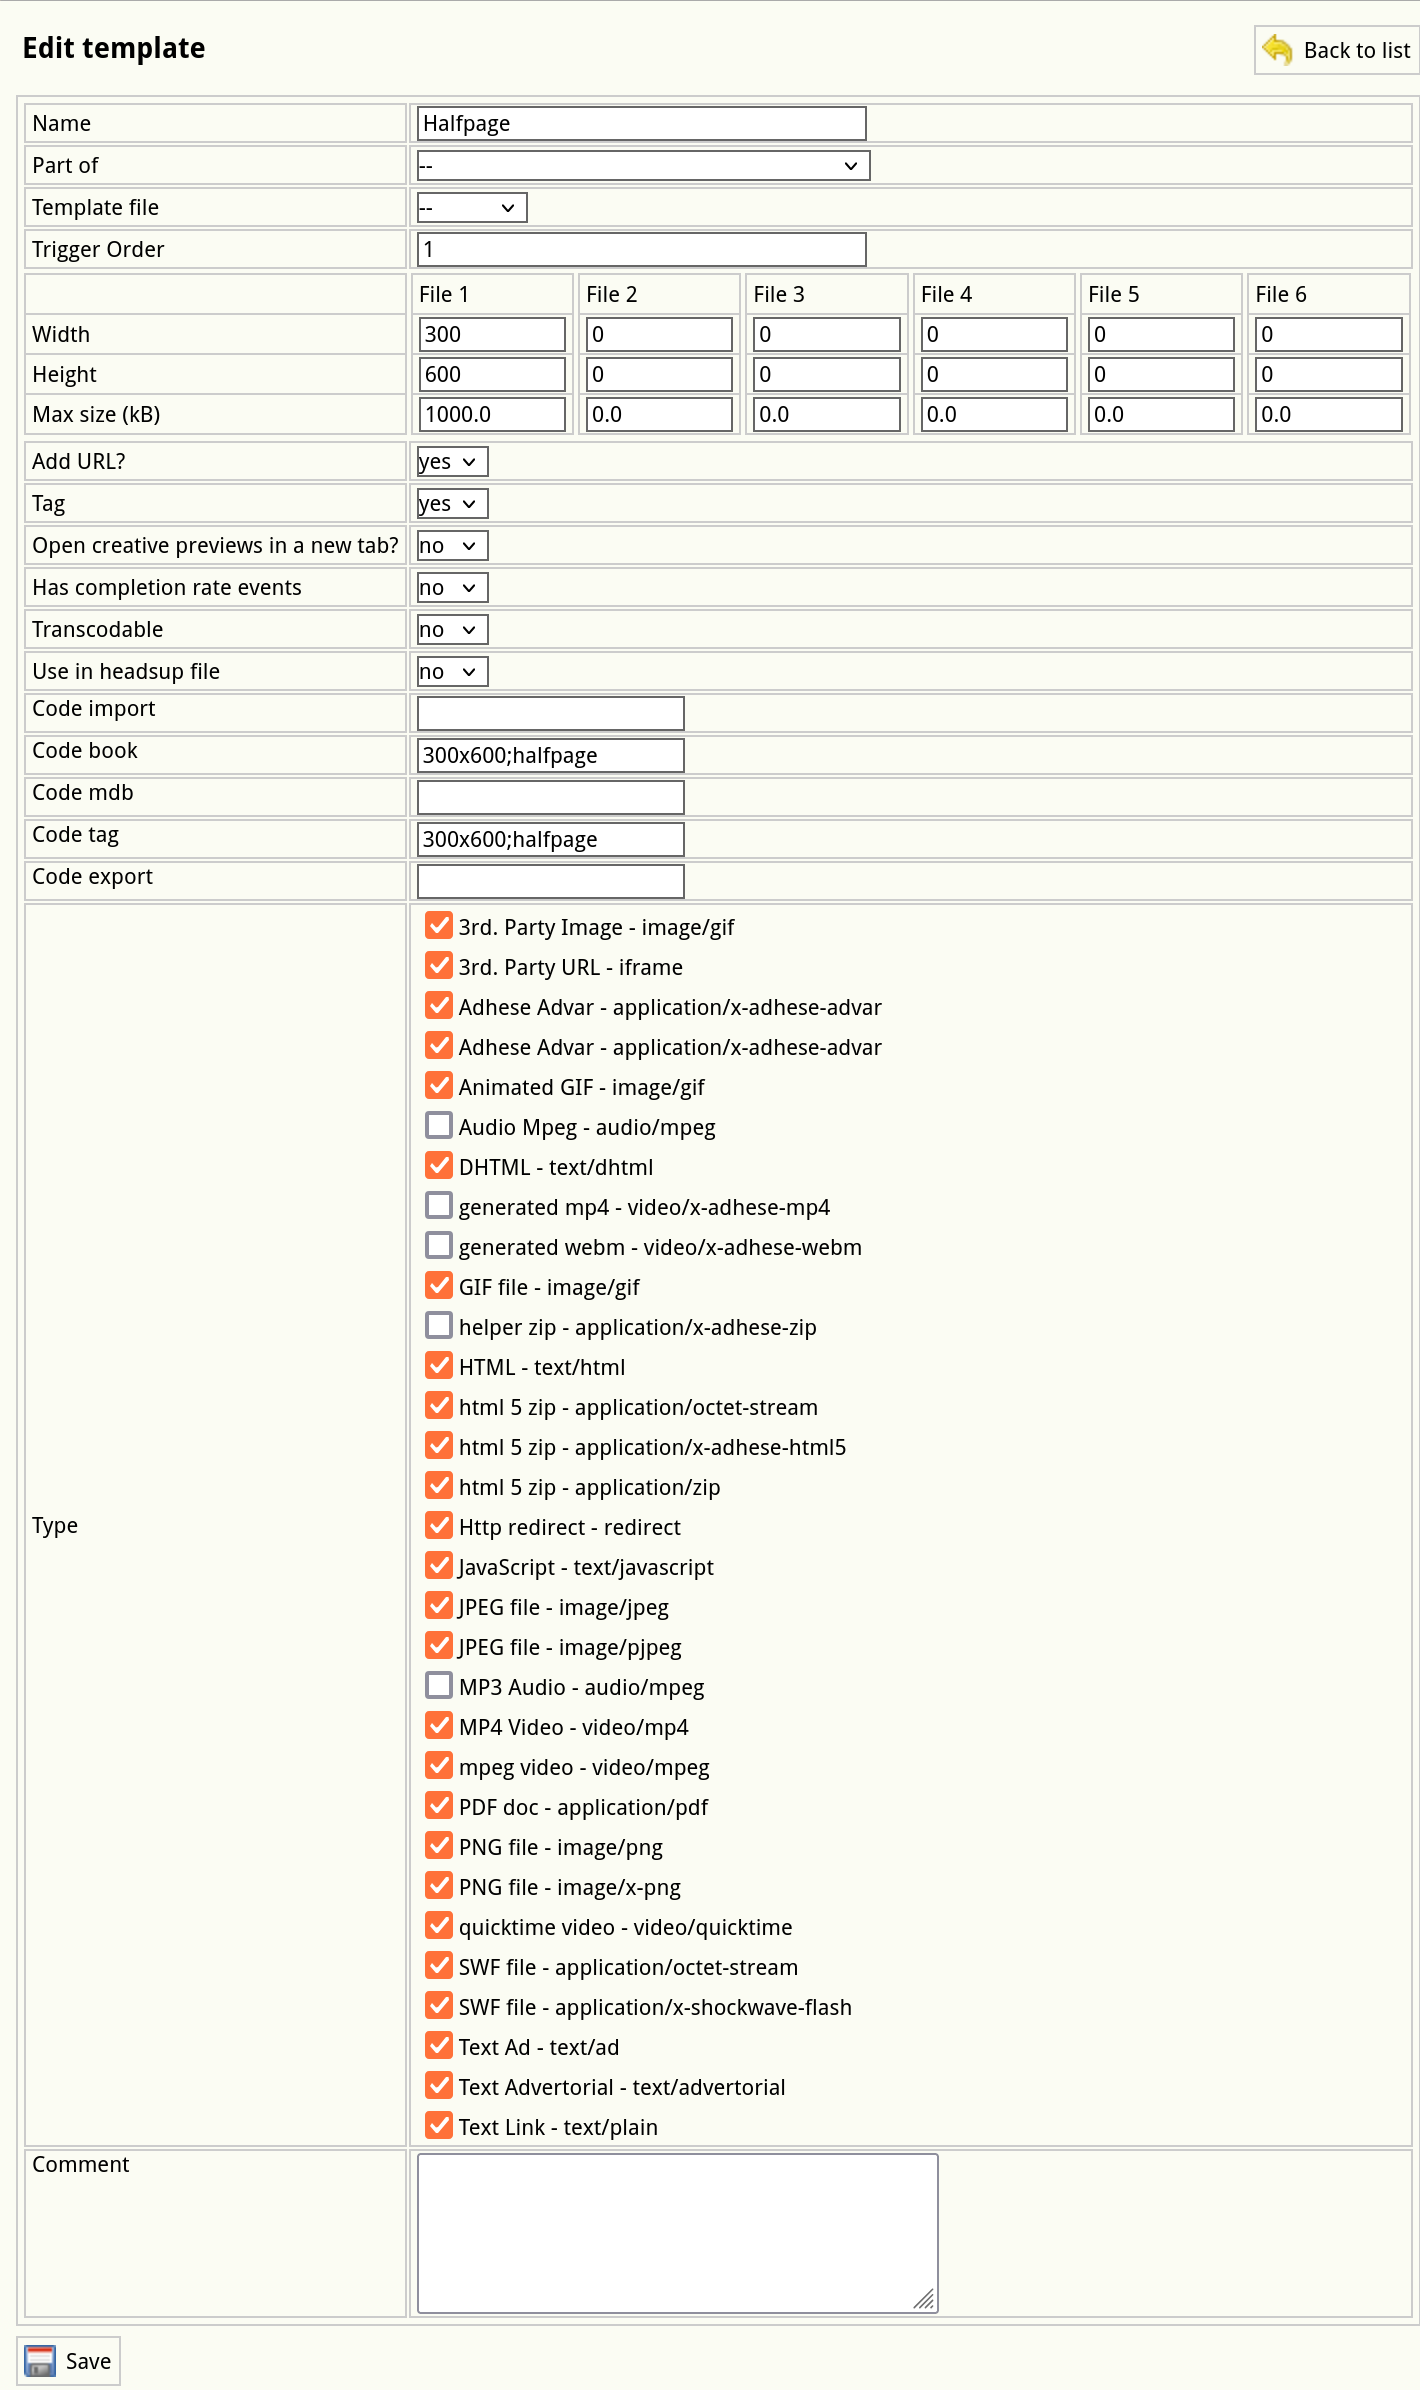](https://documentation.adhese.org/uploads/images/gallery/2024-10/qedNbVz4tAkUWHQm-schermafdruk-van-2024-10-22-10-26-12.png) 4. Change any of the format’s details. 5. Click *Save*. # Stacked format A *Stack* format sends a list of ads available to display for that position. The client (browser) decides which ad(s) to display. An example of a stacked format is a text link ad. To create a stacked format, add a new format: 1. Click *Admin* in the left navigation menu. This opens the *Administration* screen. 2. Click *Formats*. The *Formats* screen opens: [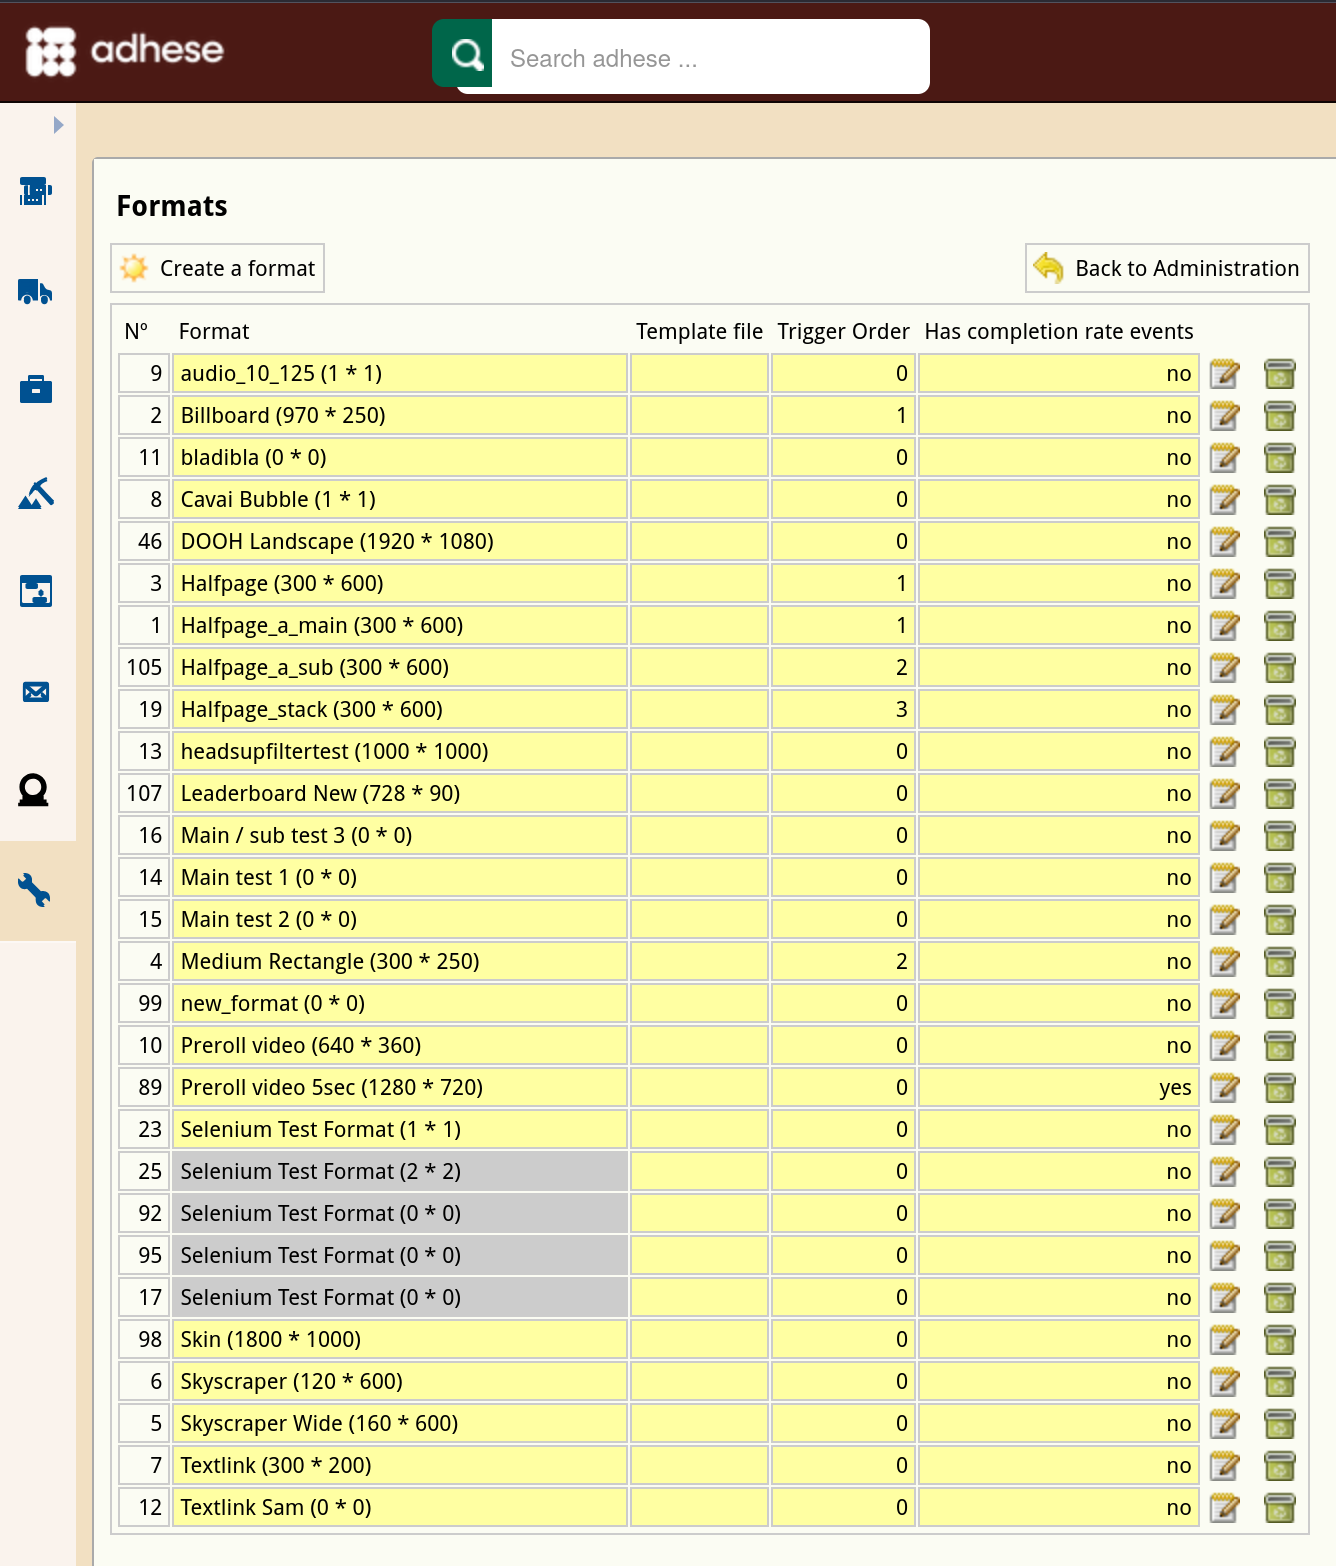](https://documentation.adhese.org/uploads/images/gallery/2024-10/nei7BiRgT8yMuXop-schermafdruk-van-2024-10-21-13-51-38.png) 3. Click the *Create a format* button. The *Create a new format* screen opens: [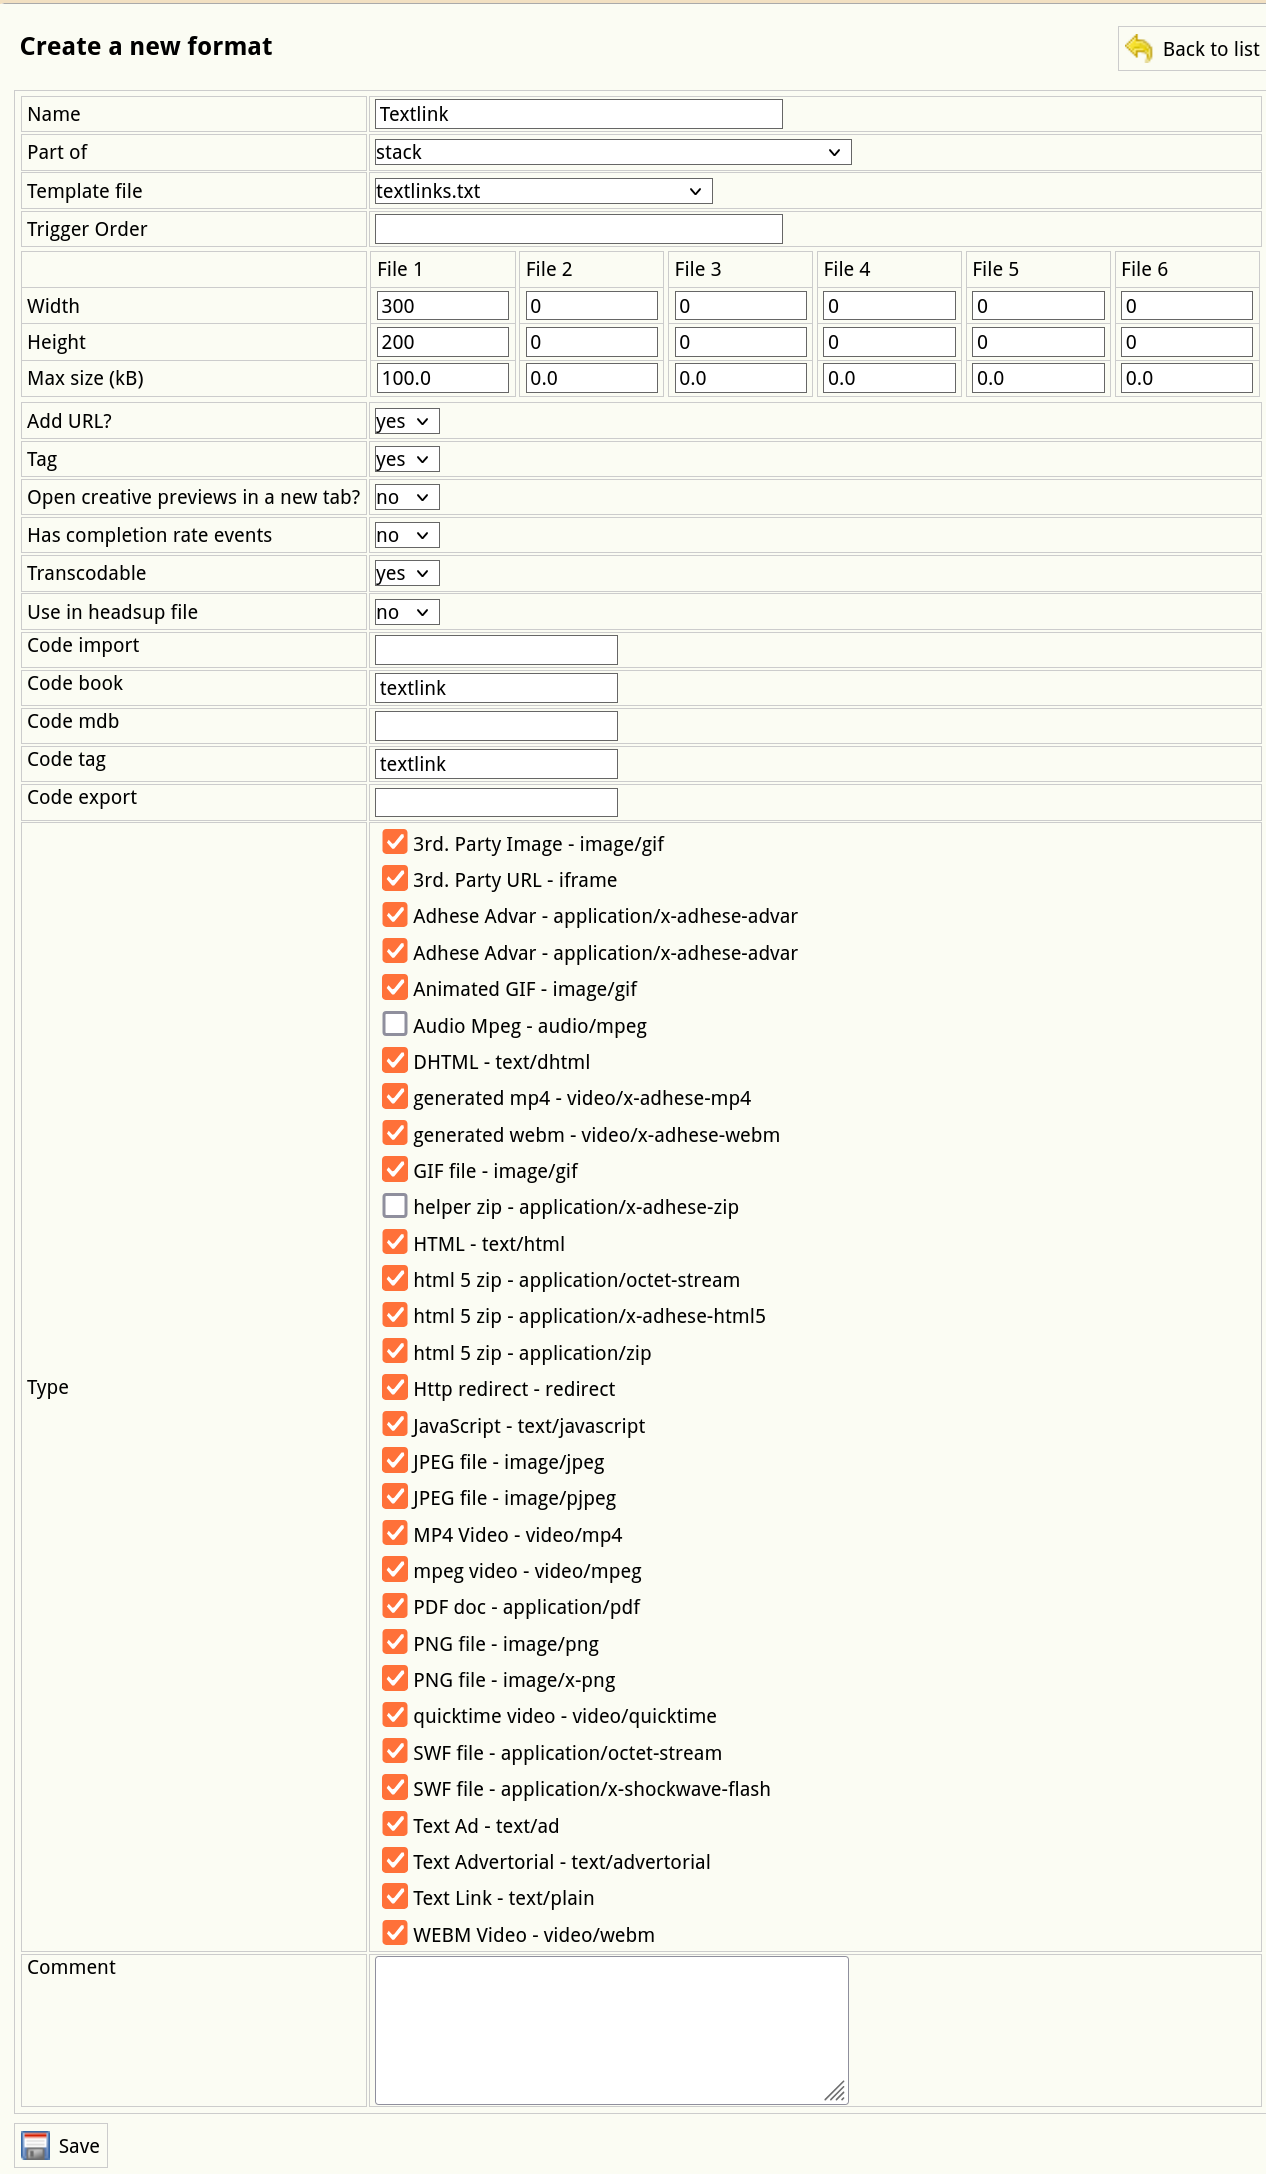](https://documentation.adhese.org/uploads/images/gallery/2024-10/Gc6ShFAxvKgNSXnw-schermafdruk-van-2024-10-21-14-45-42.png) 4. Define the following properties that are necessary for the correct implementation of a stacked format: 1. From the **Part-of** drop-down, select *Stack* to define the format as a stack format. 2. Select the correct JSON template from the **Template file** drop-down. Do not select a template if you plan to use an [Advar template](https://documentation.adhese.org/books/inventory-setup/page/templates#bkmrk-advar-templates) to return a JSON object. 3. Indicate the **Type** of the format, such as a third-party URL or image, video, animated GIF, or text ad. 5. Click the *Save* button beneath the form to save your new format. # Positions All necessary elements of a position, namely the [publication](https://documentation.adhese.org/books/inventory-setup/page/publications), [location](https://documentation.adhese.org/books/inventory-setup/page/locations) and [format](https://documentation.adhese.org/books/inventory-setup/page/formats), are available now. In the simplified diagram of the inventory’s structure, we have inserted a subset of the newly created publications, locations and formats: [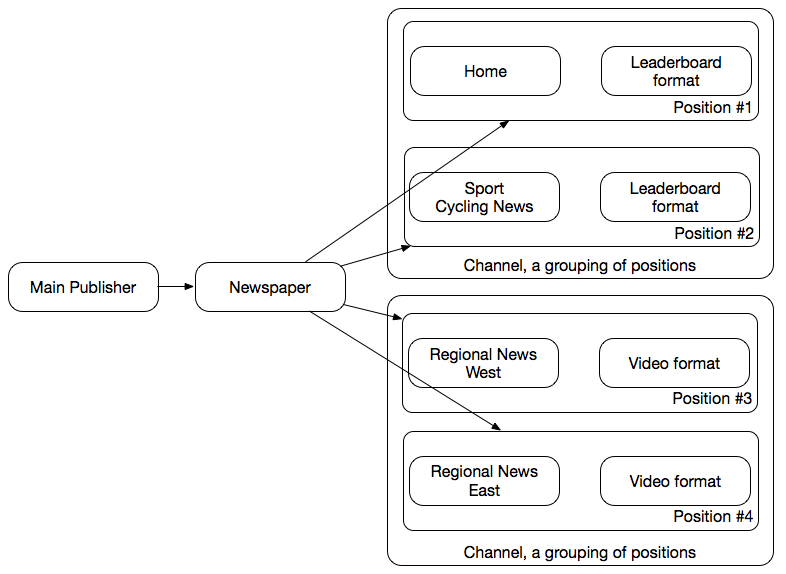](https://documentation.adhese.org/uploads/images/gallery/2024-06/q3TkNd7locZo6sx5-positions1.png) # Create a position The *Positions* screen consists of a table with nine columns: 1. The *#* column displays the ID of the location. 2. The *Location* column shows the name of the publication and the location of the position. 3. The *Name* column details the (optional) name of the position. 4. The *Format* column indicates the format of the position. 5. The *Width* column specifies the width of the format. 6. The *Height* column specifies the height of the format. 7. The *Size (kB)* column displays the maximum file size of the format. 8. The *Position type* column details the [position type](https://documentation.adhese.org/books/inventory-setup/page/positions#bkmrk-position-types) of the position. 9. The content of the *Subformats* column is hidden by default. To display the content, click *Show*. The *Subformats* column shows all subformats that belong to the position's format. To filter the *Positions* belonging to a specific publication, select a publication from the **Show only** drop-down menu above the list and click the magnifying glass icon. You can also filter the *Positions* screen by the status of a position's connected format using the **Filter** drop-down menu. Determine the number of results to display from the **Number of results** drop-down. Use the **search** bar to search for specific positions, e.g. by entering a subformat. You can sort the list of positions by location, the name of the position, or the format by clicking the relevant table column's heading. Download a **spreadsheet** file that contains a list of all positions by clicking the *Download all positions as spreadsheet* button. ### Create a new position To create a new position for each desired combination of a format and location of a publication: 1. Click *Admin* in the left navigation menu. This opens the *Administration* screen. 2. Click *Positions*. The *Positions* screen opens: [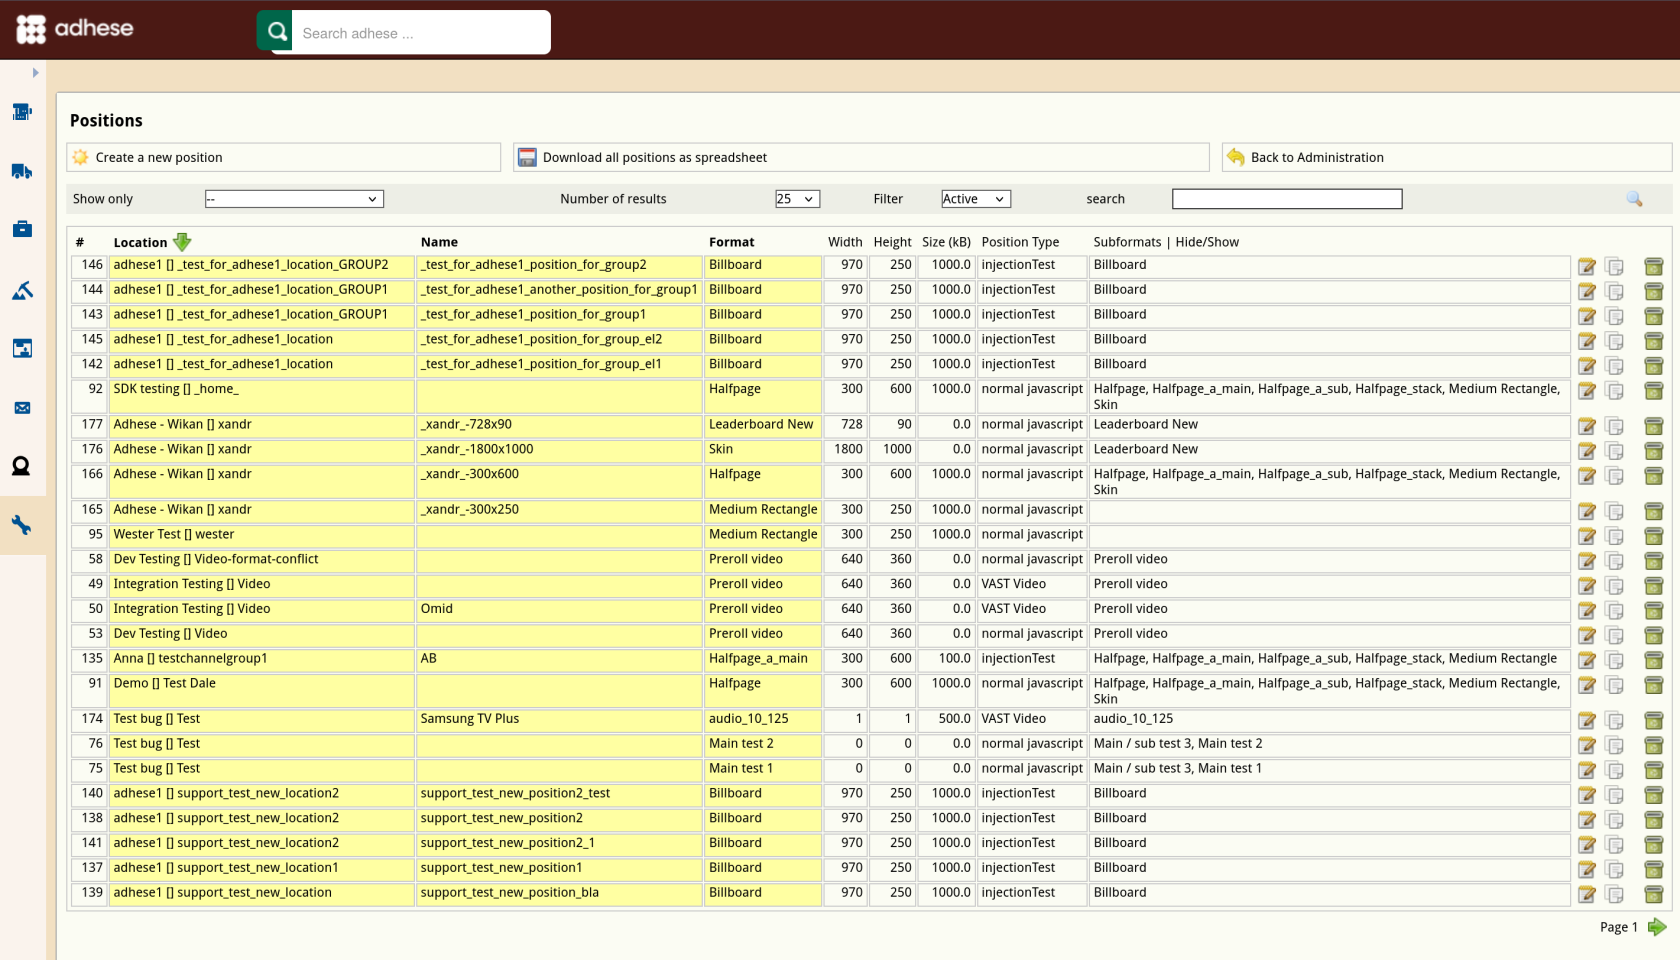](https://documentation.adhese.org/uploads/images/gallery/2024-10/rGfAjx3Q4Rf2nTMb-schermafdruk-van-2024-10-22-09-59-58.png) 3. Click the *Create a position* button. This opens the *Create a new position* screen. [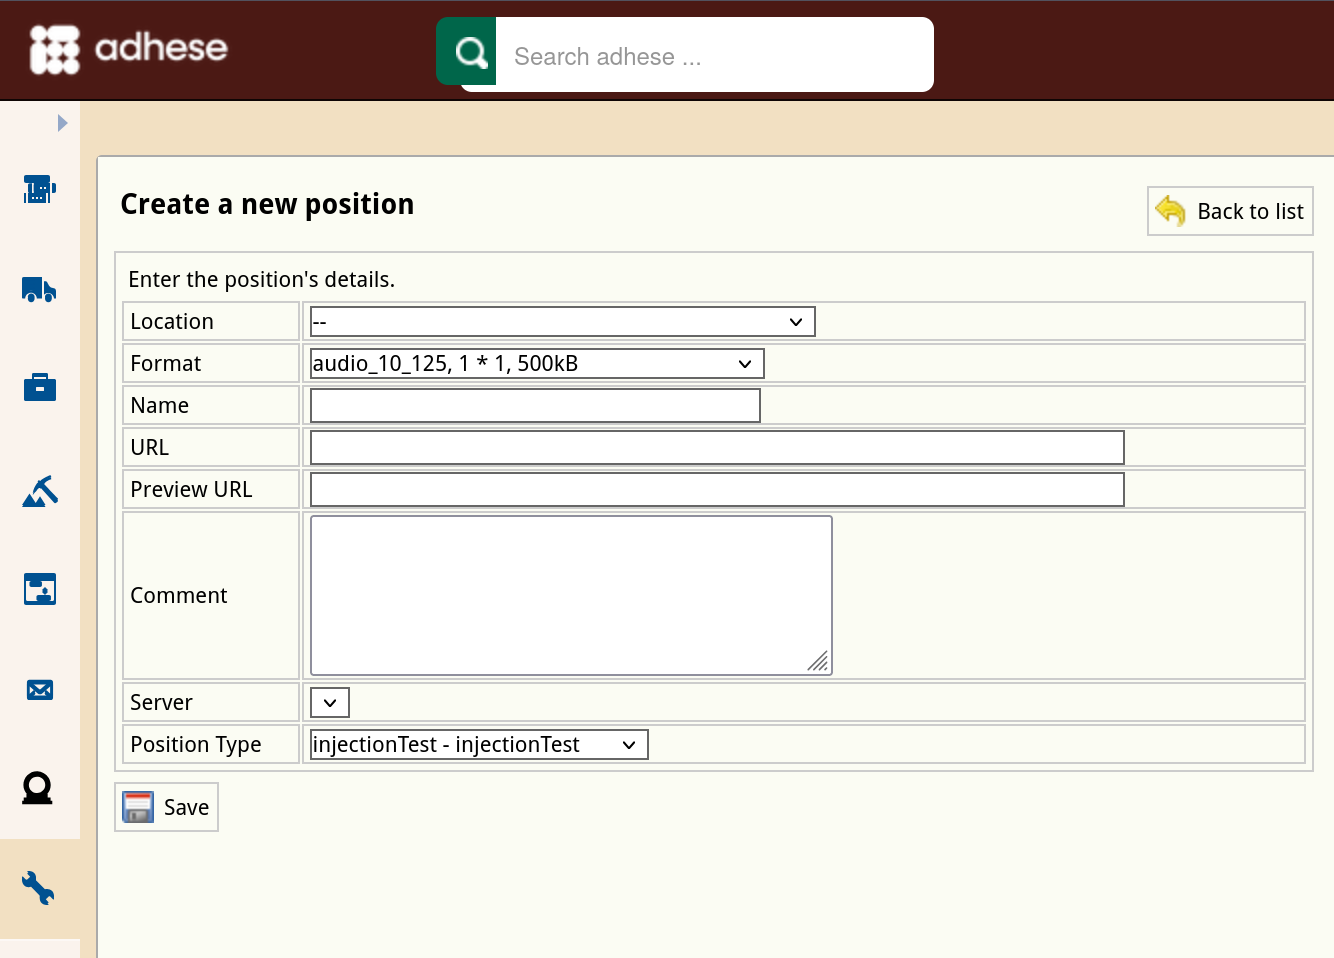](https://documentation.adhese.org/uploads/images/gallery/2024-10/8bpvfyIeV4I6suuj-schermafdruk-van-2024-10-22-10-15-45.png) 4. Choose a location from the **Location** drop-down. 5. Choose a format from the **Format** drop-down. 6. (Optional) Enter a name for the position in the **Name** field. 7. If you wish to serve, for example, a leaderboard banner ad in the header and the footer of the homepage, you have two identical formats but at a different position. To differentiate between positions, enter a unique integer number and/or string of characters in the URL field for each subsequent position. 8. (Optional) In the **Preview URL** field, enter a URL for live previewing a creative. Instead of linking the preview URL to a publication, you can select a specific page where this position will appear. 9. (Optional) Enter a comment in the **Comment** field. 10. Skip the next property (Server) as it is of no significance anymore. 11. Select a position type from the **Position type** drop-down. Refer to [Position types](https://documentation.adhese.org/books/inventory-setup/page/positions#bkmrk-position-types) for a more detailed explanation of this concept. 12. Click the *Save* button beneath the form to save your new position.To create a position with similar properties as an existing position, you can copy the existing position.
### Edit a position To edit a position: 1. Go to the *Administration* screen. Click *Admin* in the left navigation menu. 2. Click *Positions*. 3. In the list of positions, click the name of the position or click the edit icon [ ](https://documentation.adhese.org/uploads/images/gallery/2024-06/IstAXFeUKktevMfN-afbeelding.png)for the position you want to edit. The *Edit position* screen opens: [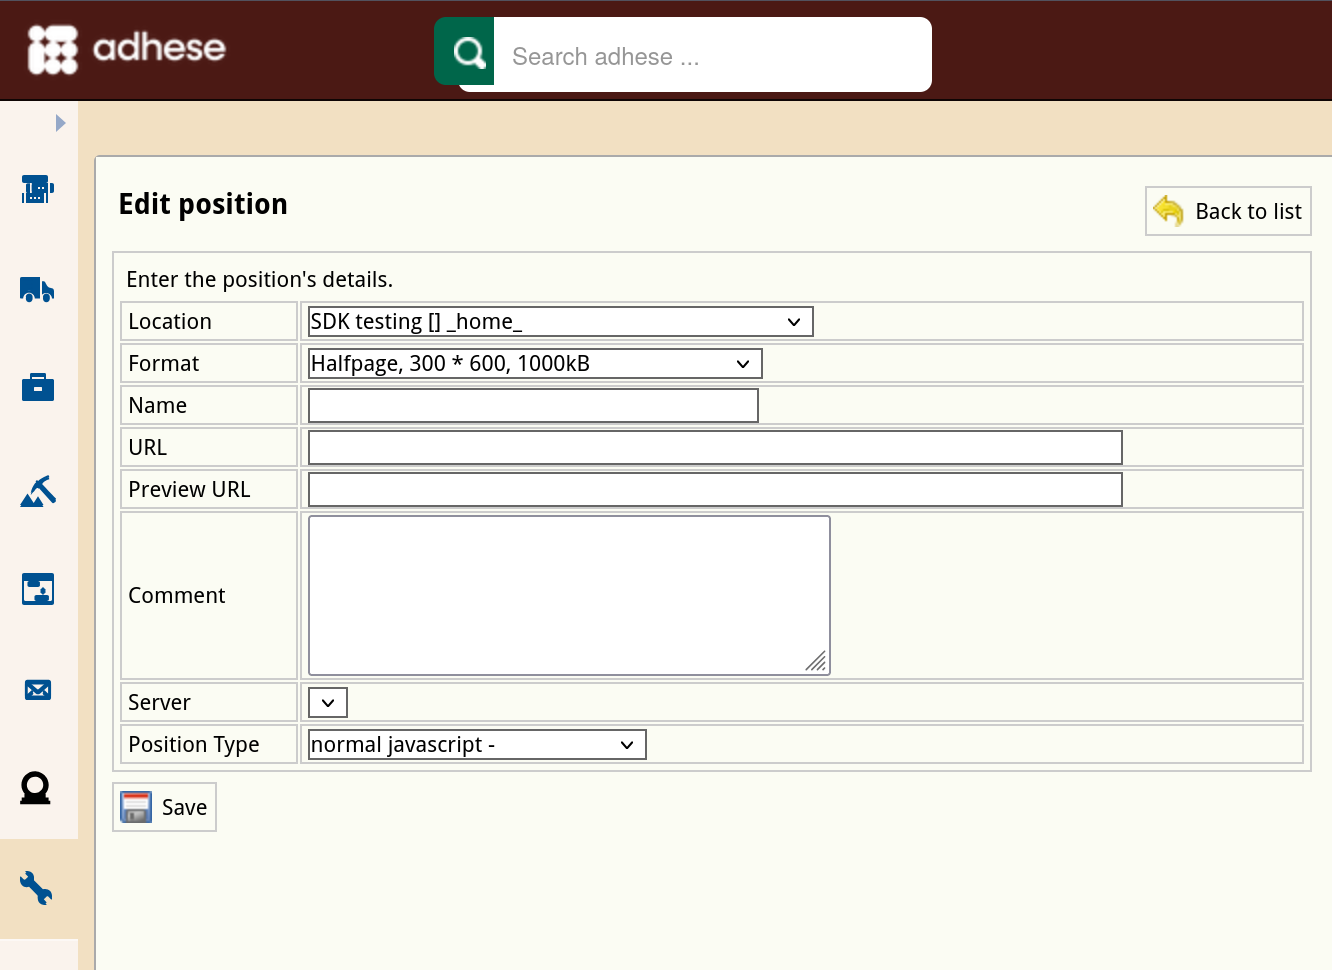](https://documentation.adhese.org/uploads/images/gallery/2024-10/Ka61Thjzbny12V1e-schermafdruk-van-2024-10-22-10-18-17.png) 4. Change any of the position’s details. 5. Click *Save*. ### Copy a position Copying a position is a simple method of creating a new position with similar properties to an existing one. To copy a position: 1. Go to the *Administration* screen. Click *Admin* in the left navigation menu. 2. Click *Positions*. 3. Click the copy icon [](https://documentation.adhese.org/uploads/images/gallery/2024-06/TYPfr7kY2qMK94QR-afbeelding.png) for the position you want to copy. The *Edit position (this is a copy)* screen opens: [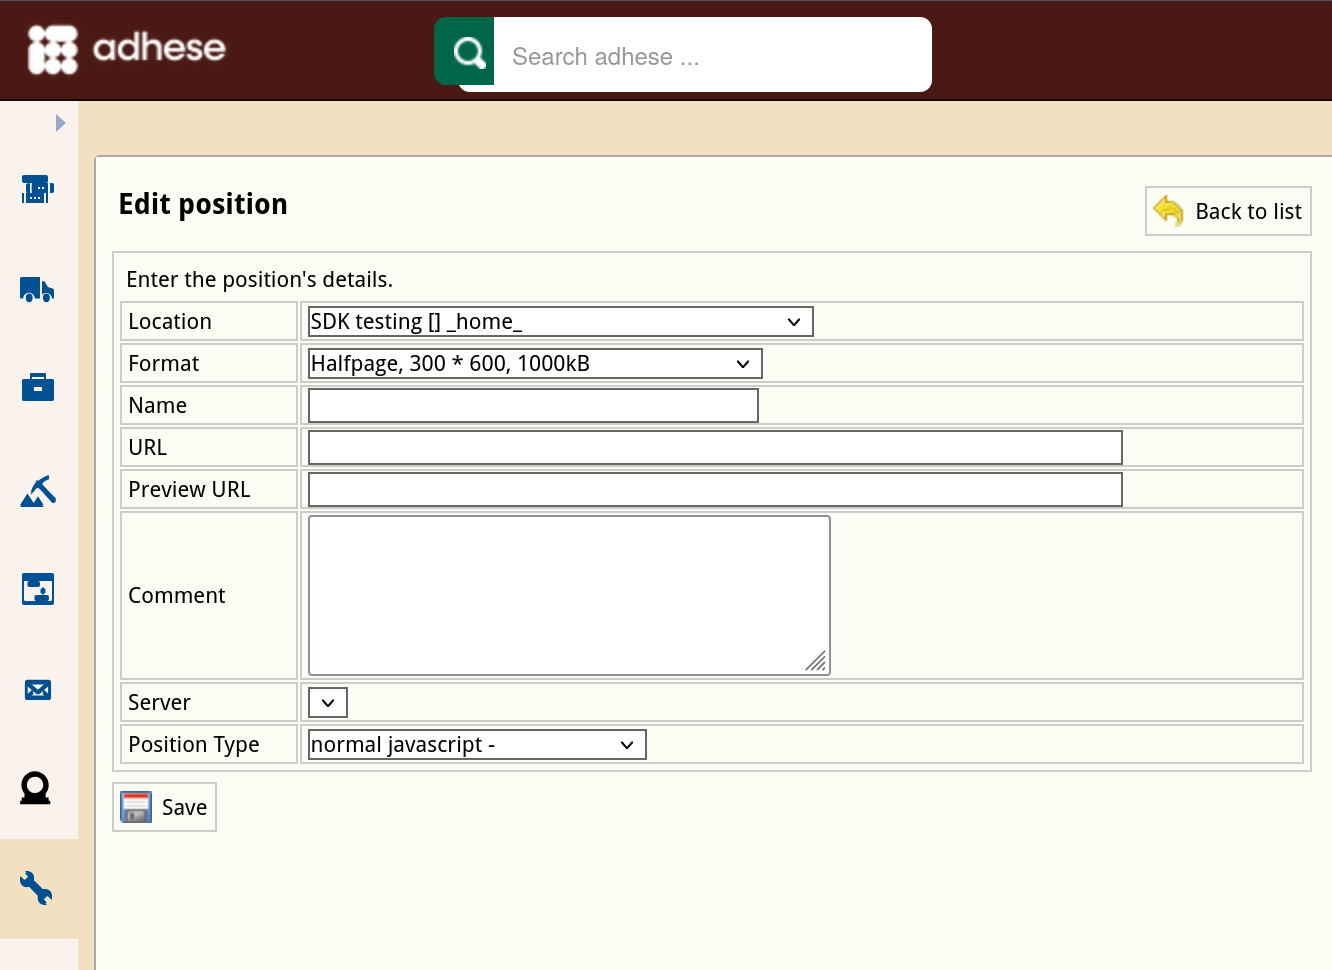](https://documentation.adhese.org/uploads/images/gallery/2024-10/4TMpDMxZYzDnu30w-schermafdruk-van-2024-10-22-10-18-17.png) 4. Change any of the position’s details. 5. Click *Save*. ### Delete a position To delete a position: 1. Go to the *Administration* screen. Click *Admin* in the left navigation menu. 2. Click *Positions*. 3. In the list of positions, click the publisher's name or click the trash can icon [](https://documentation.adhese.org/uploads/images/gallery/2024-06/4akUlCmC1bDKiPTu-afbeelding.png)for the position you want to delete. 4. Click the **Yes, remove this position** button to confirm. If a position has delivered impressions in the past and is deleted, it will be set to inactive. Reports stay available after the removal of a position. # Position types Position types add additional functionality to a position. Their main purpose is to define the MIME type of the response and the possible templates wrapped around the output.A MIME type or Internet Media Type is used to ensure that the receiver correctly interprets the resource. A MIME type indicates the type of data contained in a file. Web browsers use MIME types to determine how to display files that are not in HTML format.
Position types are client-specific implementations that are defined in the setup stage. The *Position types* screen presents a table with three columns: 1. The *N**o* column displays the ID of the position type. 2. The *Position type* column shows the name of the position type. 3. The *Template* column shows the template that belongs to the position type. ### Create a new position type To add a position type: 1. Click *Admin* in the left navigation menu. This opens the *Administration* screen. 2. Click *Position types*, the *Position types* screen opens: [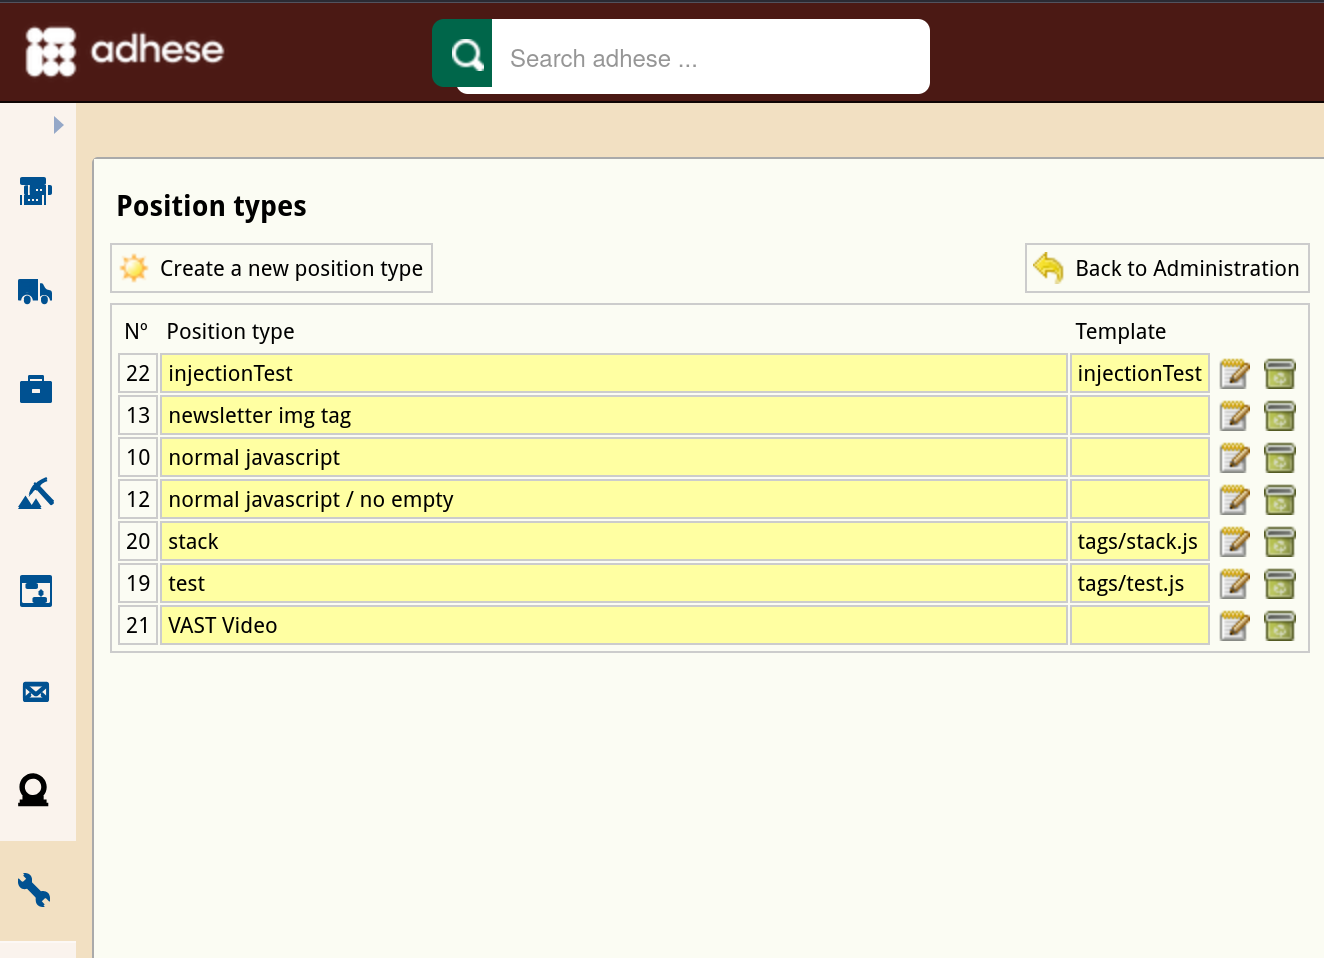](https://documentation.adhese.org/uploads/images/gallery/2024-10/s2BQ9QgPy7CAickm-schermafdruk-van-2024-10-22-10-23-47.png) 3. Click the *Create a new position type* button. The *Create a new position type* screen opens: [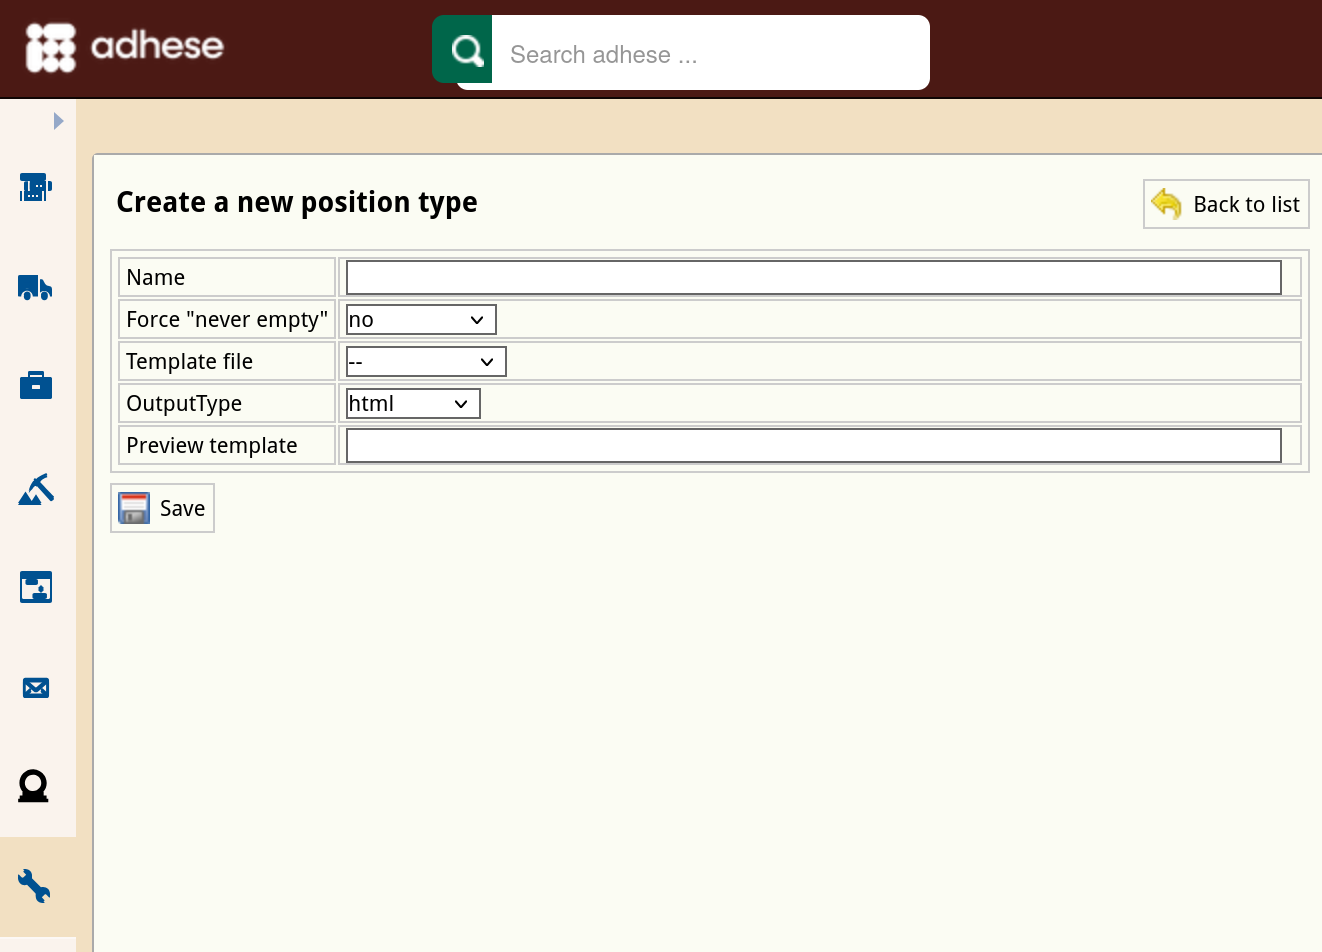](https://documentation.adhese.org/uploads/images/gallery/2024-10/pWAf7rkBMfQipIdm-schermafdruk-van-2024-10-22-10-24-09.png) 4. Enter a name for the position type in the **Name** field*.* 5. In the **Force “Never empty”** drop-down, select one of the following: - Select ***Yes*** to ensure that the position always displays an ad. This is particularly useful when a web page would otherwise break if no ad is available. - ***Continuous*** is a specific option for email campaigns. Select *Continuous* to equate the delivery period of the booking to the delivery period of the email campaign. The booking will show a configurable number of days before and after the start and end date. If you create a booking for this position, you will receive the following notification: [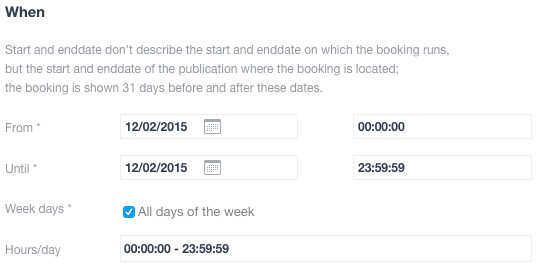](https://documentation.adhese.org/uploads/images/gallery/2024-06/AtEHjpNC0GEyTmCZ-create-a-new-position-type3.png)Make sure the request contains the da (date) parameter.
- Select ***No*** if none of the above options applies. 6. (Optional) Select a template file from the **Template file** drop-down. Refer to [Templates](https://documentation.adhese.org/books/adhese-ui/page/the-administration-screen#bkmrk-formats-and-template) for more information about template files. 7. Select an output type (*JavaScript*, *HTML*, *filename*, or *XML*) from the **Output type** drop-down. 8. (Optional) In the **Preview template** field, provide a template if a template is necessary to render the preview correctly. 9. Click the *Save* button. ### Edit a position type To edit a position type: 1. Go to the *Administration* screen. Click *Admin* in the left navigation menu. 2. Click *Position types*. 3. In the list of position types, click the name of the position type or click the edit icon [](https://documentation.adhese.org/uploads/images/gallery/2024-06/IstAXFeUKktevMfN-afbeelding.png) for the position type you want to edit. The *Edit position type* screen opens: [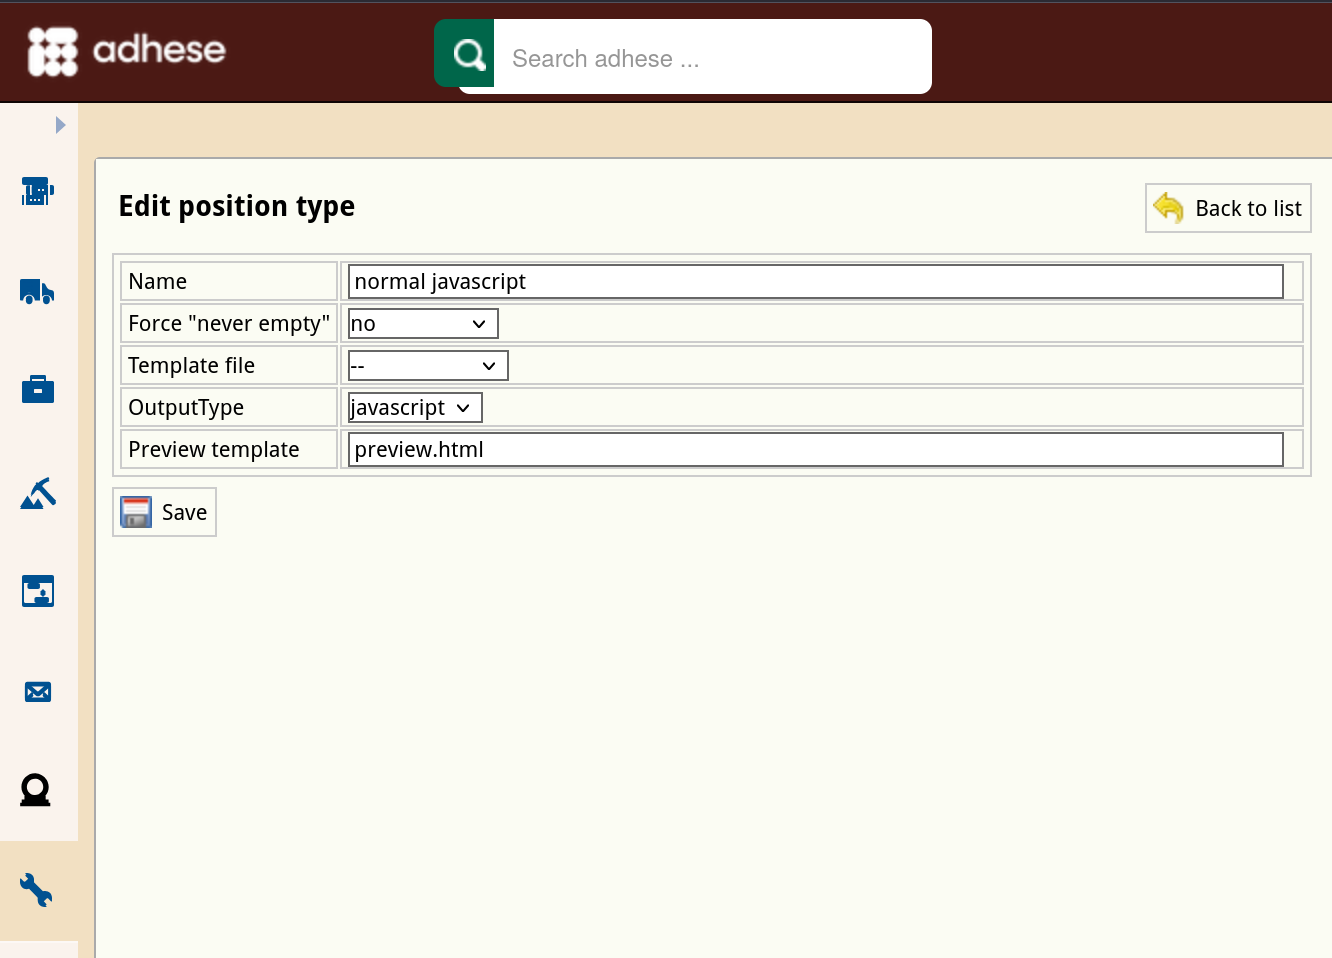](https://documentation.adhese.org/uploads/images/gallery/2024-10/42EksCnTUkhpWQTv-schermafdruk-van-2024-10-22-10-24-50.png) 4. Change any of the position type’s details. 5. Click *Save*. # Channels Channels are a collection of positions within a publication (e.g. run-of-site) or across your network of publications (e.g. run-of-network). **Channels** group identical formats across different locations and make it easy to target ads across similar web pages. All our [forecasting](https://documentation.adhese.org/books/adhese-ui/page/inventory-screenforecasting#bkmrk-inventory-%2F-forecast) options include channels. The *Channels* screen shows a table with three columns: 1. The *No* column displays the ID of the location. 2. The *Channels* column shows the name of the publication, location, and format. 3. The *No* of items column indicates for each channel the number of items it incorporates. Download a **spreadsheet** file that contains a list of all channels by clicking the *Download all channels as spreadsheet* button. # Create a new channel To create a new channel: 1. Create a new location; see [Create a new location](https://documentation.adhese.org/books/inventory-setup/page/locations#bkmrk-create-a-new-locatio) chapter.Do not forget to select a group level in the **Channel** drop-down. The highest group level is 1. The higher the number the lower the group level. For more information on group levels, see [this page](https://documentation.adhese.org/books/campaign-management/page/the-delivery-scheme-of-adhese-explained#bkmrk-location-level).
2. Create a new position; see [Create a new position](https://documentation.adhese.org/books/inventory-setup/page/positions#bkmrk-create-a-new-positio) chapter. 3. Click *Channels* in the *Administration* screen. The *Channels* screen opens: [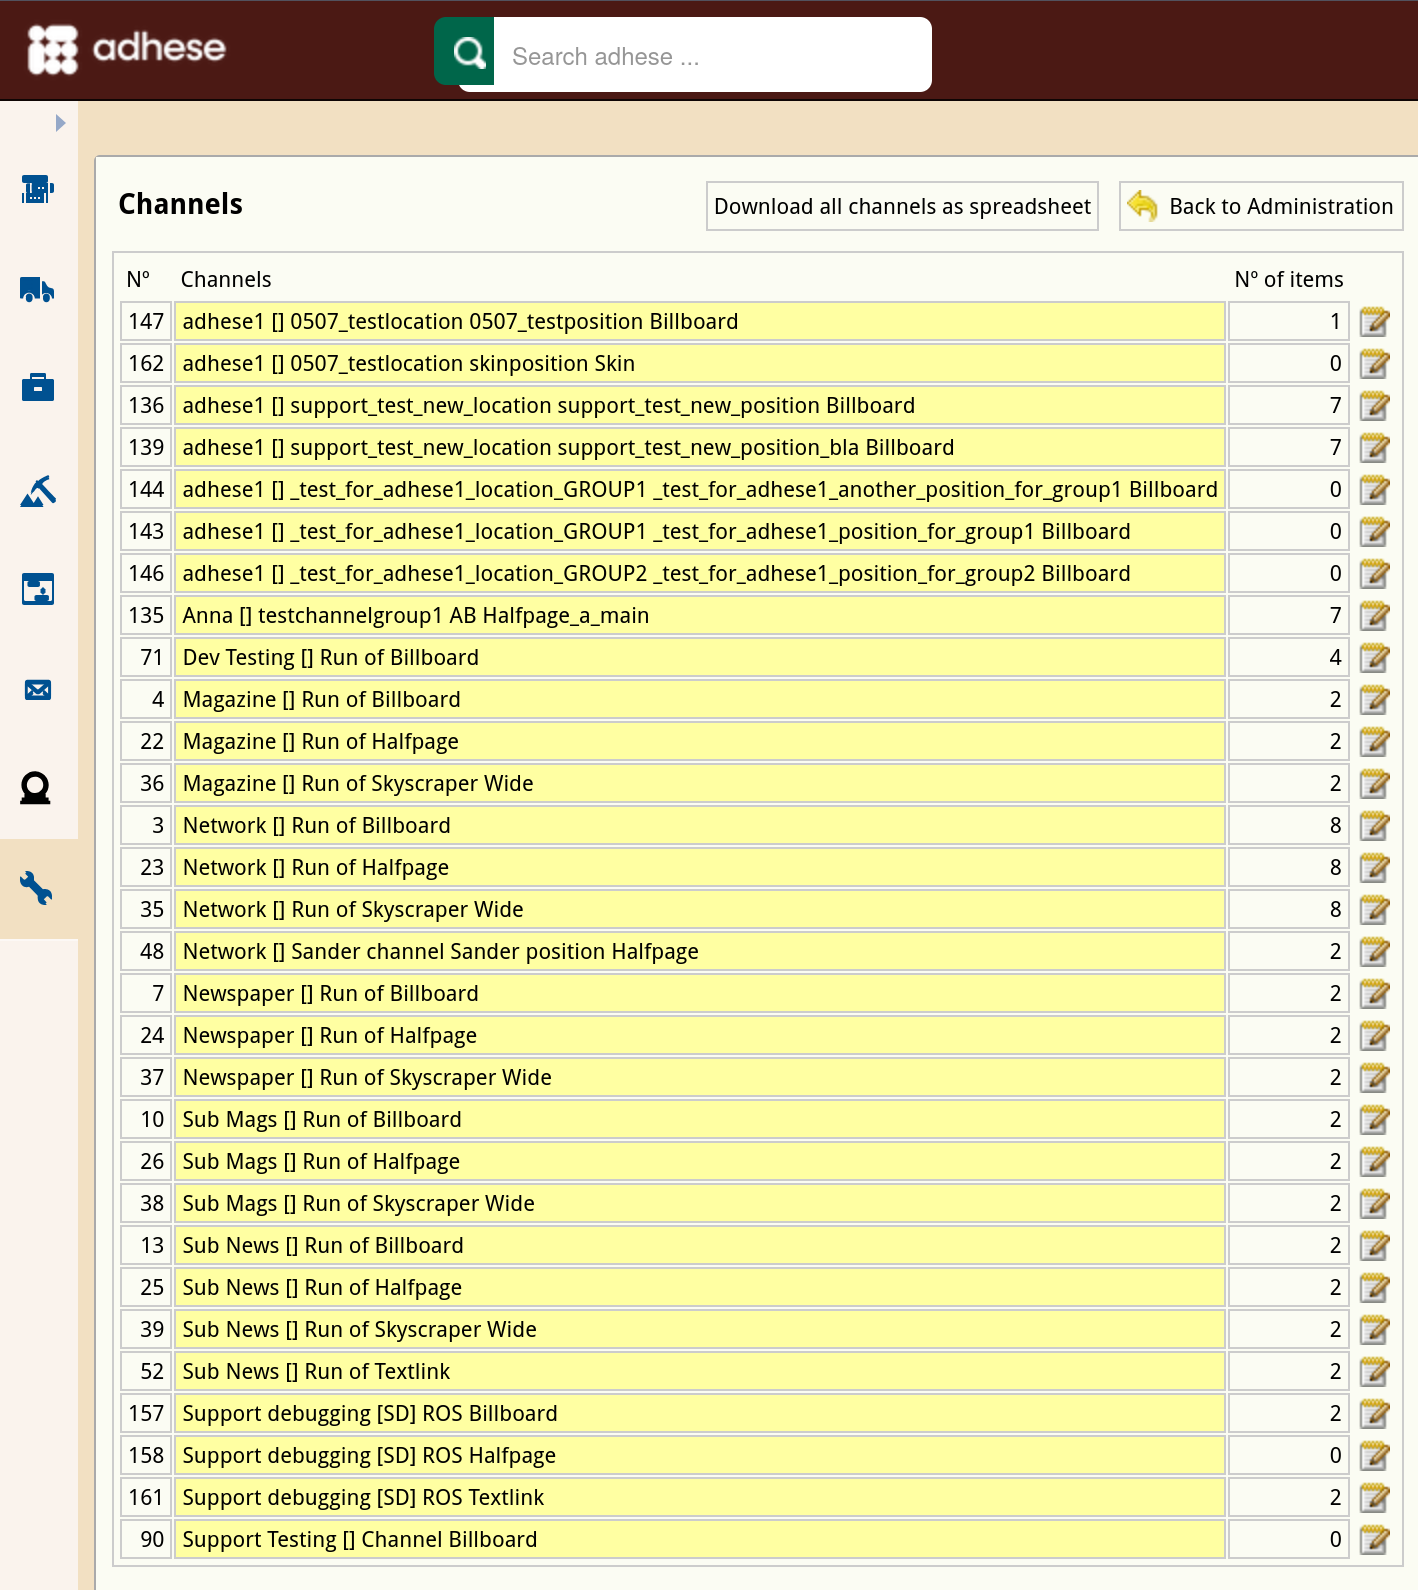](https://documentation.adhese.org/uploads/images/gallery/2024-10/97264bl4BsHRSsXx-schermafdruk-van-2024-10-22-13-20-11.png) 4. Click the channel position you have just created. The *Edit channel* screen opens. Based on the selected format, all available positions across your entire network appear in the left column. [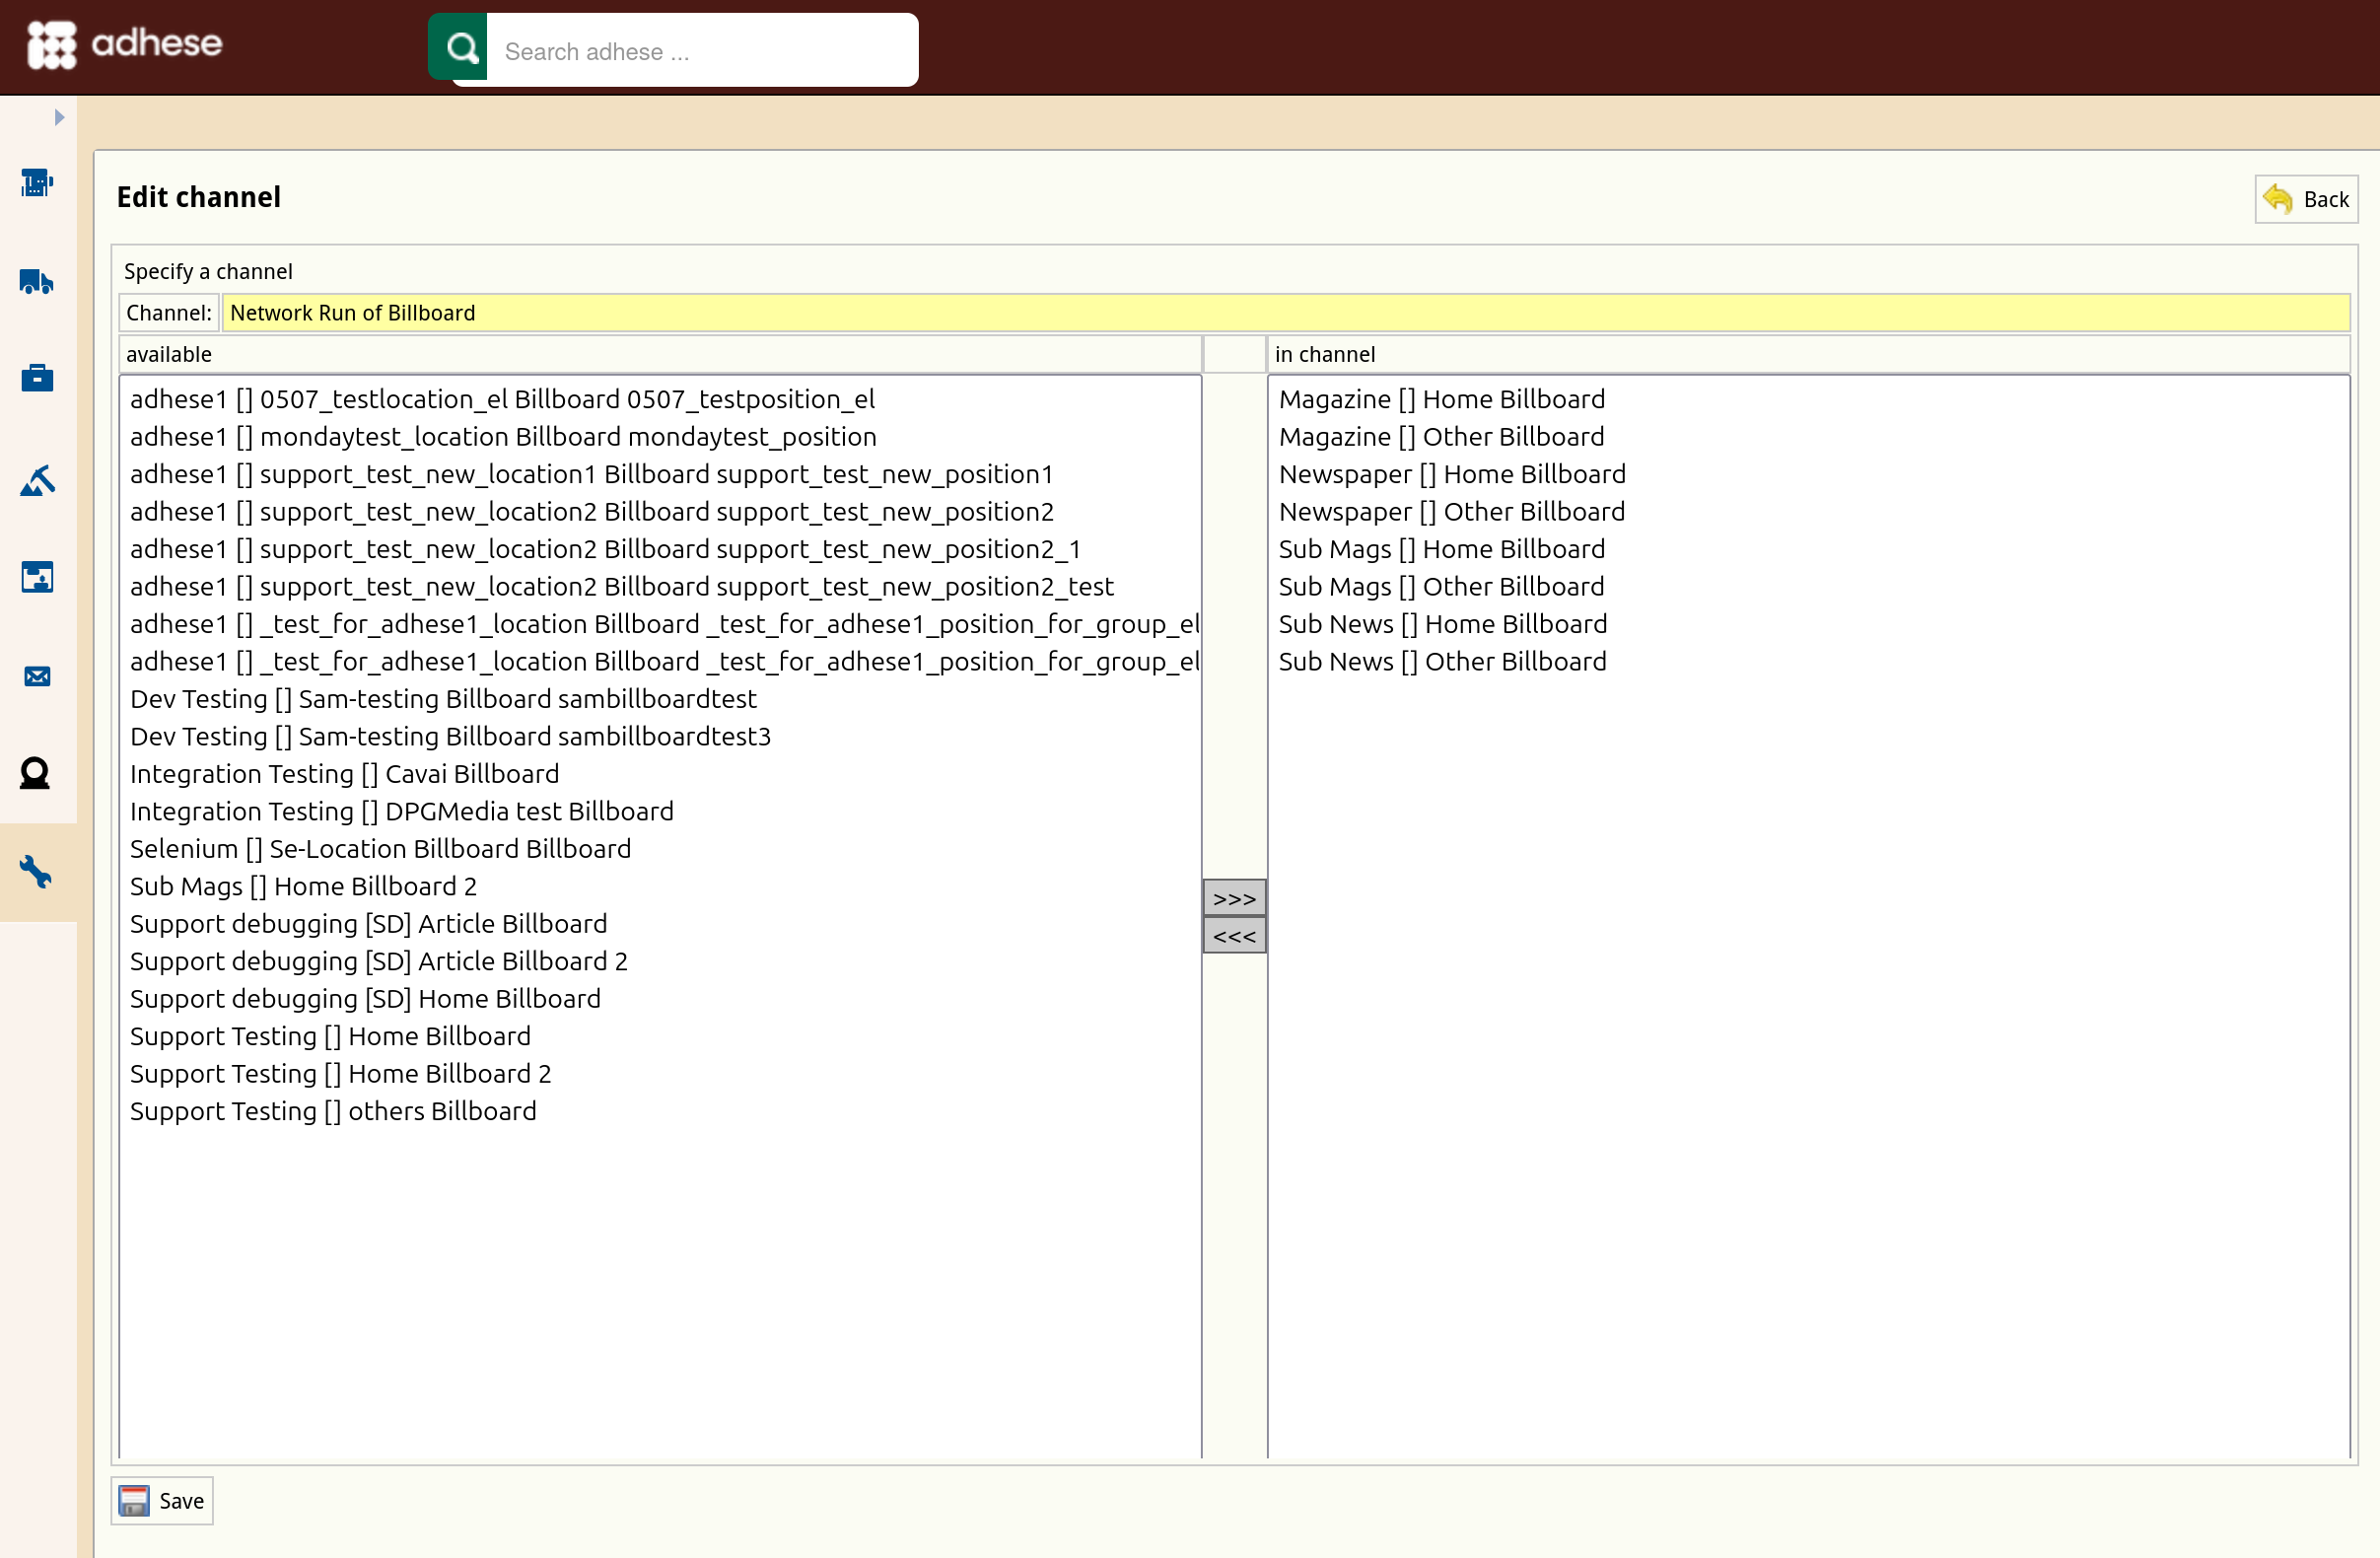](https://documentation.adhese.org/uploads/images/gallery/2024-10/aTYPBtxtBHFH22XR-schermafdruk-van-2024-10-22-13-21-08.png) 5. To add a position to the channel, select a position from the list of available positions on the left and click the >>> button. 6. To remove a position from the channel, select a position from the right-hand list of positions in the channel and click the <<< button. 7. Click the *Save* button to finish. # Edit a channel To edit a channel: 1. Go to the *Administration* screen. Click *Admin* in the left navigation menu. 2. Click *Channels*. The *Channels* screen opens. 3. On the *Channels* screen, click the name of the channel you want to modify or use the edit icon [](https://documentation.adhese.org/uploads/images/gallery/2024-06/Gk6rxgFjOAIS2eci-edit.png). The *Edit channel screen* opens. 4. Change the channel by: 1. Including additional positions: 1. Select the position from the list on the left, and 2. Click the >>> button. 2. Excluding positions from the channel: 1. Select the position from the list on the right, and 2. Click the <<< button. 5. Click *Save*. # List all channels and positions To obtain a list of all Channels and positions, and a list of all positions that are not currently in a Channel, go to Administration and click *Channels*. On the *Channels* screen, click the *Download all channels as spreadsheet* button. The spreadsheet contains two tabs: - **Positions**, listing all channels and the positions they currently contain, with the following columns: - Position ID - Position publication - Position location - Position format - Channel ID - Channel publication - Channel location - Channel format - Channel group level - **Positions not in channels**, listing all positions not currently in a channel, with the following columns: - Position ID - Position publication - Position location - Position format # Request Endpoints Adhese supports the integration of the Adhese ad server into mobile applications using **ad tags**. Ad tags are code snippets that inform the Adhese ad server about the available inventory it can target. To achieve this, an ad request URL is sent with all the necessary information and targeting parameters. Adhese responds to this request with a JSON response that allows the application to deliver an ad and correctly track its impressions and clicks. ## URL structure An example of a request URL that contains only the basic (**required**) parts: [ `https://ads-demo.adhese.com/json/sl_sdk_example_-leaderboard/?t=244.18664863333106` ](https://ads-demo.adhese.com/json/sl_sdk_example_-leaderboard/?t=244.18664863333106) - `https://ads-[account].adhese.com` - You can find the value of the account attribute in your Adhese subscription information or through our support portal. - `/json/` - Adding this part to the URL makes sure that the result you receive is JSON formatted. - JSON has a fixed structure and, therefore, fixed fields. Refer to the [List of JSON response structure object fields](https://documentation.adhese.org/books/integration-setup/page/json-endpoint-full-response-structure) for an explanatory list of the fields. - `/sl[location code]-[format code]/` - `sl` Is the prefix for the section which contains the [position](https://documentation.adhese.org/books/inventory-setup/page/positions) information and is followed by two codes, separated by a dash `-` . - The location code has to match the **URL code** of the corresponding [location](https://documentation.adhese.org/books/inventory-setup/page/locations) in Adhese. - The format code has to match the **code tag** of the [format](https://documentation.adhese.org/books/inventory-setup/page/formats) you wish to request. - `?t=[timestamp]` - It is necessary to add a timestamp to avoid caching issues. ### Additional parameters The request URL can contain additional parameters for [Targeting](https://documentation.adhese.org/books/campaign-management/page/bookings#bkmrk-targeting). An URL that contains targeting will look like this: [`https://ads-demo.adhese.com/json/sl_sdk_example_-leaderboard/brChrome;OSX/dtdesktop/incars?t=244.18664863333106`](https://ads-demo.adhese.com/json/sl_sdk_example_-leaderboard/?t=244.18664863333106) A 2-letter combination (e.g. br, dt or in) prefixes every target parameter and the actual target(s) comes after. If a parameter contains more than one target, use a semicolon to separate the different values. The configuration of your Adhese account determines the available targeting parameters and their prefixes. Please get in touch with our [Support team](mailto:support@adhese.com) for more details. Every account contains the following default parameters: - `/br`: brands or data about the browser and operating system; - `/dt`: device type, such as phone, tablet, desktop or unknown; - `/in`: interests, this parameter is user-defined. - `/tl`: consent indicator, values `none`|`all`, default is `none` ## Response structure The request returns a JSON object with the fields described in the [List of JSON response structure object fields](https://documentation.adhese.org/books/integration-setup/page/json-endpoint-full-response-structure). Adhese returns an empty JSON object (just two curly brackets) if it cannot deliver a suitable ad for the request. # Clients ## Add a client In the *Header* tab of a campaign, you can add several parties or companies in the [Client](https://documentation.adhese.org/books/campaign-management/page/campaigns#bkmrk-client) part. To add a new company to your account: 1. Click *Customers* on the *Administration* screen. The *Customers* screen opens: [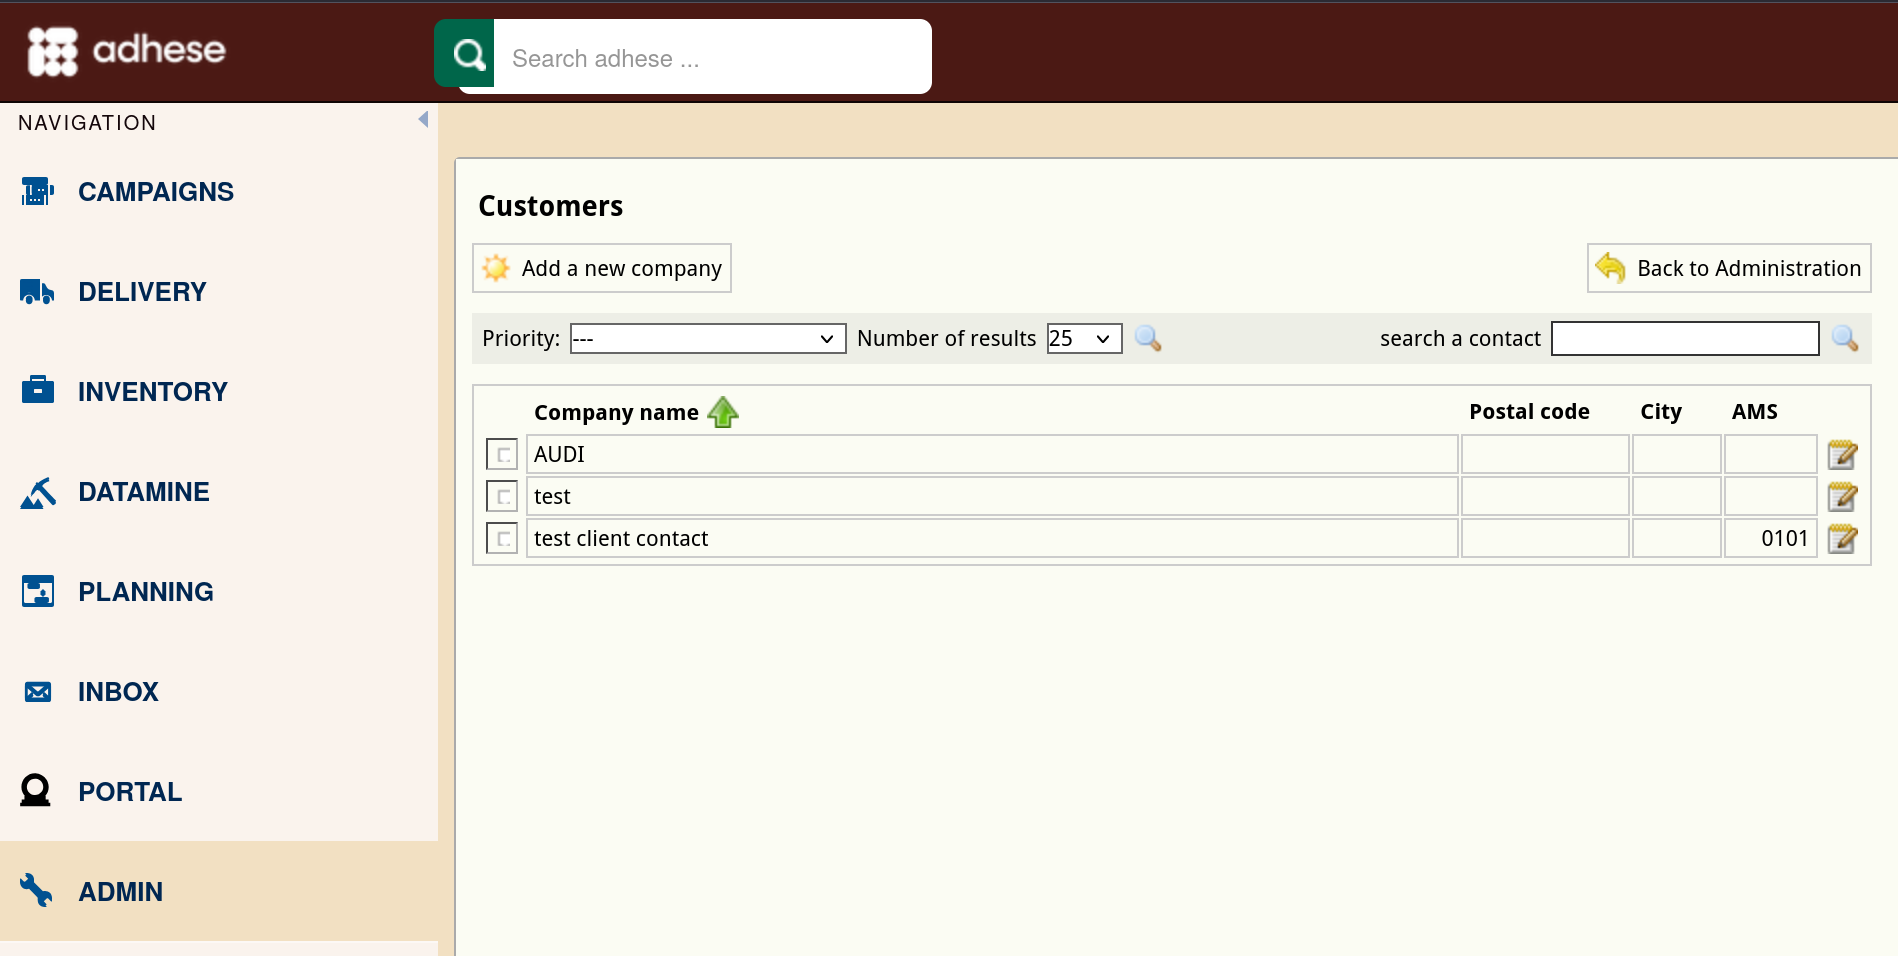](https://documentation.adhese.org/uploads/images/gallery/2024-10/sUwSlPMbtmCaBxei-schermafdruk-van-2024-10-28-10-19-59.png) For more information about the *Customers* screen, refer to [Customers](https://documentation.adhese.org/books/adhese-ui/page/the-administration-screen#bkmrk-customers). 2. To add a new client or company, click the *Add a new company* button. The *Add a new company* screen opens: [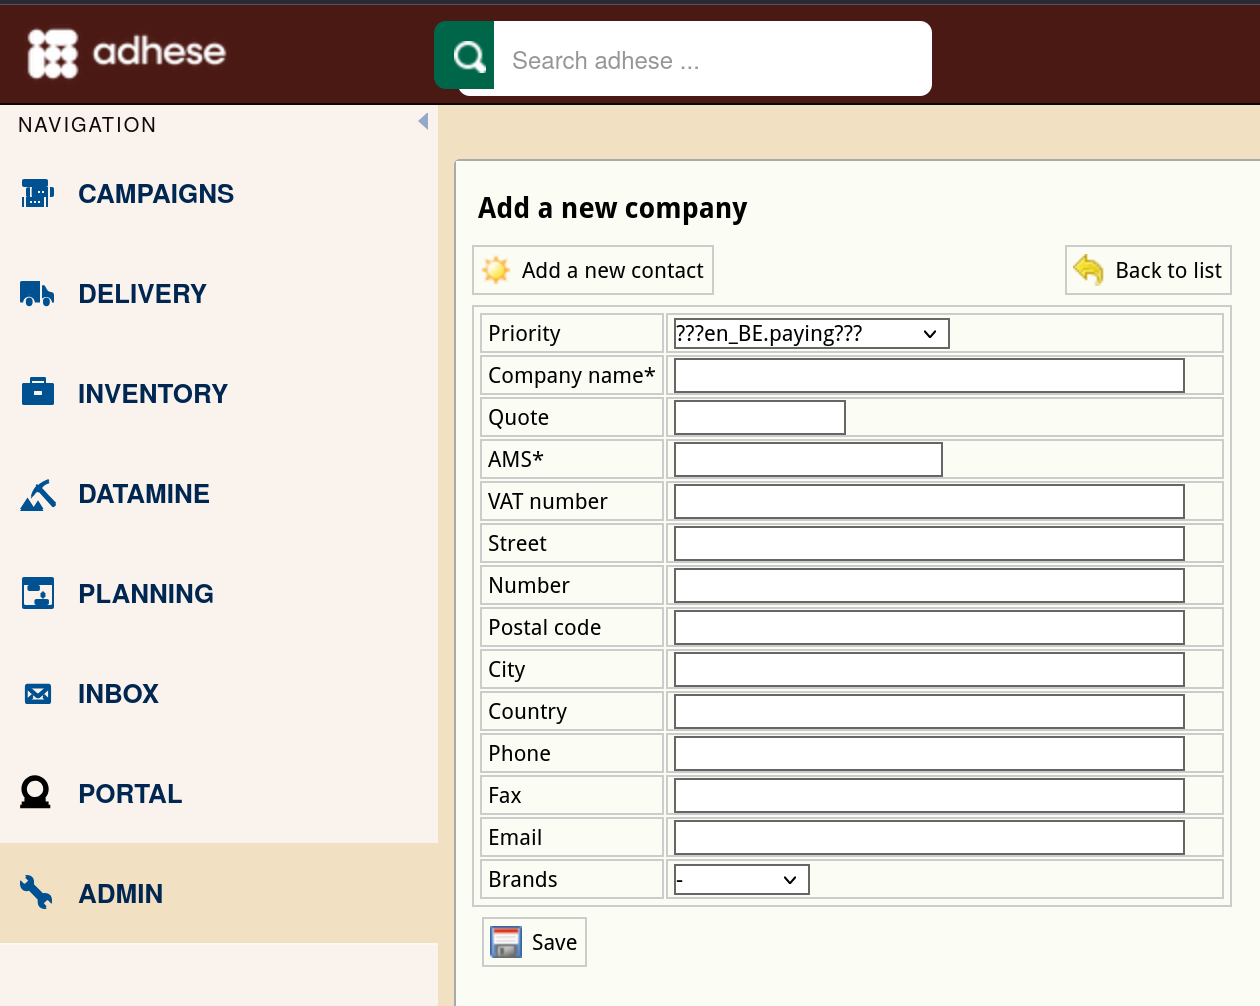](https://documentation.adhese.org/uploads/images/gallery/2024-10/qypzvApuiSKXn8jM-schermafdruk-van-2024-10-28-10-24-14.png) 3. Define the following details: 1. (Optional) Select a billing method for the company from the **Invoice type** drop-down. 2. Enter the name of the company in the **Company name** field. 3. (Optional) Enter an abbreviated company name in the **Quote** field. 4. Enter the AMS ID of the company in the **AMD** field. 5. (Optional) Enter the VAT number of the company in the **VAT number** field. 6. (Optional) Enter the name of the street of the company's address in the **Street** field. 7. (Optional) Enter the number of the company's address in the **Number** field. 8. (Optional) Enter the postal code of the company's address in the **Postal code** field. 9. (Optional) Enter the city of the company's address in the **City** field. 10. (Optional) Enter the country of the company's address in the **Country** field. 11. (Optional) Enter the telephone number of the company in the **Phone** field. 12. (Optional) Enter the fax number of the company in the **Fax** field. 13. (Optional) Enter the email address of the company in the **Email** field. 5. Click the *Save* button. ## Add a new contact To add a contact to a company: 1. Click *Customers* on the *Administration* screen. The *Customers* screen opens. 2. Click the company's name or click the edit icon for the company you want to add a client to. 3. Above the form, click the *Add a new contact* button. The *Add a new contact* screen opens: [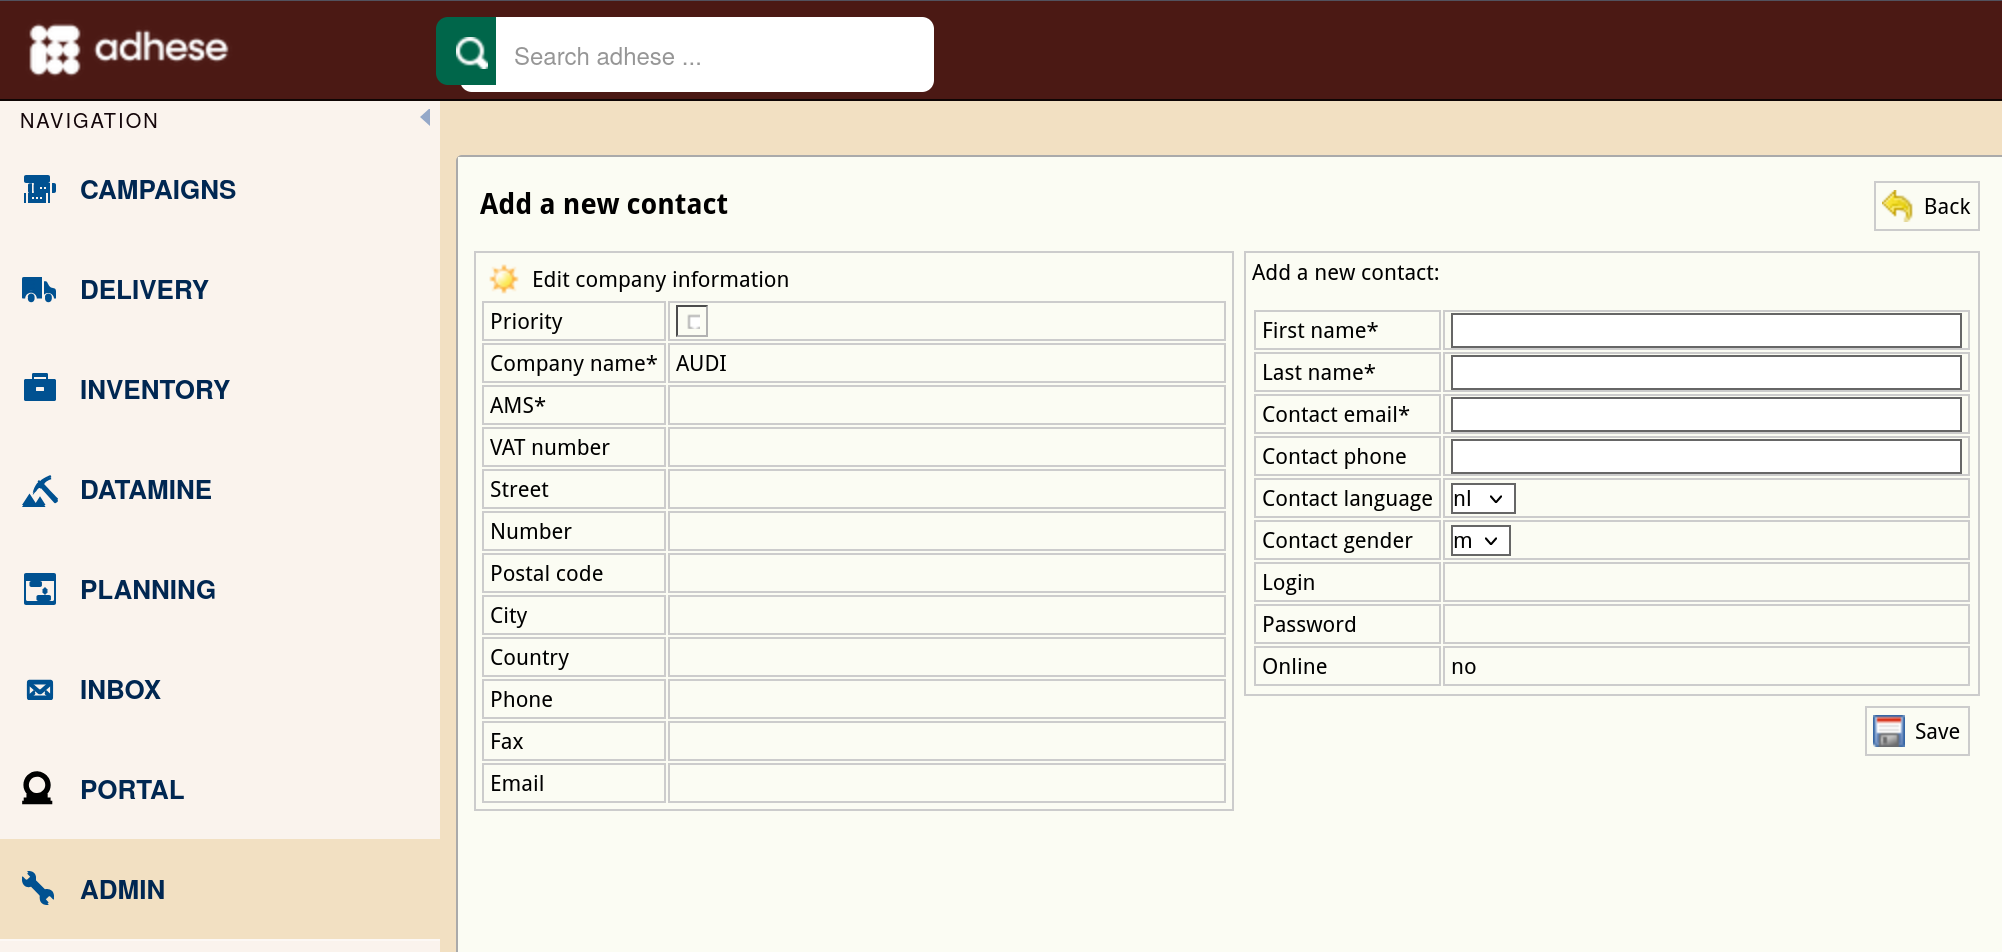](https://documentation.adhese.org/uploads/images/gallery/2024-10/GLHPditYzuf5H3sC-schermafdruk-van-2024-10-28-10-24-52.png) 4. Define the following details: 1. Enter the name of the contact in the **First name** field. 2. Enter the surname of the contact in the **Last name field.** 3. Enter the email address of the contact in the **Contact email** field. 4. (Optional) Enter the phone number of the contact in the **Contact phone** field. 5. (Optional) Choose a language from the **Contact language** drop-down. 6. (Optional) Select a gender from the **Contact gender** drop-down. 5. Click the *Save* button. ## Edit a client To edit a client or customer: 1. Click *Customers* on the *Administration* screen. This opens the *Customers* screen. 2. To edit a client or company, click the company's name you want to modify or click the edit icon [](https://documentation.adhese.org/uploads/images/gallery/2024-06/0qpcu8CUmHUF5WHR-edit.png). The *Edit company information* screen opens: [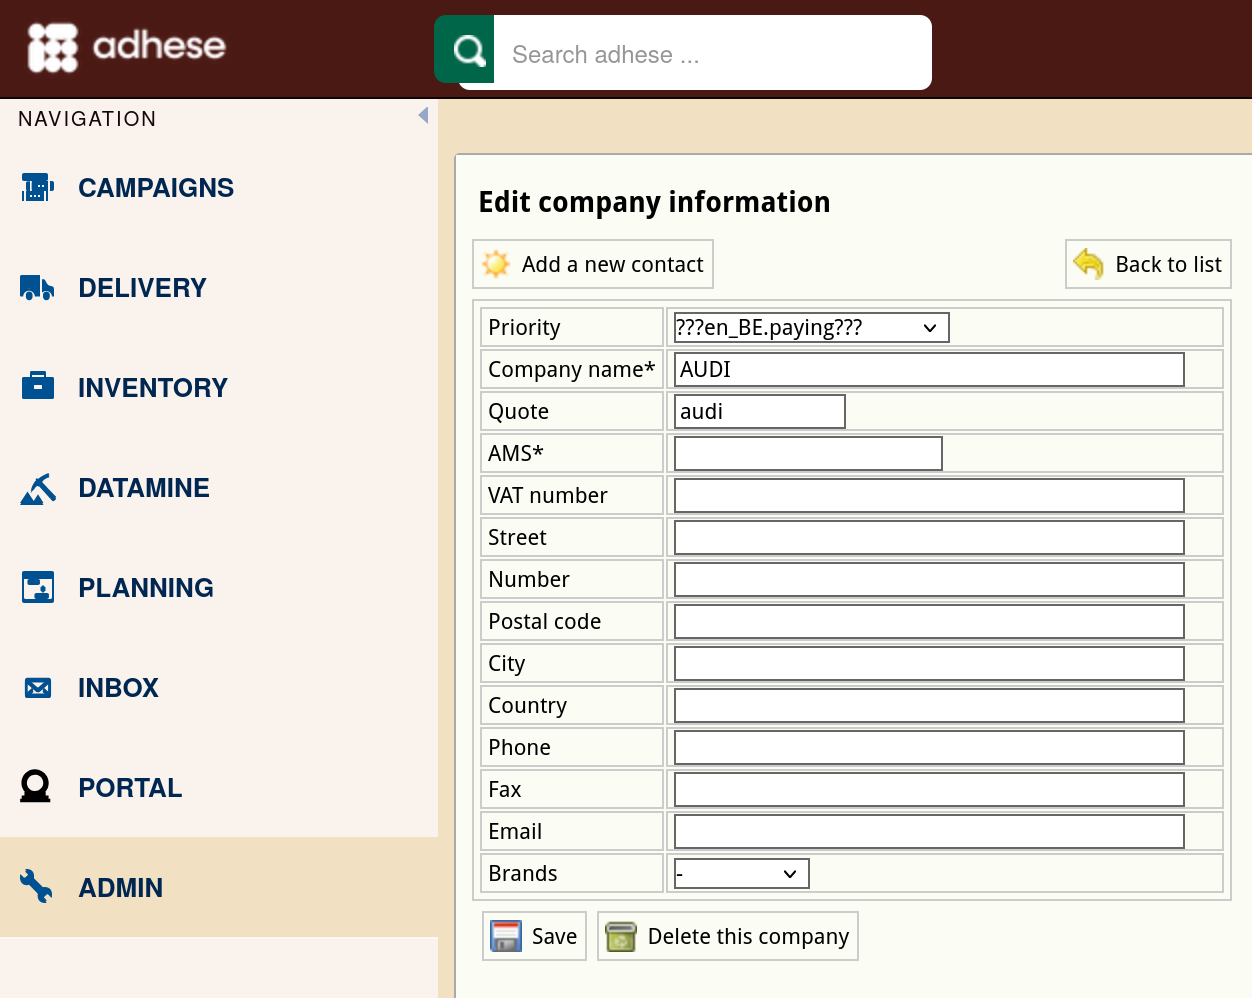](https://documentation.adhese.org/uploads/images/gallery/2024-10/Y5FKYQvHdoVGz6SW-schermafdruk-van-2024-10-28-10-27-40.png) 3. Change any of the details. 4. Click the *Save* button. ## Delete a client To delete a client: 1. Click *Customers* on the *Administration* screen. The *Customers* screen opens. 2. To delete a company, click the company's name you want to delete or click the edit icon [](https://documentation.adhese.org/uploads/images/gallery/2024-06/IDBElMGCmr5txQbI-edit.png). The *Edit company information* screen opens. 3. Beneath the form, click the *Delete this company* button. # 3rd party tags through 3PAS [Google](https://developers.google.com/third-party-ads/adx-vendors) accepted Adhese as a certified third-party server. This certification allows clients to upload third-party tags of Adhese to Google. The syntax of these certified tags is as follows: ```htmlThe adhese_3pas script is not available by default. Contact Adhese support if it is the first time integrating 3PAS tags on your account.
Composing the slot code The full slot code consists of a few values that can be located within the admin UI of your Adhese account: `sl[location code][position code]-[format code]` - The`sl` prefix **(required)** - The **location** code: matches the **URL code** of the corresponding Adhese [location](https://documentation.adhese.org/books/inventory-setup/page/locations). **(required)** - The **position** code: matches the **URL code** of the corresponding Adhese [position](https://documentation.adhese.org/books/inventory-setup/page/positions). **(optional)*** - The **format** code: matches the **code tag** of the [format](https://documentation.adhese.org/books/inventory-setup/page/formats) you wish to request. **(required)** ***The position code is optional, as this field can be left empty when creating a position in Adhese** # The implementation of the Adhese ad tagsThis information refers to the old Adhese SDK, for current information on setting up the inventory and slots, see: [Typescript SDK](https://documentation.adhese.org/books/integration-setup/page/typescript-web-sdk)
Once you have mapped the structure of your inventory and created the appropriate positions, it is time to create and implement the ad tags. **Ad tags** are the foundation of our technology. They allow us to deliver and measure targeted campaigns. ## How to get started with Adhese 1. Load the following piece of JavaScript code in the `` of the page: ```html ``` 2. Provide a local function that returns the content identification: ```html ``` 3. Initialize the Adhese instance: ```javascript varadhese = newAdhese(); adhese.init({debug:true, account:"demo", location: getLocation }); // value of the account attribute can be found in your Adhese subscription information or through our support portal. ``` ## Implementation of the Adhese ad tag ### Legacy requests Legacy requests are implemented as a `script` fragment inside the `Safeframe used to be on by default, but this is no longer the case with the new SDK and doesn't need to be disabled anymore when using the Typescript SDK.
# System-wide over-delivery An over-delivery percentage can be configured. For example, if set to 2%, each campaign will deliver 2% more impressions than initially booked. An over-delivery percentage is applied to prevent minimal under-delivery of third-party ads in the event of reporting [discrepancies](https://documentation.adhese.org/books/troubleshooting/page/general-troubleshooting)Don't hesitate to contact support if you want to increase or decrease your system-wide over-delivery percentage.
The default overdelivery value is 5%
# How to deal with responsive web pages The increasing use of various devices such as smartphones, phablets, tablets, and laptops highlights the importance for publishers and advertisers to adopt a responsive strategy. The design of a **responsive** website adjusts to the size of the device's browser screen. In contrast, the website's content's readability or interface's usability is not compromised. **The technology of Adhese can deliver the same creative across multiple devices.** You only need to determine the display resolution in which the creative dimensions will adequately fit. An ad will only be displayed (and counted as an impression) if the ad request is sent from a device that can guarantee the correct delivery of the ad. So, you don't need to create a booking or upload a creative for each different kind of device, manufacturer or browser you'd like to target. However, advertisers can still deliver an optimised creative for each device they want to target separately. # Targeting # Targeting *Targeting* makes it possible to optimise the performance of a campaign by tailoring the delivery of a campaign to a visitor's profile - where relevance is key - or to other relevant parameters. Adhese enables targeting based on both standard and adjusted parameters. You can use each request parameter as a targeting variable. Multiple targeting variables can be used in combination. During the implementation process of your Adhese account, you will need to consider which variables or parameters you would like to use for targeting purposes. You can add additional parameters to your account at any time. A request can have targeting parameters at three different levels: 1. as a parameter in the request itself, 2. as a value in the cookie, or 3. as a value at the server (identification will happen through a unique key or session). A request can combine the above three methods.**GDPR:** Remember that the unique identification of visitors and storing personal and other data is subject to national, European and international legislation. It is the **exclusive responsibility** of the publisher to comply with the law and adequately notify the user of its rights. Adhese can help and advise publishers herein. More on user privacy is available in [the GDPR section](https://documentation.adhese.org/books/adhese-setup-and-implementation/page/user-privacy-and-gdpr#bkmrk-gdpr) of the documentation.
**Relationship between targets:** Targets values from different target types have an AND relation, while values within the same type have an OR relationship. To create an AND relationship between targets of the same type, make an additional target value in the admin screen that includes both target codes (first\_target&second\_target). The same can be done for negative targets (!first\_target&!second\_target).
**New targets & forecasting:** New targets lack forecast data and are therefore best used in combination with the SOV setting. When used with the auto setting, the system will try to calculate an estimated share. With many competing bookings on that same target, however, it is likely that only some bookings will receive a share. The other bookings will only start delivering once forecast data is available, which can take up to two weeks.
## Managing Targets {{@256}} ### Target Tags {{@274}} ### Negative targeting As explained in the introduction on this page, you can use a request parameter as a targeting variable. You can also reverse this logic by using a parameter to exclude bookings targeted by it. For instance, a negative target could be 'all countries except Belgium'. ### Joining targets and negative targets You can join two targets values in an AND relation by creating a combined target with '&'. To do so, follow these steps: 1. Make sure both target values already exist within the relevant target type (ex. "code1" and "code2") 2. Create a new target value, give it a name and join the two target codes with & (ex. "code1&code2") 3. You can now select the combined target in the target type in the booking header screen. When selecting the combined target, both values (code1 AND code2) will need to be present for the booking to be delivered You can also exclude delivery when a certain value is present by creating a negative target value with '!'. To do so, follow these steps: 1. Make sure a positive target value already exists within the relevant target value (ex. "code1") 2. Create a new target value, give it a name (ex. Not Code1) and exclude the value with ! (ex."!code1") 3. You can now select the negative target value within the target type in the booking header screen. When selecting the negative target value, the booking will not be delivered if the excluded value is present Combined targets and negative targets can also be combined. If you want to deliver on a broad target within a target type, but you want to make sure you exclude a certain value, you can join the positive target value with a negative one: - For example: You want to deliver on code, which includes code1, code2 and code3, but you want to exclude code 2. You can join the targets like this: '!code2&code'[](https://documentation.adhese.org/uploads/images/gallery/2024-10/qQbwusc8AnoUhOPd-schermafdruk-van-2024-10-01-17-01-11.png)Note that when combining a negative with a positive target value, '!' must be the first character.
## Targeting options #### Contextual targeting Contextual targeting ensures that a booking is relevant to the content of the website. The text of a website is scanned for **content keywords**, **article tags**, or **topics**. Bookings targeted on those keywords are subsequently returned to the website. For example, if a visitor is reading a movie review, Adhese can show a booking from a nearby movie theatre that is playing the same movie. This targeting method is custom-implemented per client. #### External data sources Adhese can also take **external data** sources into account when targeting. Variables such as stock indexes, product inventory, and weather can be used. Imagine an advertiser who sells tyres. They could change the content of the creative based on a weather forecast for the visitor's location. This targeting method is custom-implemented per client. #### Competitive exclusions Campaign variables can be used to ensure that certain bookings are not served together simultaneously. This feature is similar to our delivery multiples solution, but it is relevant to the campaign level. For instance, you can opt not to deliver bookings from the same client or two competitor companies, such as car manufacturers, at the same time. If you are interested in this custom feature, please [contact us](https://documentation.adhese.org/books/introduction/page/adhese-support). #### More targeting options To learn more about the various targeting options in Adhese, consult the following pages: - [Brand Targeting](https://documentation.adhese.org/books/inventory-management/page/user-agent-targeting) - [Behavioural Targeting](https://documentation.adhese.org/books/inventory-management/page/behavioural-targeting) - [Retargeting](https://documentation.adhese.org/books/inventory-management/page/retargeting) - [Hierarchical Targeting](https://documentation.adhese.org/books/inventory-management/page/hierarchical-targeting) - [Advanced Targeting](https://documentation.adhese.org/books/inventory-management/page/advanced-targeting) # User Agent targetingUA Targeting is a custom feature. Please [contact](https://documentation.adhese.org/books/introduction/page/adhese-support) support if you are interested in implementing one or more user agent targeting variables.
UA Targeting in older accounts will still be called *Brand* targeting.
User agent targeting enables you to target your audience by technical aspects, for example: - Internet service providers, such as Telenet, Proximus, VodafoneZiggo or KPN; - Browser, like Chrome, Safari, or Firefox; - Brands like Apple or Samsung; - Device, for example, a tablet, smartphone, or desktop; - Operating systems, for instance, iOS, Android, Windows, Linux or macOS. You can use UA Targeting to focus ad delivery on specific device types, but only when this information is available. For example, if you only want to deliver to computers and tablets, but not smartphones, tick the *Device - Desktop* and *Device - Tablet* boxes, but do **not** tick the *Device - Phone* box. See the screenshot below. [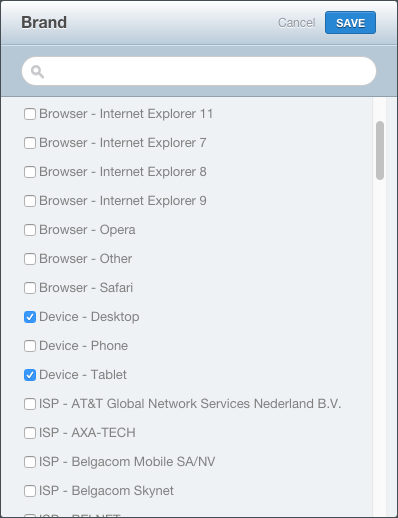](https://documentation.adhese.org/uploads/images/gallery/2024-06/mevzLB3xn7bpYmBe-targeting2.png) # Hierarchical Targeting With **hierarchical targeting**, each different targeting group is given a priority, which allows a targeting group with the lowest volume to be given priority over other targeting groups.Hierarchical targeting is not compatible with channels. Bookings with hierarchical targets must be booked on individual positions.
Hierarchical targeting is an option that is not included in the default Adhese set-ups. If you want to add this option, please contact [support](https://documentation.adhese.org/books/introduction/page/adhese-support).
An example: [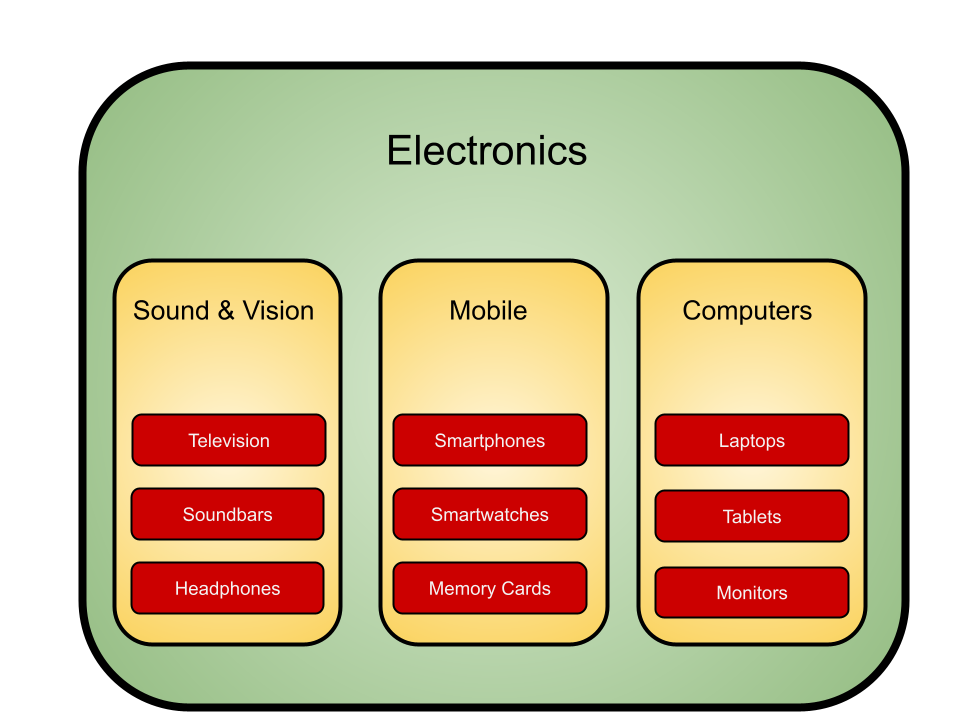](https://documentation.adhese.org/uploads/images/gallery/2024-06/VNYeAd7KXwIfKXwU-hierarchical-targeting1.png) There are three different target groups: - Main category (for example, Electronics - green) - Product group (for example, Computers - yellow) - Super category (for instance, Laptops or Tablets or Monitors - red) In the example above, bookings targeted at the **Super category** (red) take priority over bookings targeted at the **Product group** (yellow). Bookings targeted at the **Product group** (yellow) take priority over bookings targeted at the **Main category** (green). It is possible to target both the **Product group** and **Super category** when making a booking. For example, if you target the **Super Categories** *Laptop* and *Tablets* and the **Product group** *Computers*, the *Laptop* and *Tablets* targets will receive the highest priority. All other targets under the **Super category** (such as *Monitors*) will also show the booking because they fall under the **Product group** *Computers*, but only if there is no competing booking targeted on that particular **Super category**. When booking with the target **Main category** (*Electronics*), each **Product Group** (*Sound & Vision, Mobile and Computers*) and all underlying **Super Category** sections can display the booking, but only if there is no competing booking targeted at a particular **Product Group** or **Super Category**. # Advanced TargetingAdvanced Targeting is a feature that must be enabled and requires additional setup. Please contact Support if you would like to make use of this feature.
Targets that fall under advanced targeting do not contain forecast data. They are best used in combination with SOV delivery.
## Introduction Advanced targeting allows the Adhese instance admins to create complex targeting rules and save them with a label. Sales and Operations can select these targets when booking a campaign. ## Creating and Editing To manage Advanced Targeting in Adhese, click on the *Advanced Targeting* link in the Administration screen. The following screen will appear: [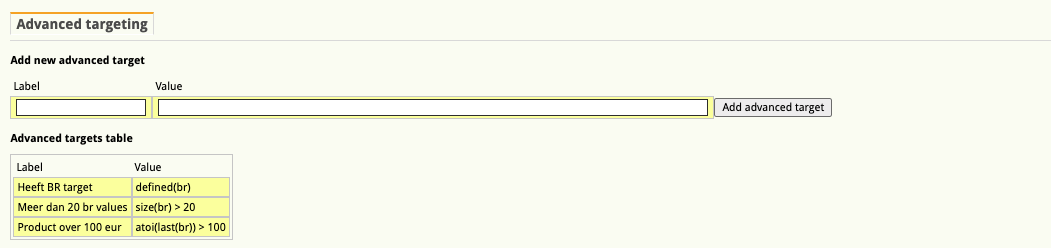](https://documentation.adhese.org/uploads/images/gallery/2024-06/kVO50XTewTk1c1Ia-advanced-targeting1.png) The screen is divided into two parts: - Add new advanced target - Advanced target table Click **Add new advanced target** to add a new one. To add a new target, enter a label, give it a value and click the *Add Advanced Target* button. The code must be unique for the application to accept it. The **Advanced Targets table** lists the advanced targets that have been created. ## Creating a new Targeting Expression Targeting expressions contain target identifiers and functions. The identifiers allow you to tell the system which targets you want to check, modify, etc.… With the functions, you can express what you want to do with the values. By 'target values' we mean the incoming values of an ad request, regardless of how they were injected into the request. So, this could be a value sent by the browser or app, a segment picked up by a server-side mapping, or a combination of both. ### Defining which targets to use Targets are referred to by their two-letter prefix code: “dt”, “co”, etc... just like in the POST body of an ad request. The exact values available for your Adhese instance can be found in the documentation of your account. The values of each target are always considered to be multi-valued. Their type is List<String>, a list of alphanumeric characters. If you know that a target is single-valued (as can be set in the 'definitions' of your instance), you can use last() to change the type to String (or Void if an empty list). ### Functions to express what to do with a target value Each function acts on the values sent by the request and is identified by the given 2-character target code. For example, given a request like the one below and using the target code 'sg', which is often used for 'segments': https://ads-myadheseinstance.adhese.com/json/sl123/tlall/**sgfamily;sports**/ag45/dtdesktop/II456d676e8d6878s687/ We can identify the target by its two-letter code, ‘sg,’ and see two values: ‘**family**’ and '**sports**'. ## List of all functions ### 1. Check the presence of the target ``` defined(target_code) ``` Checks if a target is present, even if it has an empty string value. ##### Example ``` defined(sg) ``` will match the following requests [https://ads-myadheseinstance.adhese.com/json/sl123/tlall/**sgfamily;sports**/ag45/dtdesktop/II456d676e8d6878s687/](https://ads-myadheseinstance.adhese.com/json/sl123/tlall/sgfamily;sports/ag45/dtdesktop/II456d676e8d6878s687/) https://ads-myadheseinstance.adhese.com/json/sl123/tlall/**sg**/ag45/dtdesktop/II456d676e8d6878s687/ but not match this one https://ads-myadheseinstance.adhese.com/json/sl123/tlall/ag45/dtdesktop/II456d676e8d6878s687/ ### 2. Count number of target values ``` size(target_code) ``` Counts the number of values for a given target code. ##### Example ``` size(sg) > 1 ``` will match [https://ads-myadheseinstance.adhese.com/json/sl123/tlall/**sgfamily;sports**/ag45/dtdesktop/II456d676e8d6878s687/](https://ads-myadheseinstance.adhese.com/json/sl123/tlall/sgfamily;sports/ag45/dtdesktop/II456d676e8d6878s687/) https://ads-myadheseinstance.adhese.com/json/sl123/tlall/**sgfamily**/ag45/**sggourmet**/dtdesktop/II456d676e8d6878s687/ but will not match this one https://ads-myadheseinstance.adhese.com/json/sl123/tlall/**sgfamily**/ag45/dtdesktop/II456d676e8d6878s687/ ### 3. Check the presence of value ``` target_code intersects {'value'} ``` Returns true if ‘value’ is part of the values for the given target_code ##### Example ``` sg intersects {'sports'} ``` will match [https://ads-myadheseinstance.adhese.com/json/sl123/tlall/**sgfamily;sports**/ag45/dtdesktop/II456d676e8d6878s687/](https://ads-myadheseinstance.adhese.com/json/sl123/tlall/sgfamily;sports/ag45/dtdesktop/II456d676e8d6878s687/) https://ads-myadheseinstance.adhese.com/json/sl123/tlall/**sgsports**/ag45/**sggourmet**/dtdesktop/II456d676e8d6878s687/ but will not match https://ads-myadheseinstance.adhese.com/json/sl123/tlall/**sgfamily**/ag45/dtdesktop/II456d676e8d6878s687/ ### 4. Logical operators ``` (condition1 && condition2) || (condition3 && condition4) ``` **&&** expresses ‘and’, **||** expresses ‘or’, **( )** round brackets can be used for grouping expressions ##### Example ``` sg intersects {'family'} || (sg intersects {'sports'} && dt intersects {'desktop'}) ``` will match [https://ads-myadheseinstance.adhese.com/json/sl123/tlall/**sgfamily;sports**/ag45/dtdesktop/II456d676e8d6878s687/](https://ads-myadheseinstance.adhese.com/json/sl123/tlall/sgfamily;sports/ag45/dtdesktop/II456d676e8d6878s687/) https://ads-myadheseinstance.adhese.com/json/sl123/tlall/**sgsports**/ag45/sggourmet/**dtdesktop**/II456d676e8d6878s687/ but will not match https://ads-myadheseinstance.adhese.com/json/sl123/tlall/**sgsports**/ag45/**dtmobile**/II456d676e8d6878s687/ ### 5. Numerical comparison operators ``` atoi(last(target_code)) operator integer ``` Compares the value of a target_code (converted from a string to an integer) with a fixed integer. ##### Available operators - < : less than - <= : less than or equal - > : greater than - >= : greater than or equal - <> : not equal - = : equal ##### Example ``` atoi(last(ag)) > 35 && atoi(last(ag)) <= 65 ``` will match [https://ads-myadheseinstance.adhese.com/json/sl123/tlall/sgfamily;sports/**ag45**/dtdesktop/II456d676e8d6878s687/](https://ads-myadheseinstance.adhese.com/json/sl123/tlall/sgfamily;sports/ag45/dtdesktop/II456d676e8d6878s687/) https://ads-myadheseinstance.adhese.com/json/sl123/tlall/sgsports/**ag65**/sggourmet/dtdesktop/II456d676e8d6878s687/ but will not match https://ads-myadheseinstance.adhese.com/json/sl123/tlall/sgsports/**ag25**/dtmobile/II456d676e8d6878s687/ ### 6. Decode urls and split ``` last(split(decode64(last(target_code))),'/') = string ``` Converts the last value of the given target_code from base64 encoded to a string, splits it by slash and compares the last item with a string ##### Example ``` last(split(decode64(last(br)),'/')) = 'index.html' ``` will match https://ads-myadheseinstance.adhese.com/json/sl123/tlall/sgsport/ag25/dtmobile/II456d676e8d6878s687/**rfL2Zvby9iYXIvaW5kZXguaHRtbA==**/ but will not match https://ads-myadheseinstance.adhese.com/json/sl123/tlall/sgsport/ag25/dtmobile/II456d676e8d6878s687/**rfL2Zvby9iYXIvb3ZlcnZpZXc=**/ # Managing Targets **Important rules to keep in mind when working with targets:**1. The code cannot contain any punctuation. The only exceptions allowed are an underscore (**\_**), an ampersand (**&**) (to add two or more codes in one target), and an exclamation mark (**!**) (for negative targets). 2. Using a '-' will cause problems in the backend (rotation file) once the target is used in a booking 3. Targets have a character limit of 40. If a single target would exceed 40 characters, consider using [advanced targeting](https://documentation.adhese.org/books/inventory-management/page/advanced-targeting)).
To manage targets in Adhese, click the *Targets - Manage targets* link in the administration screen. The following screen is then displayed: [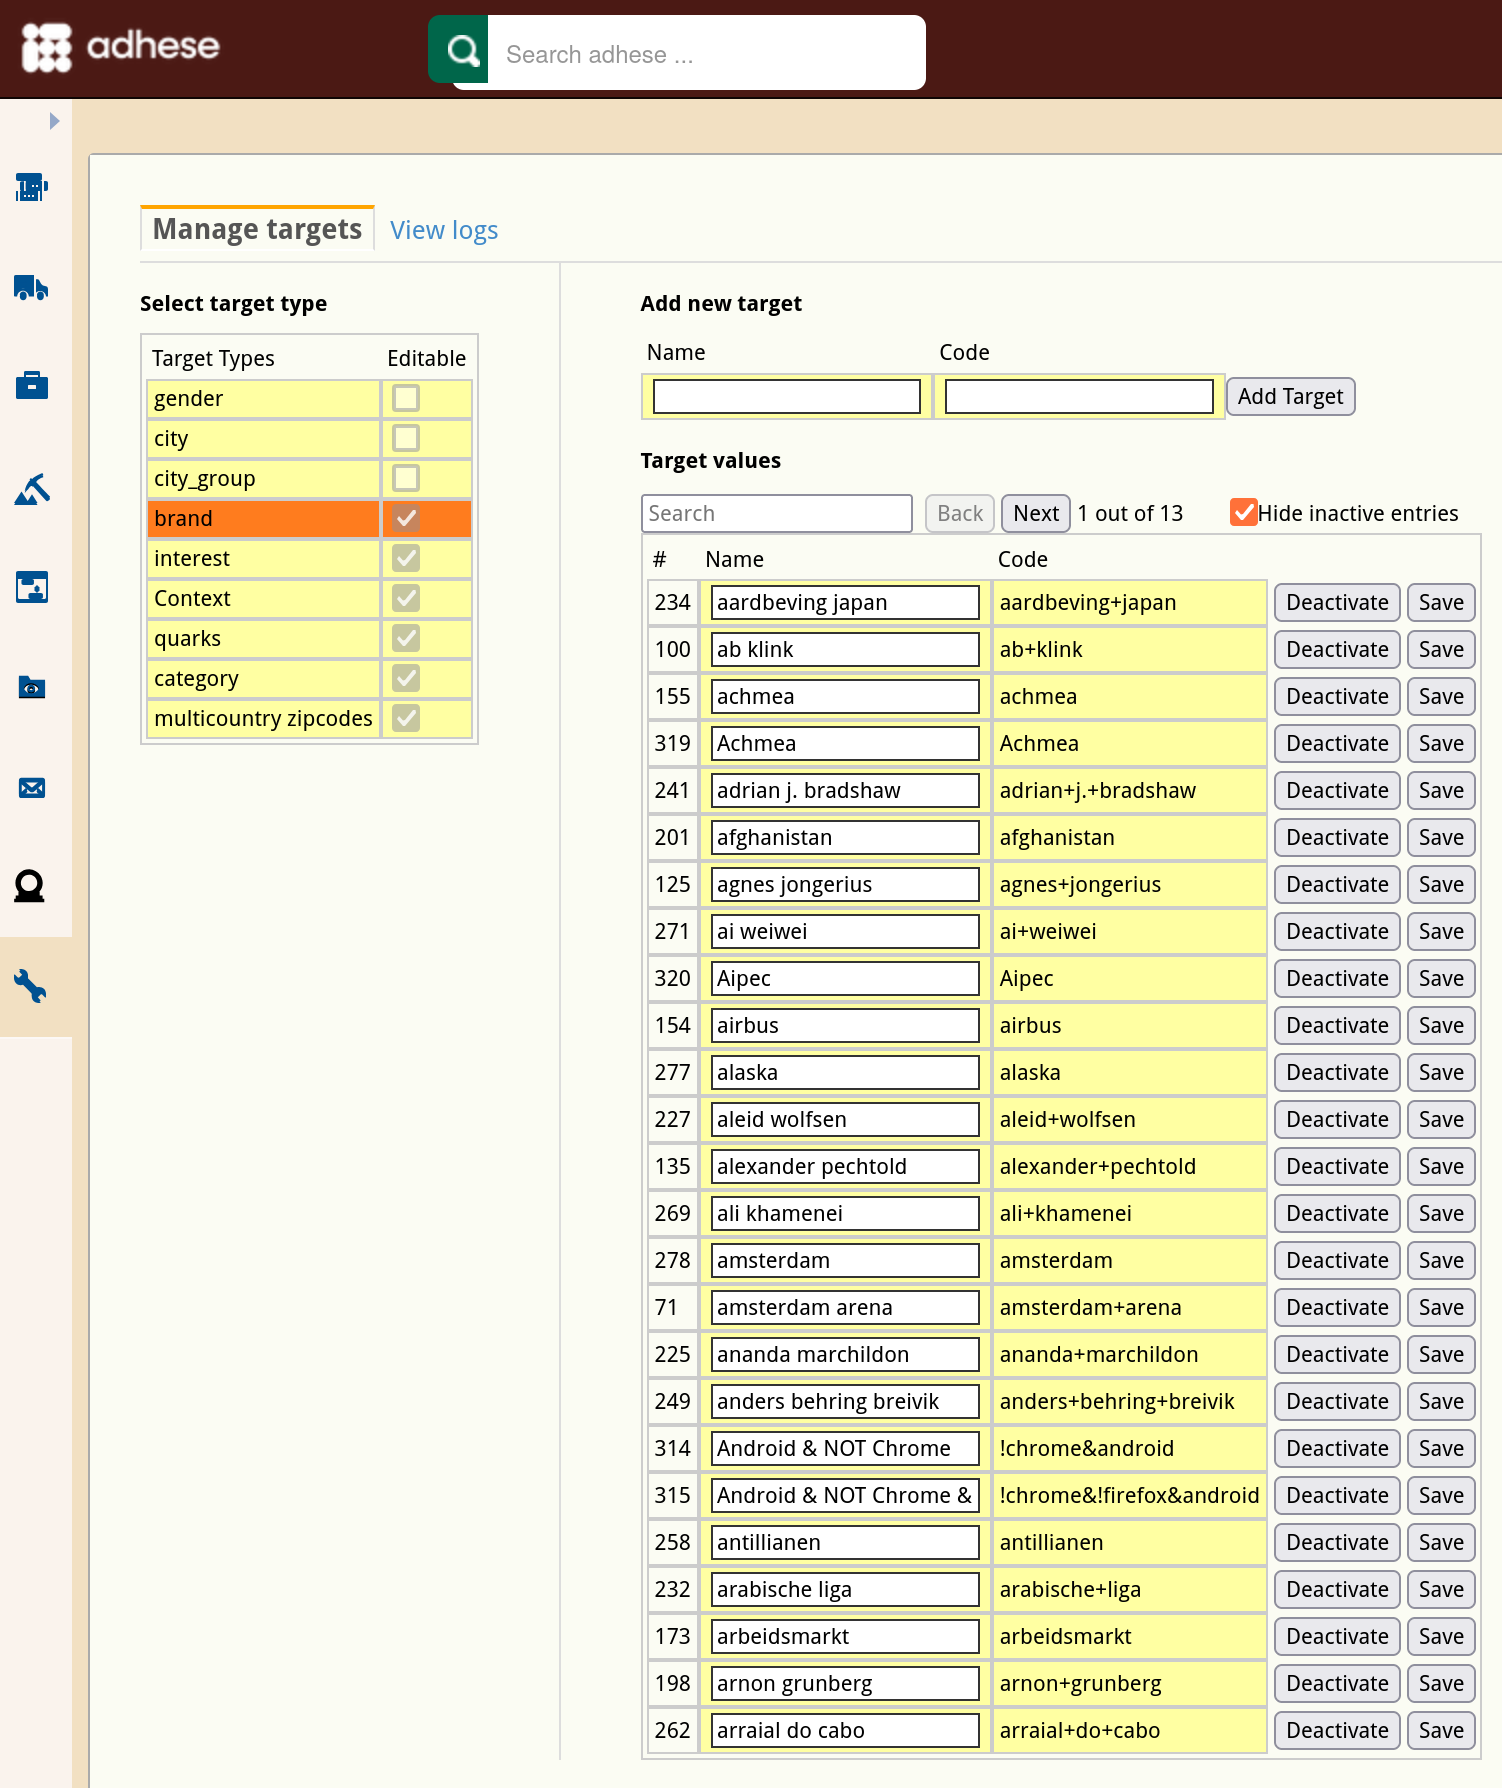](https://documentation.adhese.org/uploads/images/gallery/2024-10/WwkoSDxuOLhUskJM-schermafdruk-van-2024-10-29-09-37-48.png) The screen is divided into two parts: - Select target types on the left side - Add new target values on the right side The **Select target types** part shows all the available target types and indicates whether they are editable or not. Ticked boxes are editable. Empty boxes are not editable. When you select a target type, the colour changes from yellow to orange, and your selection is displayed in the *Add new target/target values* part of the screen. Click **Add new target** if you want to add a new target value. To add a new target, fill in a name, give it a code and hit the *Add Target* button. The code has to be unique to be accepted by the application. - a search box - a back and next button showing the number of pages for this particular target - a checkbox to hide or show inactive entries. The list can be sorted by clicking the *\#*, *name* or *code*. You can edit the name of each target. After editing, you can save your changes by clicking the *save* button. To deactivate a target, simply click on the *deactivate* button. Once deactivated, the button's label will change to *activate*. To find out more about how targeting can be used within a booking, see the [Targeting](https://documentation.adhese.org/books/campaign-management/page/bookings#bkmrk-targeting) section of the **Bookings** page # Adobe Destination ConnectionSend audience segments to Adhese for targeted ad delivery on publisher-owned inventory. Files are exported to Adhese's secure S3 bucket.
# Adhese connection ## Overview You can send audience segments from *Adobe Experience Platform* to Adhese and use them for targeted ad delivery on Adhese-served inventory. Audience exports are delivered as files to Adhese's secure cloud storage. > This destination connector and documentation page are created and maintained by *Adhese*. For any inquiries or update requests, contact us at [Support Adhese](https://adhese.atlassian.net/servicedesk/customer/portals). ## Use cases To help you better understand how and when you should use the *Adhese* destination, here are sample use cases that *Adobe Experience Platform* customers can solve by using this destination. ### Use Audience Segmentation for advertising campaigns A publisher or retailer builds first-party audiences in *Adobe Experience Platform*, for example: frequent readers of a content category, regular buyers of selected product categories, loyalty program members; and sends these audiences to their Adhese instance to enable advertisers to [target](https://documentation.adhese.org/books/inventory-management/page/targeting) them with relevant campaigns on the retailer's or publisher's own [inventory](https://documentation.adhese.org/books/inventory-management/page/the-inventorys-structure). ## Prerequisites Before you can send audiences to Adhese, you must be onboarded as an Adhese customer. Contact your Adhese account manager or [Support Adhese](https://adhese.atlassian.net/servicedesk/customer/portals) to set up the integration. During onboarding, Adhese provides you with: - An **Amazon S3 access key ID** and **secret access key**, used to authenticate the connection - The **Adhese customer name** to export to - Your active Adhese **region** [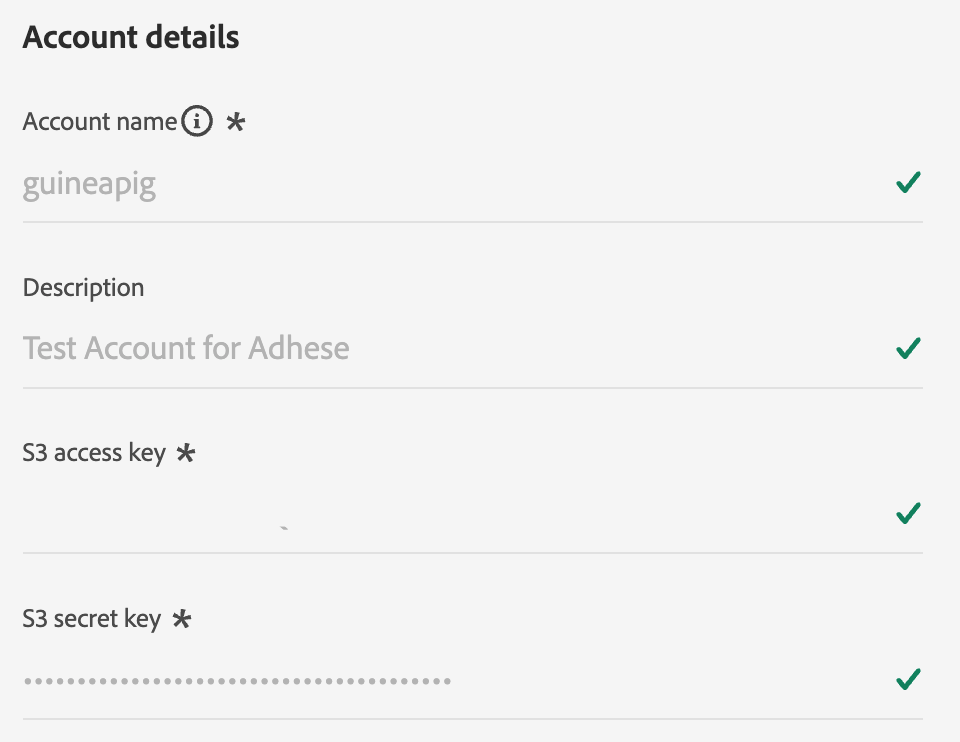](https://documentation.adhese.org/uploads/images/gallery/2026-06/3AFUBMXaUvWI0Qi2-image.png) No data is shared with other Adhese customers: your credentials grant write access exclusively to your own folder. ## Supported identities *Adhese* supports the activation of identities described in the table below. Use the identity that you also use to identify users on your website or app, so Adhese can match the exported audience members at ad-delivery time. See the following link for more information on configuring [identities](https://experienceleague.adobe.com/en/docs/experience-platform/identity/features/namespaces) in *Adobe Experience*.| **Target Identity** | **Description** | **Considerations** |
|---|---|---|
| GAID | Google Advertising ID | Select the GAID target identity when your source identity is a GAID namespace. |
| IDFA | Apple ID for Advertisers | Select the IDFA target identity when your source identity is an IDFA namespace. |
| ECID | Experience Cloud ID | A namespace that represents ECID. This namespace can also be referred to by the following aliases: "Adobe Marketing Cloud ID", "Adobe Experience Cloud ID", "Adobe Experience Platform ID". Read the following document on ECID for more information. |
| email\\\_lc\\\_sha256 | Email addresses hashed with the SHA256 algorithm | Both plain text and SHA256 hashed email addresses are supported by *Adobe Experience Platform*. When your source field contains unhashed attributes, check the **Apply transformation** option, to have \*Experience Platform\* automatically hash the data on activation. |
| extern\\\_id | Custom user IDs | Select this target identity when your source identity is a custom namespace, for example your own first-party user ID that is also available to Adhese at ad-delivery time. |
| **Audience origin** | **Supported** | **Description** |
|---|---|---|
| Segmentation Service | Yes | Audiences generated through the Experience Platform [Segmentation Service](https://experienceleague.adobe.com/en/docs/experience-platform/segmentation/home). |
| All other audience origins | Yes | This category includes all audience origins outside of audiences generated through the Segmentation Service. Some examples include: custom upload audiences imported into Experience Platform from CSV files, look-alike audiences, federated audiences, audiences generated in other Experience Platform apps such as [*Adobe Journey Optimizer*](https://experienceleague.adobe.com/en/docs/journey-optimizer/using/audiences-profiles-identities/audiences/create/create-landing-page), and more. |
| **Audience data type** | **Supported** | **Description** | **Use cases** |
|---|---|---|---|
| People audiences | Yes | Based on customer profiles, allowing you to target specific groups of people for marketing campaigns. | Frequent buyers, cart abandoners |
| Account audiences | No | Target individuals within specific organizations for account-based marketing strategies. | B2B marketing |
| Prospect audiences | No | Target individuals who are not yet customers but share characteristics with your target audience. | Prospecting with third-party data |
| Dataset exports | No | Collections of structured data stored in the *Adobe Experience Platform* Data Lake. | Reporting, data science workflows |
| **Item** | **Type** | **Notes** |
|---|---|---|
| Export type | Audience export | You are exporting all members of an audience with the identifiers (such as ECID, hashed email, or a custom user ID) used in the *Adhese* destination. |
| Export frequency | Batch | [Batch destinations export](https://experienceleague.adobe.com/en/docs/experience-platform/destinations/how-destinations-work/profile-export-behavior#file-based-destinations) files to downstream platforms in increments of three, six, eight, twelve, or twenty-four hours. |
Additional configuration is required for inventory categories other than *Display* to be available in the *Campaign Manager* interface. If you would like the other categories to be available in the Campaign Manager interface, please [contact Support.](https://adhese.atlassian.net/servicedesk/customer/portals)
At publication level, an inventory category can be set. This inventory category has four options: - -- or none: this is the default option - Display - In Store - Sponsored Product [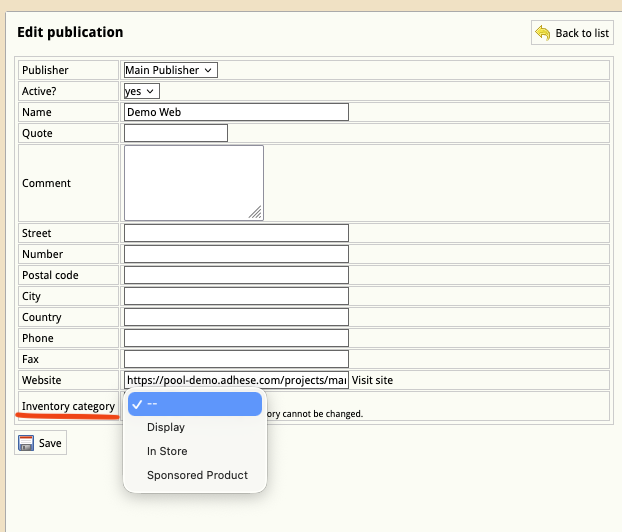](https://documentation.adhese.org/uploads/images/gallery/2026-06/2wZ2ihTFIbPCa33u-schermafbeelding-2026-06-12-om-10-34-03.png) Once an inventory category is set, the inventory for that publication will be restricted to a specific campaign or booking type in the Campaign Manager UI. In this case, the inventory under Demo Web will only be available when selecting the *Display* booking type. [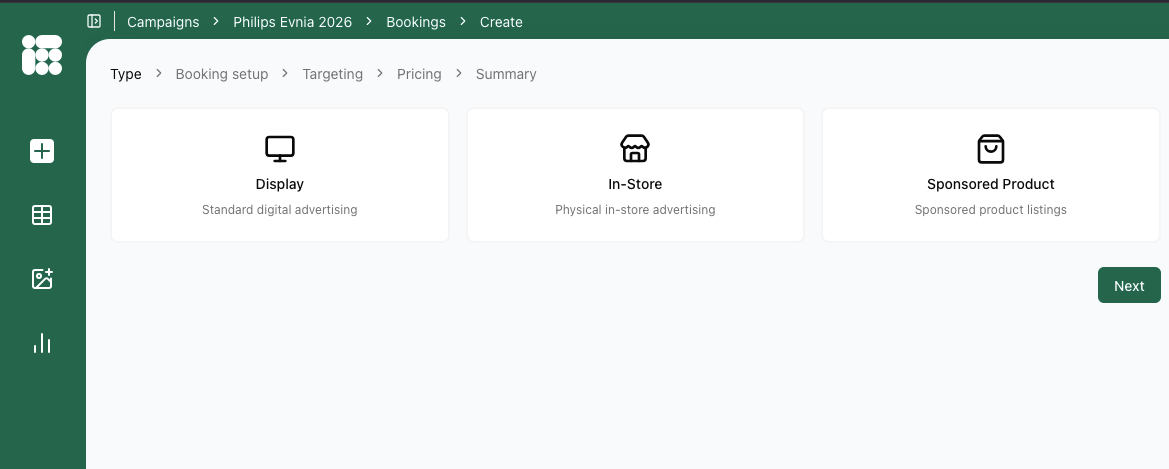](https://documentation.adhese.org/uploads/images/gallery/2026-06/p4De6uO7j0aFFt5a-schermafbeelding-2026-06-29-om-15-01-24.png) Note: Once the *Inventory Category* has been set and saved, it cannot be changed!