# Positions

All necessary elements of a position, namely the [publication](https://documentation.adhese.org/books/inventory-setup/page/publications), [location](https://documentation.adhese.org/books/inventory-setup/page/locations) and [format](https://documentation.adhese.org/books/inventory-setup/page/formats), are available now. In the simplified diagram of the inventory’s structure, we have inserted a subset of the newly created publications, locations and formats:

[![positions1.png](https://documentation.adhese.org/uploads/images/gallery/2024-06/scaled-1680-/q3TkNd7locZo6sx5-positions1.png)](https://documentation.adhese.org/uploads/images/gallery/2024-06/q3TkNd7locZo6sx5-positions1.png)

# Create a position

The *Positions* screen consists of a table with nine columns:

1. The *#* column displays the ID of the location.
2. The *Location* column shows the name of the publication and the location of the position.
3. The *Name* column details the (optional) name of the position.
4. The *Format* column indicates the format of the position.
5. The *Width* column specifies the width of the format.
6. The *Height* column specifies the height of the format.
7. The *Size (kB)* column displays the maximum file size of the format.
8. The *Position type* column details the [position type](https://documentation.adhese.org/books/inventory-setup/page/positions#bkmrk-position-types) of the position.
9. The content of the *Subformats* column is hidden by default. To display the content, click *Show*. The *Subformats* column shows all subformats that belong to the position's format.

To filter the *Positions* belonging to a specific publication, select a publication from the **Show only** drop-down menu above the list and click the magnifying glass icon.

You can also filter the *Positions* screen by the status of a position's connected format using the **Filter** drop-down menu. Determine the number of results to display from the **Number of results** drop-down.

Use the **search** bar to search for specific positions, e.g. by entering a subformat. You can sort the list of positions by location, the name of the position, or the format by clicking the relevant table column's heading.

Download a **spreadsheet** file that contains a list of all positions by clicking the *Download all positions as spreadsheet* button.

### Create a new position

To create a new position for each desired combination of a format and location of a publication:

1. Click *Admin* in the left navigation menu. This opens the *Administration* screen.
2. Click *Positions*. The *Positions* screen opens:
    
    [![Schermafdruk van 2024-10-22 09-59-58.png](https://documentation.adhese.org/uploads/images/gallery/2024-10/scaled-1680-/rGfAjx3Q4Rf2nTMb-schermafdruk-van-2024-10-22-09-59-58.png)](https://documentation.adhese.org/uploads/images/gallery/2024-10/rGfAjx3Q4Rf2nTMb-schermafdruk-van-2024-10-22-09-59-58.png)
3. Click the *Create a position* button. This opens the *Create a new position* screen.  
    [![Schermafdruk van 2024-10-22 10-15-45.png](https://documentation.adhese.org/uploads/images/gallery/2024-10/scaled-1680-/8bpvfyIeV4I6suuj-schermafdruk-van-2024-10-22-10-15-45.png)](https://documentation.adhese.org/uploads/images/gallery/2024-10/8bpvfyIeV4I6suuj-schermafdruk-van-2024-10-22-10-15-45.png)
4. Choose a location from the **Location** drop-down.
5. Choose a format from the **Format** drop-down.
6. (Optional) Enter a name for the position in the **Name** field.
7. If you wish to serve, for example, a leaderboard banner ad in the header and the footer of the homepage, you have two identical formats but at a different position.   
    To differentiate between positions, enter a unique integer number and/or string of characters in the URL field for each subsequent position.
8. (Optional) In the **Preview URL** field, enter a URL for live previewing a creative. Instead of linking the preview URL to a publication, you can select a specific page where this position will appear.
9. (Optional) Enter a comment in the **Comment** field.
10. Skip the next property (Server) as it is of no significance anymore.
11. Select a position type from the **Position type** drop-down. Refer to [Position types](https://documentation.adhese.org/books/inventory-setup/page/positions#bkmrk-position-types) for a more detailed explanation of this concept.
12. Click the *Save* button beneath the form to save your new position.

<p class="callout info">To create a position with similar properties as an existing position, you can copy the existing position.</p>

### Edit a position

To edit a position:

1. Go to the *Administration* screen. Click *Admin* in the left navigation menu.
2. Click *Positions*.
3. In the list of positions, click the name of the position or click the edit icon [![afbeelding.png](https://documentation.adhese.org/uploads/images/gallery/2024-06/scaled-1680-/IstAXFeUKktevMfN-afbeelding.png) ](https://documentation.adhese.org/uploads/images/gallery/2024-06/IstAXFeUKktevMfN-afbeelding.png)for the position you want to edit. The *Edit position* screen opens:  
    [![Schermafdruk van 2024-10-22 10-18-17.png](https://documentation.adhese.org/uploads/images/gallery/2024-10/scaled-1680-/Ka61Thjzbny12V1e-schermafdruk-van-2024-10-22-10-18-17.png)](https://documentation.adhese.org/uploads/images/gallery/2024-10/Ka61Thjzbny12V1e-schermafdruk-van-2024-10-22-10-18-17.png)
4. Change any of the position’s details.
5. Click *Save*.

### Copy a position

Copying a position is a simple method of creating a new position with similar properties to an existing one. To copy a position:

1. Go to the *Administration* screen. Click *Admin* in the left navigation menu.
2. Click *Positions*.
3. Click the copy icon [![afbeelding.png](https://documentation.adhese.org/uploads/images/gallery/2024-06/scaled-1680-/TYPfr7kY2qMK94QR-afbeelding.png)](https://documentation.adhese.org/uploads/images/gallery/2024-06/TYPfr7kY2qMK94QR-afbeelding.png) for the position you want to copy. The *Edit position (this is a copy)* screen opens:  
    [![Schermafdruk van 2024-10-22 10-18-17.png](https://documentation.adhese.org/uploads/images/gallery/2024-10/scaled-1680-/4TMpDMxZYzDnu30w-schermafdruk-van-2024-10-22-10-18-17.png)
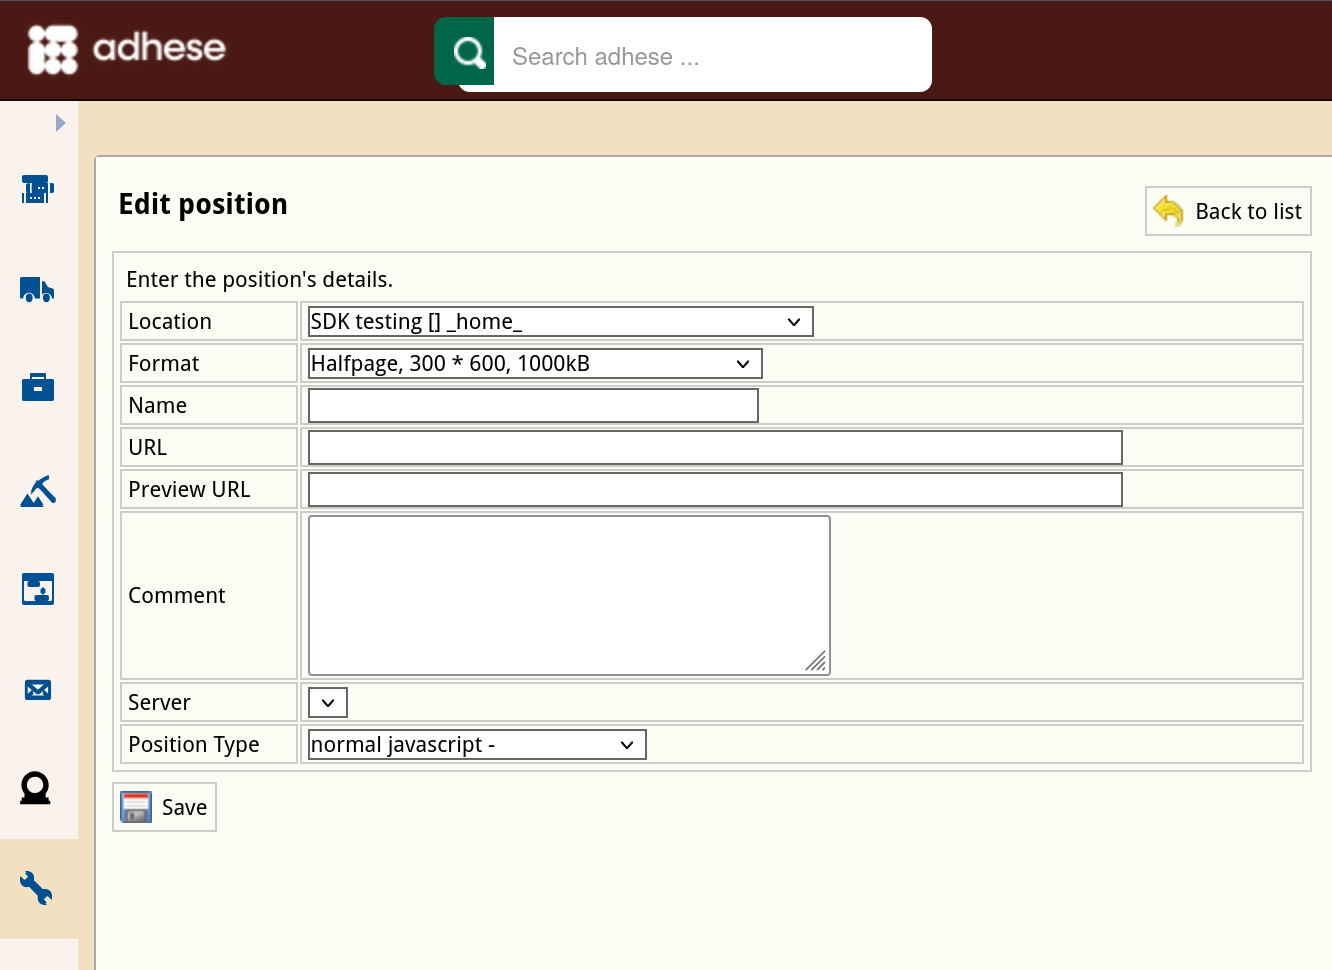
](https://documentation.adhese.org/uploads/images/gallery/2024-10/4TMpDMxZYzDnu30w-schermafdruk-van-2024-10-22-10-18-17.png)
4. Change any of the position’s details.
5. Click *Save*.

### Delete a position

To delete a position:

1. Go to the *Administration* screen. Click *Admin* in the left navigation menu.
2. Click *Positions*.
3. In the list of positions, click the publisher's name or click the trash can icon [![afbeelding.png](https://documentation.adhese.org/uploads/images/gallery/2024-06/scaled-1680-/4akUlCmC1bDKiPTu-afbeelding.png)](https://documentation.adhese.org/uploads/images/gallery/2024-06/4akUlCmC1bDKiPTu-afbeelding.png)for the position you want to delete.
4. Click the **Yes, remove this position** button to confirm.

If a position has delivered impressions in the past and is deleted, it will be set to inactive.

Reports stay available after the removal of a position.

# Position types

Position types add additional functionality to a position. Their main purpose is to define the MIME type of the response and the possible templates wrapped around the output.

<p class="callout info">A MIME type or Internet Media Type is used to ensure that the receiver correctly interprets the resource. A MIME type indicates the type of data contained in a file. Web browsers use MIME types to determine how to display files that are not in HTML format.</p>

Position types are client-specific implementations that are defined in the setup stage.

The *Position types* screen presents a table with three columns:

1. The *N*<sup>*o*</sup> column displays the ID of the position type.
2. The *Position type* column shows the name of the position type.
3. The *Template* column shows the template that belongs to the position type.

### Create a new position type

To add a position type:

1. Click *Admin* in the left navigation menu. This opens the *Administration* screen.
2. Click *Position types*, the *Position types* screen opens:  
    [![Schermafdruk van 2024-10-22 10-23-47.png](https://documentation.adhese.org/uploads/images/gallery/2024-10/scaled-1680-/s2BQ9QgPy7CAickm-schermafdruk-van-2024-10-22-10-23-47.png)
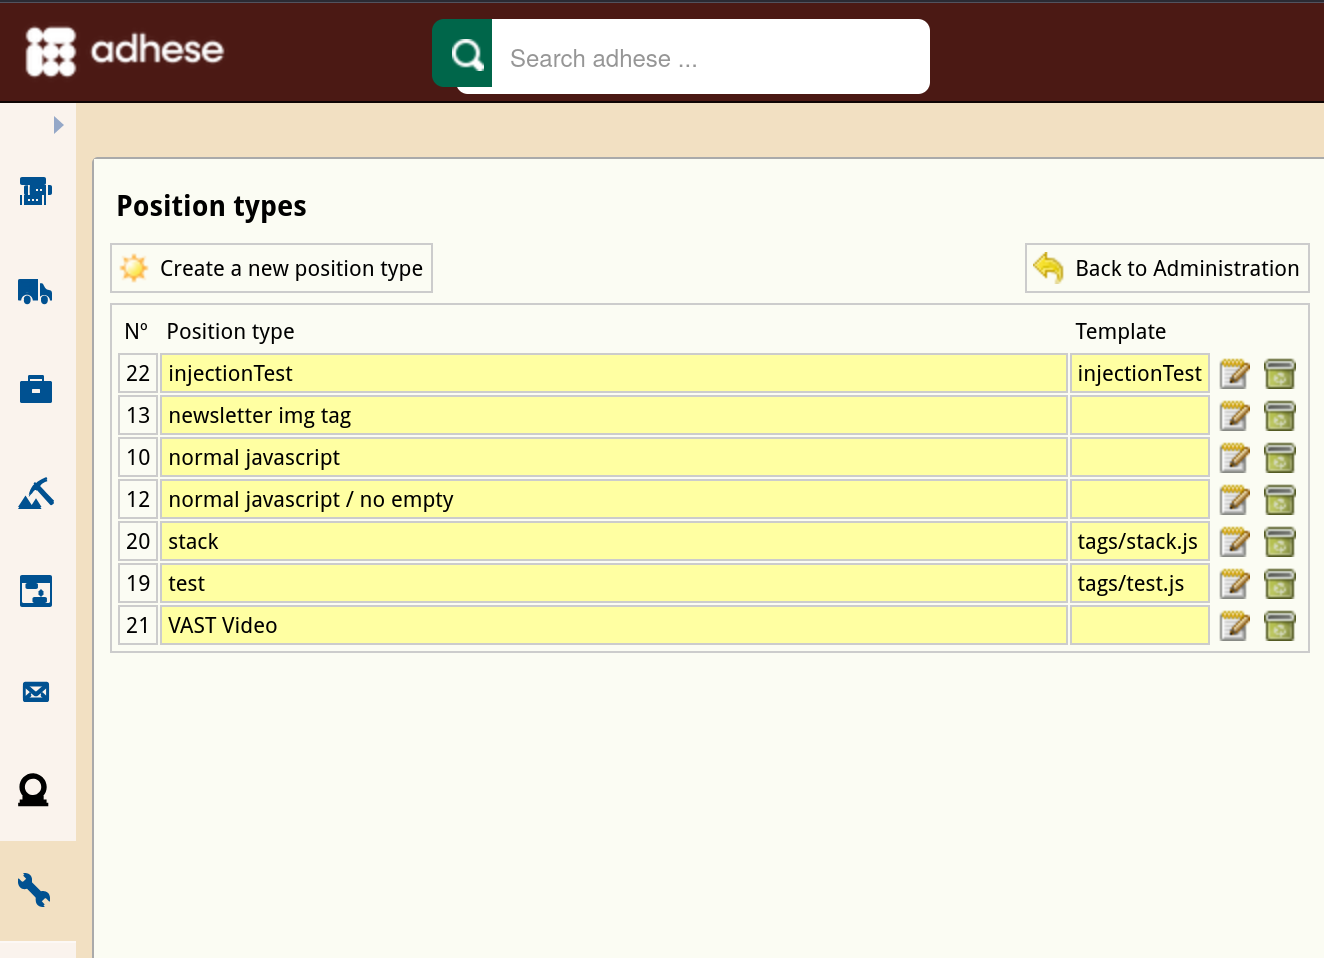
](https://documentation.adhese.org/uploads/images/gallery/2024-10/s2BQ9QgPy7CAickm-schermafdruk-van-2024-10-22-10-23-47.png)
3. Click the *Create a new position type* button. The *Create a new position type* screen opens:  
    [![Schermafdruk van 2024-10-22 10-24-09.png](https://documentation.adhese.org/uploads/images/gallery/2024-10/scaled-1680-/pWAf7rkBMfQipIdm-schermafdruk-van-2024-10-22-10-24-09.png)
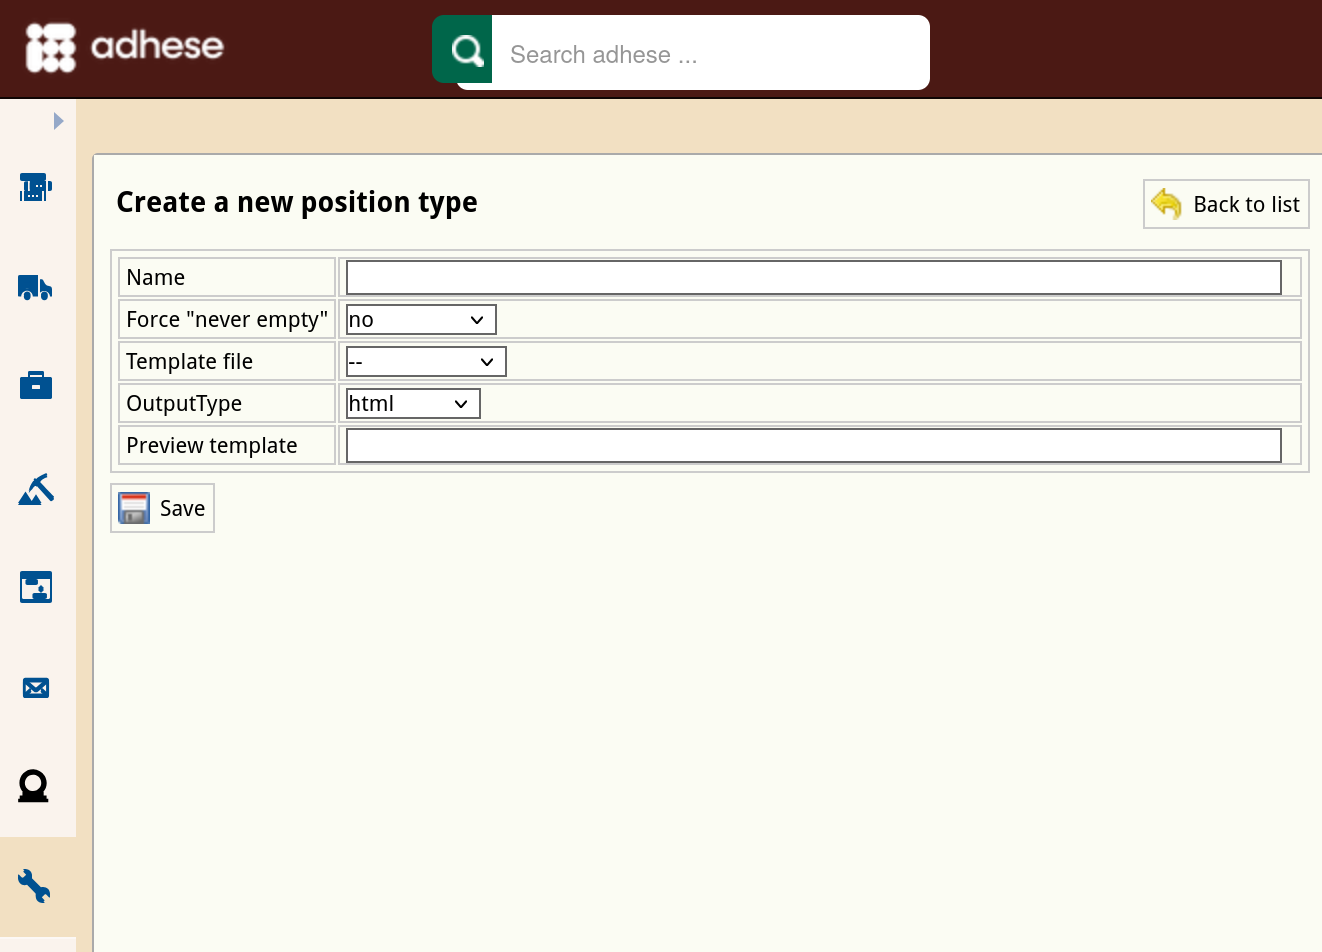
](https://documentation.adhese.org/uploads/images/gallery/2024-10/pWAf7rkBMfQipIdm-schermafdruk-van-2024-10-22-10-24-09.png)
4. Enter a name for the position type in the **Name** field*.*
5. In the **Force “Never empty”** drop-down, select one of the following: 
    - Select ***Yes*** to ensure that the position always displays an ad. This is particularly useful when a web page would otherwise break if no ad is available.
    - ***Continuous*** is a specific option for email campaigns. Select *Continuous* to equate the delivery period of the booking to the delivery period of the email campaign. The booking will show a configurable number of days before and after the start and end date. If you create a booking for this position, you will receive the following notification:
        
        [![create_a_new_position_type3.png](https://documentation.adhese.org/uploads/images/gallery/2024-06/scaled-1680-/AtEHjpNC0GEyTmCZ-create-a-new-position-type3.png)](https://documentation.adhese.org/uploads/images/gallery/2024-06/AtEHjpNC0GEyTmCZ-create-a-new-position-type3.png)
        
        <p class="callout info">Make sure the request contains the <i>da</i> (date) parameter.</p>
    - Select ***No*** if none of the above options applies.
6. (Optional) Select a template file from the **Template file** drop-down. Refer to [Templates](https://documentation.adhese.org/books/adhese-ui/page/the-administration-screen#bkmrk-formats-and-template) for more information about template files.
7. Select an output type (*JavaScript*, *HTML*, *filename*, or *XML*) from the **Output type** drop-down.
8. (Optional) In the **Preview template** field, provide a template if a template is necessary to render the preview correctly.
9. Click the *Save* button.

### Edit a position type

To edit a position type:

1. Go to the *Administration* screen. Click *Admin* in the left navigation menu.
2. Click *Position types*.
3. In the list of position types, click the name of the position type or click the edit icon [![afbeelding.png](https://documentation.adhese.org/uploads/images/gallery/2024-06/scaled-1680-/IstAXFeUKktevMfN-afbeelding.png)](https://documentation.adhese.org/uploads/images/gallery/2024-06/IstAXFeUKktevMfN-afbeelding.png) for the position type you want to edit. The *Edit position type* screen opens:  
    [![Schermafdruk van 2024-10-22 10-24-50.png](https://documentation.adhese.org/uploads/images/gallery/2024-10/scaled-1680-/42EksCnTUkhpWQTv-schermafdruk-van-2024-10-22-10-24-50.png)
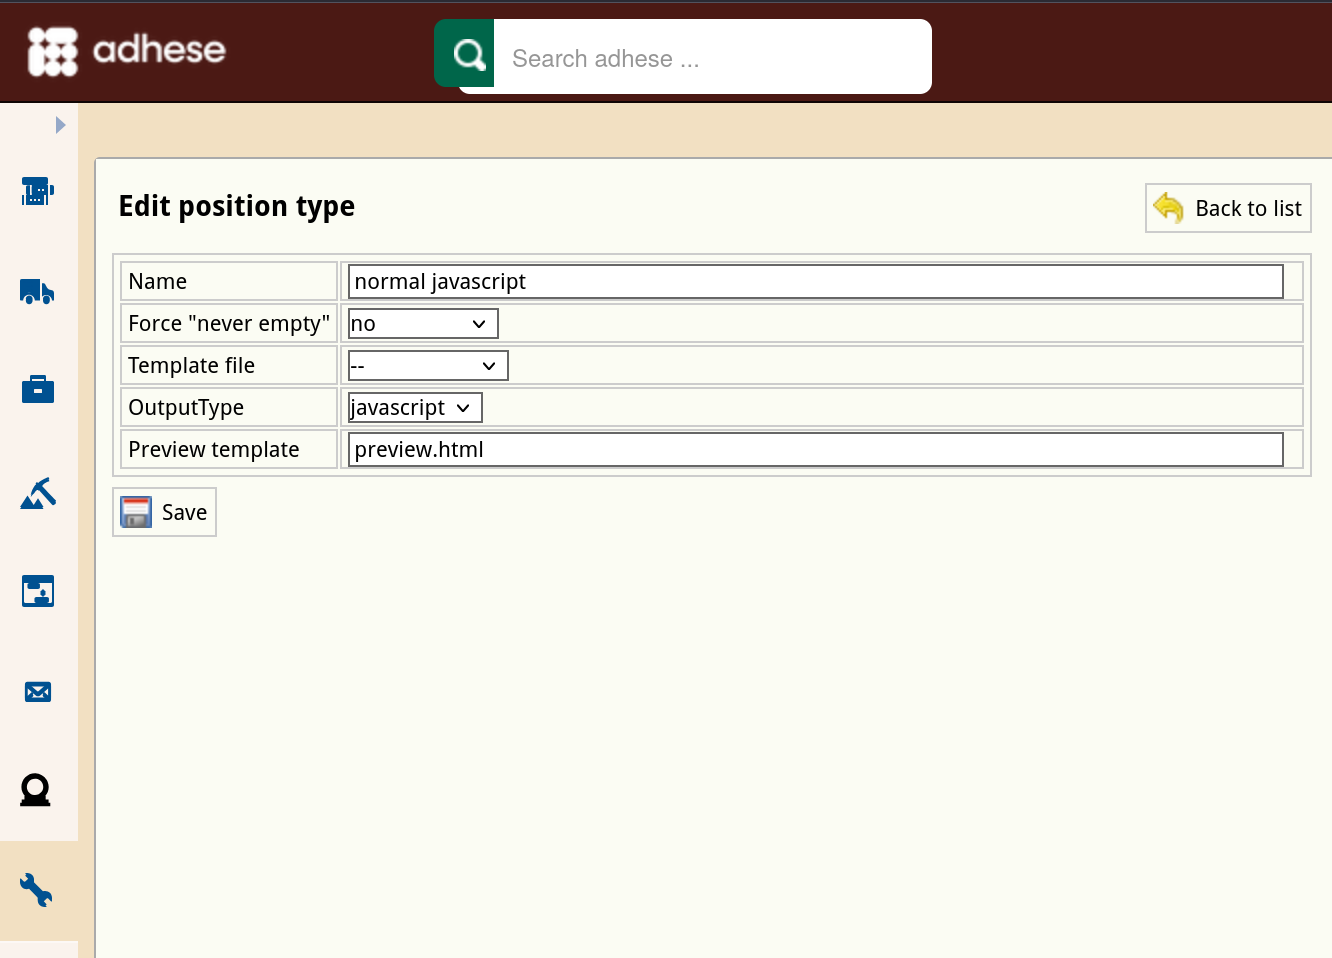
](https://documentation.adhese.org/uploads/images/gallery/2024-10/42EksCnTUkhpWQTv-schermafdruk-van-2024-10-22-10-24-50.png)
4. Change any of the position type’s details.
5. Click *Save*.