
Uploading Creatives
Once a new booking has been saved, you can upload a creative. A creative is the visual element of an advertising campaign that is displayed to visitors on your platform.
Upload a creative
You can upload different kinds of creatives in Adhese. Adhese supports the following format types:
- Image files (JPG, GIF, or PNG)
- HTML5 files
- Video files (MP4 and FLV)
- Audio files (MP3 and MPEG)
- Text
- Third-party JavaScript tags.
In addition, Adhese has developed its own format, Advar, to simplify the creation of complex creatives. Advar templates can be customized to take various forms, including video advertising formats, text ads, or content.
It depends on the client which fields are compulsory to complete. To save a creative, you must select a format. If a mandatory field is left blank, the creative can still be saved, but the mandatory fields will be set to their default values.
Add an HTML5 creative
To add an HTML5 creative:
- Go to
thethe Campaignclickclick Campaigns - Click the campaign for which you want to upload an HTML5 creative.
- Click
thethe CreativesTheThe Creative - Click
thethe Add HTML5
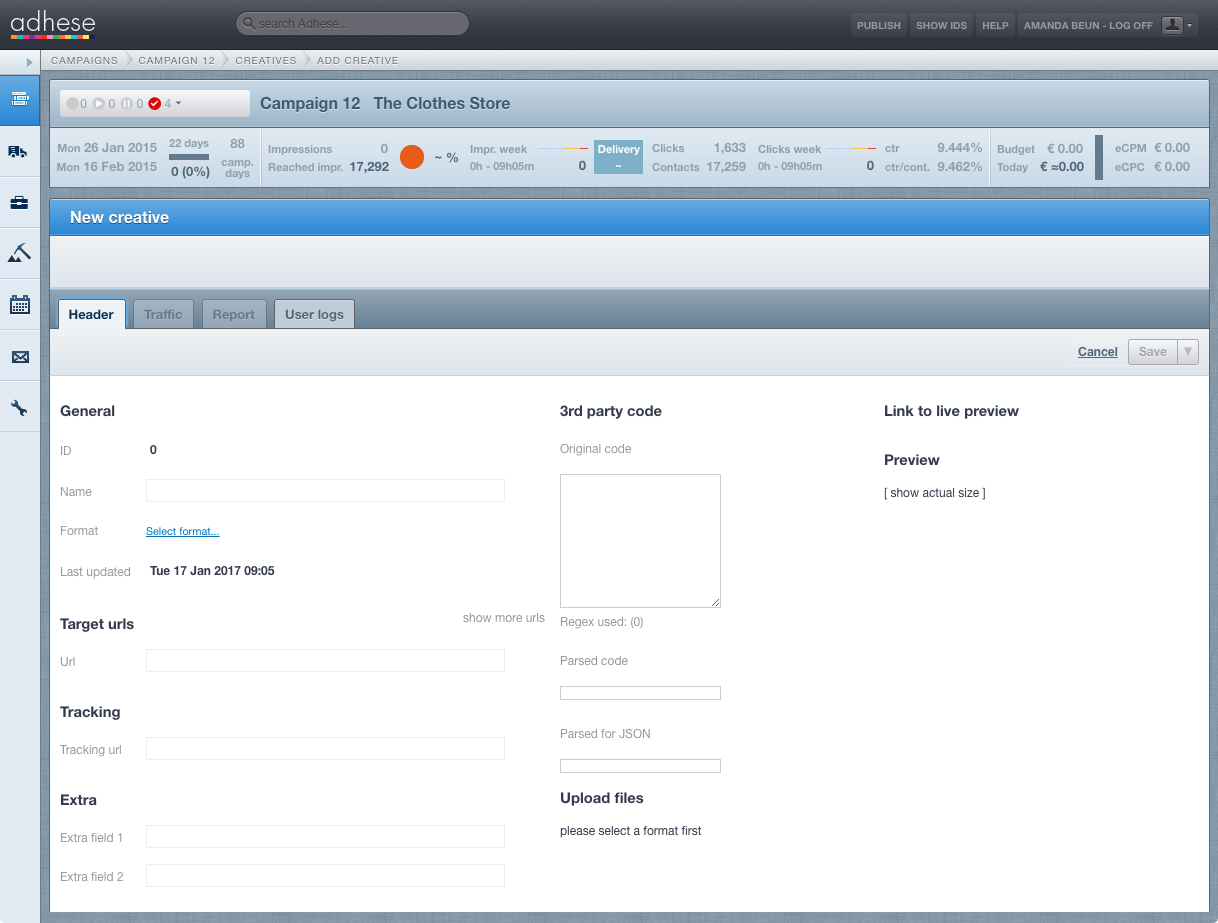
Specify the details of the creative under the following headings:
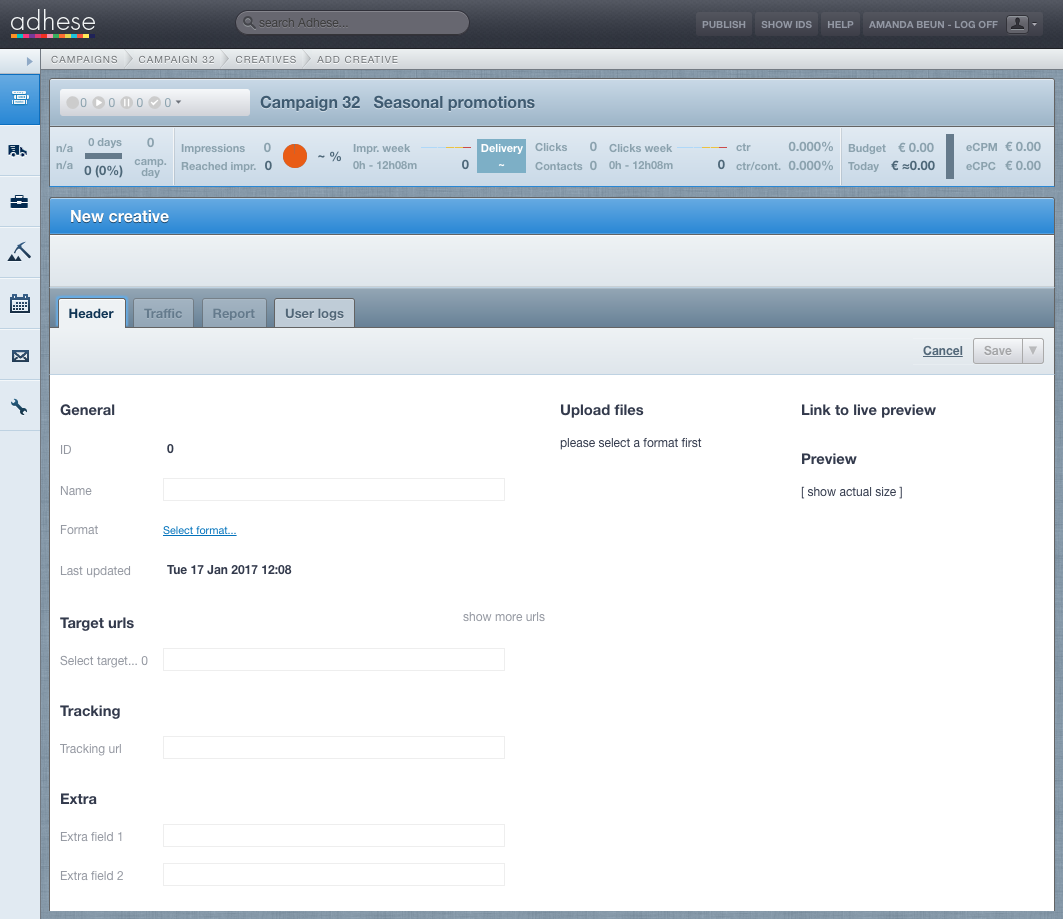
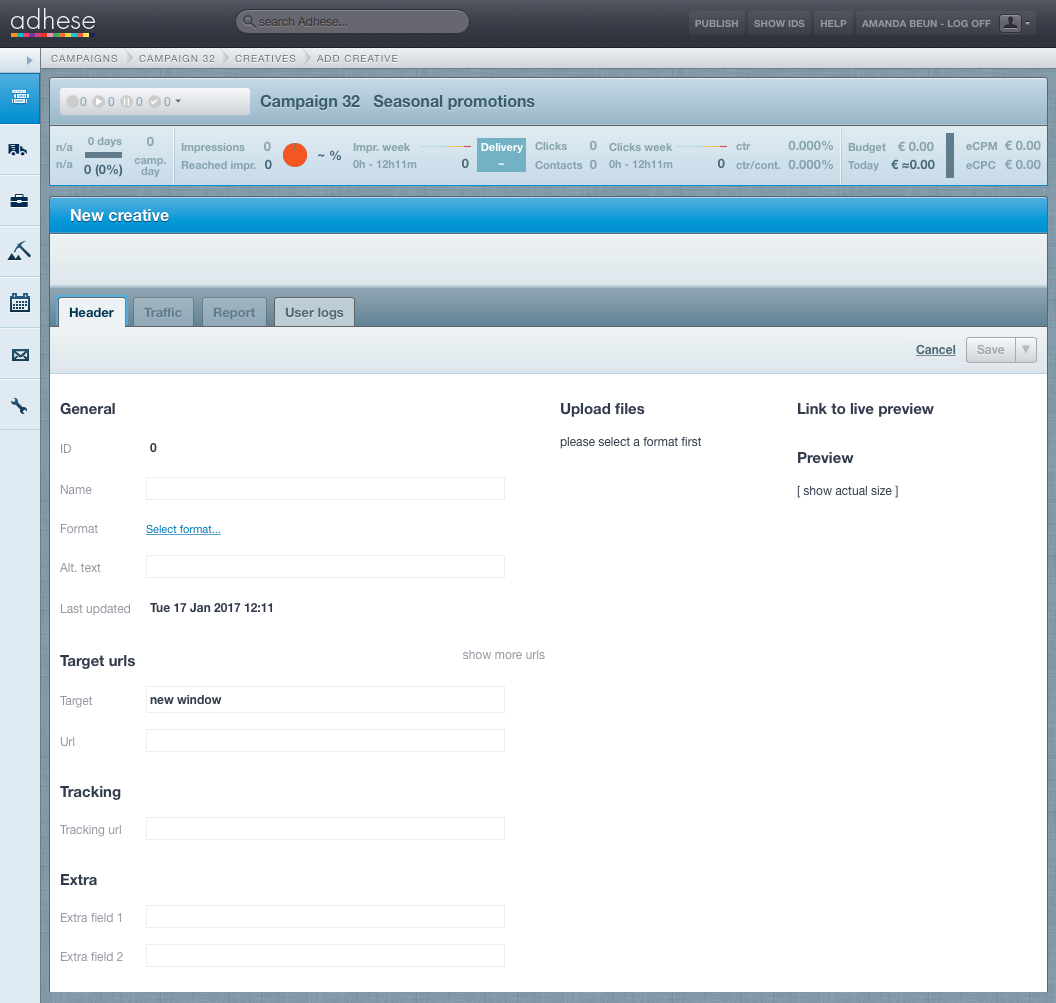
General
TheThe ID- Give the creative a meaningful and clear name in
thethe Name field. A distinct name will make it easier to recognise the creative in the next step when it is attached to a booking. - In
thethe Formatthethe Select formatthethe List of formats - The Last updated field indicates the most recent update of the creative.
Target URLs
-
In
thethe Select targetthethe landing page. Clickthethe show more URLs link to add multiple target URLs to the creative.
You may omit http:// from the target URL, as Adhese will automatically add it. If the target URL is over a secure connection, you must add httpS:// to it.
Tracking
- Adhese monitors every campaign, booking, and creative, and reports are available in the interface. It is also possible to let a third party monitor a creative. The client needs to provide a tracking URL, which is inserted in the Tracking URL
toto Third-party tracking.
Extra
TheThe Extra field 1andand 2 input fields are custom input fields depending on the chosen format and template. These fields are used to add extra functions, such as changing the background colour of a wallpaper ad.
Upload files
A format needs to be selected before you can upload an HTML5 creative.
To upload an HTML5 creative, click the the Main file button. You need to choose a correct .zip HTML5 creative file. For details, see the the HTML5 Creative file section below.
While uploading a .zip file, Adhese verifies various potential issues, including file size and proper implementation of the clickTag.
If there is an issue, the .zip file is not uploaded and Adhese gives an error message.
If you are are convinced that an error notification is not justified, you you can disregard disregard it by simply checking the the Ignore errors (only for me) box box under the the Alternative creative section and upload the file again.
Next to the .zip file, you can upload up to five additional files. This enables you to upload HTML5 creatives with additional material, such as a wallpaper.
Please note that if you do not provide a clickTag and select Ignore errors (only for me), Adhese will not track your Clicks.
Click the the Save button after the .zip file is uploaded.
HTML5 Creative file
The HTML5 creative file is a a .zip file that defines the creative or advertisement. You can either receive such a .zip file from the advertiser or prepare it by yourself.
To create it by yourself, make sure:
- The .zip file contains at least
anan index.htmhtmoror index.html file or another unique .htm or .html file. This file will be used as the starting point for the HTML5 ad.
Ensure that the filename only contains alphanumeric characters, dots, and underscores. Other characters may cause issues when Adhese processes the file.! - The main .html file contains a clickTag. Adhese relies on it to track clicks correctly.
- The main .html file relatively refers to all code and assets. This means that all links in the HTML5 creative, such as the link to an image within the ad, need to use a relative path, for example,/graphics/ad-image.png or
<img src="/graphics/ad-image.png">. This enables the ad to be self-contained and, therefore, to run independently or to render without a network connection.
Some additional guidelines:
- There are no specific rules for the folder structure inside the .zip file. You can organize all files in different subfolders or within the root folder.
- The number of files should be kept to a minimum because each different file results in a single request that affects the web page's performance where the ad is being loaded.
All links in the HTML5 creative, such as the link to an image within the ad, need to use a relative path, e.g. /graphics/ad-image.png or img src="/graphics/ad-image.png". This enables the advertisement to run independently. External libraries and web fonts can be an exception to this guideline.
The use of Adhese macros, such as [adheseReplace:xx] or <ADHESE_X>, from within the HTML5 file is not possible. An Adhese value will not replace these macros.
clickTag
To let Adhese measure the clicks of the banner, some extra work is required:
-
We require a JavaScript variable to be present in the code. This variable has to be named clickTag in order to be picked up.
The value of the clickTag variable needs to be a string literal within single quotes:Example<a id="clickThroughBtn" target='_new' href="">Register click</a> <script> var clickTag = ''; document.querySelector('#clickThroughBtn').href = clickTag; </script> ...The HTML code above is only an example of how to use the clickTag variable. Simply copying and pasting this code into your file will not suffice! The clickTag variable needs to be integrated into the already existing click logic.
- Place this variable in the main HTML file. This is the only file that will be parsed.
- The Adhese UI will provide the landing page URL. Once the banner is uploaded, this URL, together with our click tracker, will be assigned to the clickTag variable.
Make sure to make use of this variable when implementing the click-through logic!
...
   var clickTag = '';
   var clickTag2 = '';
   var clickTag3 = '';
...
All clicks will be counted collectively to calculate the total number of clicks on a specific banner. However, in the more detailed reports, you can view the clicks per URL.
Adhese detects the clickTag in compressed code, which reduces file sizes by removing line breaks, tabs, and double spaces.
Although the clickTag variable is present in the code and the click URL is correctly filled in by Adhese, it is still possible that Adhese will not measure clicks.
If this is the case, you will have to contact the supplier of the HTML5 file. It is possible that the clickTag variable is not being used or is being overwritten.
Save
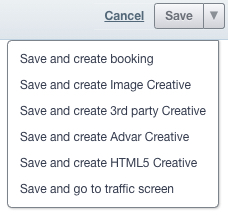
To save the file, click the Save button. When you click the arrow next to the button, additional saving options are available in a drop-down menu.

| Save and create a booking | Saves the current creative and opens a new create booking screen |
| Save and create Image Creative | Saves the current creative and opens a create Image Creative screen |
| Save and create 3rd party Creative | Saves the current creative and opens a create 3rd party Creative screen |
| Save and create Advar Creative | Saves the current creative and opens a create Advar Creative screen |
| Save and create HTML5 Creative | Saves the current creative and opens a create HTML5 Creative screen |
| Save and go to traffic screen | Saves the current creative and goes to the traffic screen for that creative |
More files
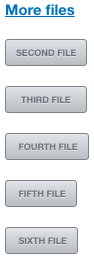
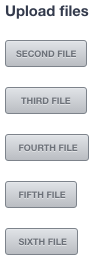
If a creative consists of more than one file, e.g., a background image and a video clip, you can add these individual files to the creative. After a format is selected, a new section becomes available: More files. This section enables you to add up to six files to a creative. Click More files... to expand this section. Five buttons appear that allow you to upload more files.

Additional creatives
Once you have selected a format, you can upload the main HTML5 creative file. You must save the main creative before uploading any additional creatives, which are variants of the main creative, such as images with different dimensions for various platforms. For further guidance on uploading additional creatives, please refer to the Additonal creatives chapter.
Preview
After the file is uploaded, a visual preview of the creative appears. Check if there are no errors.
You can switch between the creative's actual size and its thumbnail. To show the exact size, click the [ show actual size ] link, or click the the [ show thumbnail ] link to show the thumbnail.
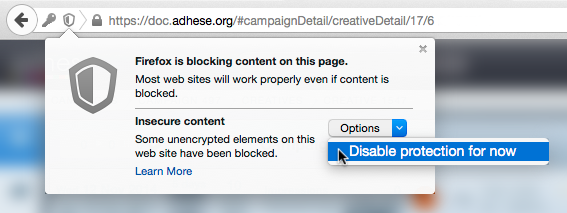
If the HTML5 contains an action script with an HTTP request, various browsers may block the preview because the Adhese interface connects through HTTPS. It depends on the kind of browser what should be done to preview the creative:
- In Google Chrome, click the shield button situated on the right of the browser's address bar. Click the Load unsafe script

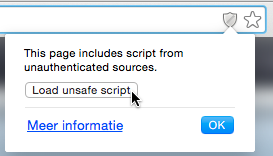
- In Mozilla Firefox, click the shield button situated on the left of the browser's address bar. In the drop-down menu, choose Disable protection for now.


Link to live preview
You can preview the creative in its context after the file is uploaded and saved. Use this feature to check for errors (see the next paragraph). We recommend checking the live preview in more than one browser. No impressions will be counted while previewing a creative in the live-preview mode. For more information about live previewing a creative, refer to to Live preview a creative.
The preview link will only be available if the booked position has the same dimensions as the selected format for the creative.
The live preview URL can be copied and shared with the advertiser to ensure that the creative is displayed as desired.
Checking the URL of the uploaded creative
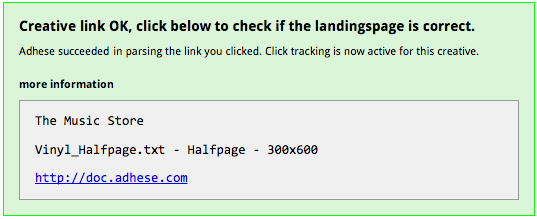
After you have uploaded and saved the HTML5 creative, the URL of the landing page needs to be verified. To verify the URL:
- Do one of the following:
- Click on the preview of the creative in the Adhese interface, or
- Click on the creative in the live-preview mode.
A new page is opened. If the URL is correct, the following message appears:
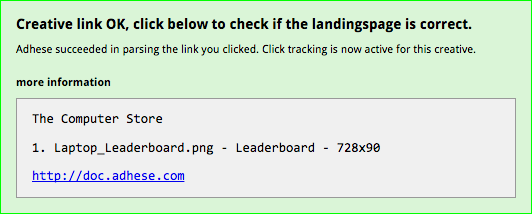
If the above message does not appear, Adhese does not measure any clicks.
-
Click the link in the message to check if the URL goes to the actual landing page.

If the preview does not click through, the HTML5 creative may not contain the clickTAG. For information about how to add a clickTAG correctly, refer to the above Upload files paragraph.
Add an image
Adhese enables users to upload image files in formats such as JPG, GIF, and PNG.
To add an image file:
- Go to the Campaign overview and click Campaigns in the left navigation menu of Adhese.
- Click the campaign for which you want to upload a creative.
- Click
thethe CreativesTheThe Creative - Click
thethe Add ImageTheThe New creative

Specify the details of the creative under the following headings:
General
TheThe ID- Give the creative a meaningful and clear name in
thethe Name - In
thethe Formatthethe Select formatthethe List of formats - (Optional) In
thethe Alternative Text field, provide text that will appear if the image cannot be displayed or if someone hovers over the image. - The Last updated field indicates the most recent update of the creative.
Target URLs
- In
thethe Target field, you can choose whether the URL of the target or landing page should open in a new browser tab or in the same browser tab of the visitor. The default setting is setatat new window. To change this default setting:ClickClick new window.TheThe Target of link modal window opens.SelectSelect same window- Click
thethe Save
-
In the URL field, determine the target URL or the URL of the landing page. Click
thethe show more URLs
You may omit http:// from the target URL, as Adhese will automatically add it. If the target URL is over a secure connection, you must add httpS:// to it.
Tracking
- Adhese monitors every campaign, booking, and creative, and reports are available in the interface. It is also possible to let a third party monitor a creative. The client needs to provide a tracking URL, which is inserted in the Tracking URL
Extra
TheThe Extra field 1andand 2 input fields are custom input fields depending on the chosen format and template. These fields are used to add extra functions, such as changing the background colour of a wallpaper ad.
Upload files
A format needs to be selected before you can upload an image file.
To upload an image file, click the the Main file button. The file should have a .jpg, .gif or .png filename extension.
Adhese analyses uploaded image files based on their dimensions and file size. If an image file exceeds the predefined maximum values, Adhese rejects the creative and displays an error message.
Save
To save the file, click the Save button. When you click the arrow next to the button, additional saving options are available in a drop-down menu.

| Save and create booking | Saves the current creative and opens a new create booking screen |
| Save and create Image Creative | Saves the current creative and opens a create Image Creative screen |
| Save and create 3rd party Creative | Saves the current creative and opens a create 3rd party Creative screen |
| Save and create Advar Creative | Saves the current creative and opens a create Advar Creative screen |
| Save and create HTML5 Creative | Saves the current creative and opens a create HTML5 Creative screen |
| Save and go to traffic screen | Saves the current creative and goes to the traffic screen for that creative |
More files
If a creative consists of more than one file, e.g. a background image and a video clip, you can add these individual files to the creative. After a format is selected, a new section becomes available: More files. This section enables you to add up to six files to a creative. Click Click More files... to expand this section. Five buttons appear that allow you to upload more files.
Additional creatives
Once you have selected a format, you can upload the main creative file. You must save the main creative before uploading any additional creatives, which are variants of the main creative, such as images with different dimensions for various platforms. For further guidance on uploading additional creatives, please refer to Additional creatives.
Preview
After the file is uploaded, a visual preview of the creative appears. Check if there are no errors.
You can switch between the creative's actual size and its thumbnail. To show the exact size, click the [ show actual size ] link, or click the [ show thumbnail ] link to show the thumbnail.
Link to live preview
You can preview the creative in its context after the file is uploaded and saved. Use this feature to check for errors (see the next paragraph). We recommend checking the live preview in more than one browser. No impressions will be counted while previewing a creative in the live-preview mode. For more information about live previewing a creative, refer to Live preview a creative.
The preview link will only be available if the booked position has the same dimensions as the selected format for the creative.
The live preview URL can be copied and shared with the advertiser to ensure that the creative is displayed as desired.
Checking the URL of the uploaded creative
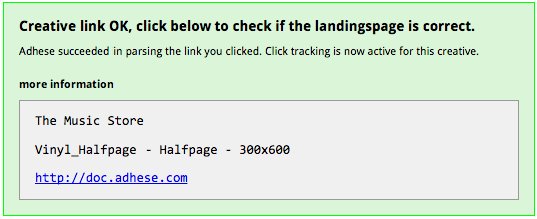
After you have uploaded and saved the image, the URL of the landing page needs to be verified. To verify the URL:
- Do one of the following:
- Click on the preview of the creative in the Adhese interface, or
- Click on the creative in the live-preview mode.
A new page is opened. If the URL is correct, the following message appears:

If the above message does not appear, Adhese does not measure any clicks. Check the syntax of the URL for possible mistakes.
- Click the link in the message to check if the URL goes to the actual landing page.

Add a third-party tag
Advertisers and advertising agencies frequently use their own ad servers. Adhese allows for the integration of third-party ad tags from multiple external ad servers and networks. Refer to the List of third-party ad servers and marketplaces for an overview of third-party ad servers.
To add a third-party tag:
- Go to
thethe Campaign overview and click Campaigns - Click the campaign for which you want to upload a creative.
- Click
thethe Creatives - Click
thethe Add 3rd party

Specify the details of the creative under the following headings:
General
TheThe ID- In the Name field, give the creative a meaningful and clear name. A distinct name makes it easy to recognise the creative in the next step when it is attached to a booking.
- In
thethe Formatthethe Select formatthethe List of formats - The Last updated field indicates the most recent update of the creative.
Target URLs
- The URL of the target or landing page for a third-party tag is typically included in the code by the third party. As a result, you don't need to provide the target URL in the URL field.
Tracking
- Adhese monitors every campaign, booking, and creative, and reports are available in the interface. It is also possible to let a third party monitor a creative. The client needs to provide a tracking URL, which is inserted in the Tracking URL
Extra
TheThe Extra field 1andand 2 input fields are custom input fields depending on the chosen format and template. These fields are used to add extra functions, such as changing the background colour of a wallpaper ad
3rd party code
- The JavaScript code of the third-party tag needs to be inserted in
thethe Original code
Adhese checks the code when the creative is saved. If Adhese recognises the external server and its specific code, it will process and adjust it accordingly. The adjusted code will then appear in the Parsed code and and Parsed for JSON fields.
If Adhese does not automatically detect and parse the third-party tag, the unmodified third-party tag will be copied.
To ensure accurate tracking of impressions and clicks and reduce third-party discrepancies in reporting, inserting the appropriate Adhese tokens into the placeholders of the third-party tag code provided is crucual. Adhese will replace placeholders when the third-party tag is recognised. If the tag is not recognised, replace a timestamp placeholder with %n and a click-tracking placeholder with %c. Adhese will then replace these placeholders with the corresponding values while saving the creative. For example, a third-party tag could look like this:
<script src="https://someadserver.com/ad/1234-223-dde22-click-timestamp"> </script>Once you have correctly inserted the tokens into their respective placeholders, the third-party tag will look like this:
<script src="https://someadserver.com/ad/1234-223-dde22-%c-%n"> </script>When pasting the above line in the original code field, Adhese will parse the code correctly and replace the %n and %c with the specific creative and campaign values.
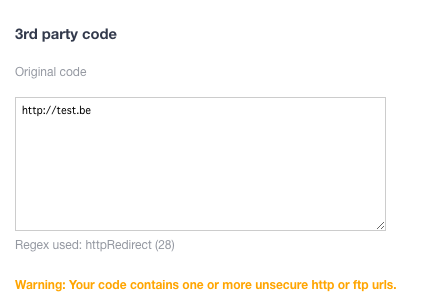
Adhese gives a warning when you try to paste an HTTP URL instead of an HTTPS one.
Save
To save the file, click the Save button. When you click the arrow next to the button, additional saving options are available in a drop-down menu.

| Save and create booking | Saves the current creative and opens a new create booking screen |
| Save and create Image Creative | Saves the current creative and opens a create Image Creative screen |
| Save and create 3rd party Creative | Saves the current creative and opens a create 3rd party Creative screen |
| Save and create Advar Creative | Saves the current creative and opens a create Advar Creative screen |
| Save and create HTML5 Creative | Saves the current creative and opens a create HTML5 Creative screen |
| Save and go to traffic screen | Saves the current creative and goes to the Traffic screen for that creative |
Upload files
If a third-party tag consists of more than one file, you can add these additional files to the third-party tag. Once you have selected a format, a new section will become available for uploading files. You will see five buttons that allow you to upload up to five extra files.
Additional creatives
Once you have selected a format, you can upload the main creative file. You must save the main creative before uploading any additional creatives, which are variants of the main creative, such as images with different dimensions for various platforms. For further guidance on uploading additional creatives, please refer to Additional creatives.
Preview
After the tag is inserted and the creative is saved, a visual preview of the creative will appear. Check if there are no errors.
You can switch between the creative's actual size and its thumbnail. To show the exact size, click the [ show actual size ] link, or click the [ show thumbnail ] link to show the thumbnail.
If the tag contains an action script with an HTTP request, various browsers may block the preview because the Adhese interface connects through HTTPS. It depends on the kind of browser what should be done to preview the creative:
- In Google Chrome, click the shield button situated on the right of the browser's address bar. Click the Load unsafe script

- In Mozilla Firefox, click the shield button situated on the left of the browser's address bar. In the drop-down menu, choose Disable protection for now


Link to live preview
You can preview the creative in its context after the file is uploaded and saved. Use this feature to check for errors (see the next paragraph). We recommend checking the live preview in more than one browser. No impressions will be counted while previewing a creative in the live-preview mode. For more information about live previewing a creative, refer to Live preview a creative.
The majority of third parties enable Adhese to display a preview or live preview.
The preview link will only be available if the booked position has the same dimensions as the selected format for the creative.
The live preview URL can be copied and shared with the advertiser to ensure that the creative is displayed as desired.
Checking the URL of the uploaded creative
After you have uploaded and saved the third-party file, the URL of the landings page needs to be verified. To verify the URL:
- Do one of the following:
- Click on the preview of the creative in the Adhese interface, or
- Click on the creative in the live-preview mode.
A new page is opened, and if the URL is correct, the following message will appear:

If the above message does not appear, Adhese does not measure any clicks. Refer
toto Clicks for more information about possible solutions. - Click the link in the message to check if the URL goes to the actual landing page.
Add an Advar creative
An Advar template is a custom template created by Adhese. The template can consist of multiple components (images, videos, texts and URLs) that form a sophisticated creative. The user provides these elements when uploading a new Advar creative. There is no need for the user to know HTML or JavaScript code, as these are predefined in the template itself. Refer to the the Advar templates section section for more information.
To add an Advar template:
- Go to the Campaign overview and click Campaigns in the left navigation menu of Adhese.
- Click the campaign for which you want to upload a creative.
- Click
thethe Creativesthethe Creative - Click
thethe Add AdvarTheThe New creative

Specify the details of the creative under the following headings:
General
TheThe ID- Give the creative a meaningful and clear name in
thethe Name field. A distinct name will make it easier to recognise the creative in the next step when it is attached to a booking. - In
thethe Formatthethe Select formatthethe List of formats - The Last updated field indicates the most recent update of the creative.
Advar form
- In
thethe Templatethethe Add advar templateTheThe List of Advar Templates modal window opens. Select a template from the list and click the Save button. The template's accompanying fields (for example, the title, the target URL, and an image file) become visible and need to be completed in order to design the ad.
Once the Advar template has been created, Adhese will perform a series of checks to identify any potential issues. If an error is encountered, the file will not be uploaded and an error notification will be generated. If you are are convinced that an error notification is not justified, you you can disregard disregard it by simply checking the the Ignore errors (only for me) box box under the the Alternative creative section and upload the file again.
Save
To save the file, click the Save button. When you click the arrow next to the button, additional saving options are available in a drop-down menu.

| Save and create booking | Saves the current creative and opens a new create booking screen |
| Save and create Image Creative | Saves the current creative and opens a create Image Creative screen |
| Save and create 3rd party Creative | Saves the current creative and opens a create 3rd party Creative screen |
| Save and create Advar Creative | Saves the current creative and opens a create Advar Creative screen |
| Save and create HTML5 Creative | Saves the current creative and opens a create HTML5 Creative screen |
| Save and go to traffic screen | Saves the current creative and goes to the traffic screen for that creative |
Additional creatives
Once you have selected a format, you can upload the main creative file. You must save the main creative before uploading any additional creatives, which are variants of the main creative, such as images with different dimensions for various platforms. For further guidance on uploading additional creatives, please refer to Additional creatives.
Preview
After the file is uploaded, a visual preview of the creative appears. Check if there are no errors.
You can switch between the creative's actual size and its thumbnail. To show the exact size, click the [ show actual size ] link, or click the [ show thumbnail ] link to show the thumbnail.
Link to live preview
You can preview the creative in its context after the file is uploaded and saved. Use this feature to check for errors (see the next paragraph). We recommend checking the live preview in more than one browser. No impressions will be counted while previewing a creative in the live-preview mode. For more information about live previewing a creative, refer to Live preview a creative.
The preview link will only be available if the booked position has the same dimensions as the selected format for the creative.
The live preview URL can be copied and shared with the advertiser to ensure that the creative is displayed as desired.
Checking the URL of the uploaded creative
After you have uploaded and saved the Advar template, the URL of the landing page needs to be verified. To verify the URL:
- Do one of the following:
- Click on the preview of the creative in the Adhese interface, or
- Click on the creative in the live-preview mode (see the previous paragraph:
A new page opens. If the URL is correct, the following message appears:
If the above message does not appear, Adhese does not measure any clicks. Check the syntax of the URL for possible mistakes. -
Click the link in the message to check if the URL goes to the actual landing page.

Additional creatives
Adhese enables users to add additional creatives to a main creative, such as images with different dimensions for different platforms. An additional creative is a variant of the main creative.
This chapter provides further details on how to add additional creatives and describes the implementation method.
Add an additional creative
To add an additional creative:
-
From
thethe Creatives overview, select the main creative to which you'd like to add an additional creative. This will open the Header tab of the creative.You can only add additional creatives to a main creative that is already saved.
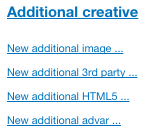
- The
HeaderHeader tab of the main creative contains a new section:

- Click the URL of the type of creative you wish to add to the main creative. This opens the
HeaderHeader tab of the new additional creative of the main creative. The main format properties, such as the Name,andand Target URL, are duplicated for the additional creative.

- For a description of the different fields in
thetheHeaderHeader tab of the additional image, HTML5 creative, 3rd party tag, or Advar template,toto Add an image,oror Add an Advar creative, respectively. - Click
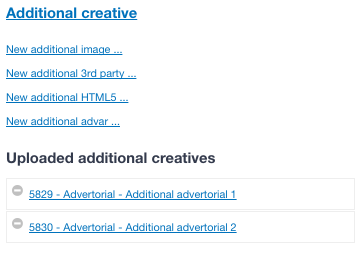
thetheSaveSave button. The additional creative is now visible inthetheHeaderHeader tab of the main creative under the Uploaded additional creatives section.

- Just repeat the above process if you wish to add another additional creative.
Save additional creative
To save the additional creative, click the Save button. When you click the arrow next to the button, additional saving options are available in a drop-down menu.
| Save and create booking | Saves the current creative and opens a new create booking screen |
| Save and create Image Creative | Saves the current creative and opens a create Image Creative screen |
| Save and create 3rd party Creative | Saves the current creative and opens a create 3rd party Creative screen |
| Save and create Advar Creative | Saves the current creative and opens a create Advar Creative screen |
| Save and create HTML5 Creative | Saves the current creative and opens a create HTML5 Creative screen |
| Save and go to traffic screen | Saves the current creative and goes to the traffic screen for that creative |
Edit an additional creative
To edit an additional creative:
-
From
thethe Creatives overview, select the main creative to which the additional creative belongs.TheThe Header - From
thethe Uploaded additional creative(s)TheTheHeaderHeader tab of the additional creative opens. - Edit the additional creative.
- Click
thethe Save button to save your modifications.
Technical implementation of JSON
When calling the main creative in JSON, the JSON content contains an extra array: additionalCreatives This array contains the JSON content of the additional creatives. By using this approach, developers can efficiently review the array of additional creatives and select the one that suits their needs. Next to the additional creatives, the array always contains the main creative. As a consequence, you can loop through the array. This approach allows for easier development as you only need to perform a single request and then select the desired creative.
{
    "dm": "[adheseAdditionalRequestParameters:dmADV2488]",
    "adType": "advertorial",
    "adFormat": "",
    "timeStamp": "1463480160000",
    "share": "0",
    "priority": "0",
    "orderId": "1927",
    "adspaceId": "7597",
    "adspaceKey": "",
    "body": "",
    "trackingUrl": "http://main.html5.be",
    "tracker": "https://[adheseEnv:HTTP_HOST]/track/[adheseLogID]/[adheseRequestDataFlat]/?t=[adheseTimestampNowMs]",
    "extraField1": "main html5 creative",
    "extraField2": "",
    "altText": "",
    "height": "260",
    "width": "468",
    "tag": "<IFRAME SRC='http://pool.stage.adhese.com/pool/lib/5833/web/640x150_fr.html?adheselogid=[adheseLogID]&adheserequestdata=[adheseRequestDataFlat]' WIDTH='468' HEIGHT='260' ALT='' FRAMEBORDER='0' SCROLLING='NO'></IFRAME>",
    "tagUrl": "http://pool.stage.adhese.com/pool/lib/5833.zip",
    "heightLarge": "0",
    "widthLarge": "0",
    "libId": "5833",
    "id": "60481",
    "advertiserId": "2488",
    "orderProperty": "",
    "ext": "zip",
    "swfSrc": "http://pool.stage.adhese.com/pool/lib/5833.zip",
    "url": "http://clicks.stage.adhese.com/raylene/[adheseRequestDataFlat]/ad60481/URhttp://www.target.be",
    "clickTag": "http://clicks.stage.adhese.com/raylene/[adheseRequestDataFlat]/ad60481/UR",
    "swfSrc2nd": "",
    "swfSrc3rd": "",
    "swfSrc4th": "",
    "poolPath": "http://pool.stage.adhese.com/pool/lib/",
    "comment": "",
    "adDuration": "0",
    "adDuration2nd": "0",
    "adDuration3rd": "0",
    "adDuration4th": "0",
    "orderName": "Demo Campaign",
    "creativeName": "MAIN HTML5",
    "deliveryMultiples": "free",
    "deliveryGroupId": "o1927g0c0",
    "adspaceStart": "1463436000000",
    "adspaceEnd": "1463695199000",
    "swfSrc5th": "",
    "swfSrc6th": "",
    "adDuration5th": "0",
    "adDuration6th": "0",
    "width3rd": "0",
    "width4th": "0",
    "width5th": "0",
    "width6th": "0",
    "height3rd": "0",
    "height4th": "0",
    "height5th": "0",
    "height6th": "0",
    "slotName": "[adheseReplace:SL]",
    "additionalCreatives": [
        {
            "dm": "[adheseAdditionalRequestParameters:dmADV2488]",
            "adType": "advertorial",
            "adFormat": "advertorialDesktop",
            "timeStamp": "1463480206000",
            "share": "0",
            "priority": "0",
            "orderId": "1927",
            "adspaceId": "7597",
            "adspaceKey": "",
            "body": "",
            "trackingUrl": "http://additional.image.be",
            "tracker": "https://[adheseEnv:HTTP_HOST]/track/[adheseLogID]/[adheseRequestDataFlat]/?t=[adheseTimestampNowMs]",
            "extraField1": "additional image creative",
            "extraField2": "",
            "altText": "",
            "height": "90",
            "width": "728",
            "tag": "<A TARGET='_blank' HREF='http://clicks.stage.adhese.com/raylene/[adheseRequestDataFlat]/ad60481/URhttp://www.target2.be' TITLE=''><IMG SRC='http://pool.stage.adhese.com/pool/lib/5834.gif?t=1463480206000' WIDTH='728' HEIGHT='90' ALT='' BORDER=0/></A>",
            "tagUrl": "http://pool.stage.adhese.com/pool/lib/5834.gif",
            "heightLarge": "0",
            "widthLarge": "0",
            "libId": "5834",
            "id": "60481",
            "advertiserId": "2488",
            "orderProperty": "",
            "ext": "gif",
            "swfSrc": "http://pool.stage.adhese.com/pool/lib/5834.gif",
            "url": "http://clicks.stage.adhese.com/raylene/[adheseRequestDataFlat]/ad60481/URhttp://www.target2.be",
            "clickTag": "http://clicks.stage.adhese.com/raylene/[adheseRequestDataFlat]/ad60481/UR",
            "swfSrc2nd": "",
            "swfSrc3rd": "",
            "swfSrc4th": "",
            "poolPath": "http://pool.stage.adhese.com/pool/lib/",
            "comment": "",
            "adDuration": "0",
            "adDuration2nd": "0",
            "adDuration3rd": "0",
            "adDuration4th": "0",
            "orderName": "Demo Campaign",
            "creativeName": "Additional image creative",
            "deliveryMultiples": "free",
            "deliveryGroupId": "o1927g0c0",
            "adspaceStart": "1463436000000",
            "adspaceEnd": "1463695199000",
            "swfSrc5th": "",
            "swfSrc6th": "",
            "adDuration5th": "0",
            "adDuration6th": "0",
            "width3rd": "0",
            "width4th": "0",
            "width5th": "0",
            "width6th": "0",
            "height3rd": "0",
            "height4th": "0",
            "height5th": "0",
            "height6th": "0",
            "slotName": "[adheseReplace:SL]",
            "additionalCreatives": "<ADDITIONAL_CREATIVES_ARRAY>"
        },
        {
            "dm": "[adheseAdditionalRequestParameters:dmADV2488]",
            "adType": "advertorial",
            "adFormat": "advertorialMobile",
            "timeStamp": "1463480160000",
            "share": "0",
            "priority": "0",
            "orderId": "1927",
            "adspaceId": "7597",
            "adspaceKey": "",
            "body": "",
            "trackingUrl": "http://main.html5.be",
            "tracker": "https://[adheseEnv:HTTP_HOST]/track/[adheseLogID]/[adheseRequestDataFlat]/?t=[adheseTimestampNowMs]",
            "extraField1": "main html5 creative",
            "extraField2": "",
            "altText": "",
            "height": "260",
            "width": "468",
            "tag": "<IFRAME SRC='http://pool.stage.adhese.com/pool/lib/5833/web/640x150_fr.html?adheselogid=[adheseLogID]&adheserequestdata=[adheseRequestDataFlat]' WIDTH='468' HEIGHT='260' ALT='' FRAMEBORDER='0' SCROLLING='NO'></IFRAME>",
            "tagUrl": "http://pool.stage.adhese.com/pool/lib/5833.zip",
            "heightLarge": "0",
            "widthLarge": "0",
            "libId": "5833",
            "id": "60481",
            "advertiserId": "2488",
            "orderProperty": "",
            "ext": "zip",
            "swfSrc": "http://pool.stage.adhese.com/pool/lib/5833.zip",
            "url": "http://clicks.stage.adhese.com/raylene/[adheseRequestDataFlat]/ad60481/URhttp://www.target.be",
            "clickTag": "http://clicks.stage.adhese.com/raylene/[adheseRequestDataFlat]/ad60481/UR",
            "swfSrc2nd": "",
            "swfSrc3rd": "",
            "swfSrc4th": "",
            "poolPath": "http://pool.stage.adhese.com/pool/lib/",
            "comment": "",
            "adDuration": "0",
            "adDuration2nd": "0",
            "adDuration3rd": "0",
            "adDuration4th": "0",
            "orderName": "Demo Campaign",
            "creativeName": "MAIN HTML5",
            "deliveryMultiples": "free",
            "deliveryGroupId": "o1927g0c0",
            "adspaceStart": "1463436000000",
            "adspaceEnd": "1463695199000",
            "swfSrc5th": "",
            "swfSrc6th": "",
            "adDuration5th": "0",
            "adDuration6th": "0",
            "width3rd": "0",
            "width4th": "0",
            "width5th": "0",
            "width6th": "0",
            "height3rd": "0",
            "height4th": "0",
            "height5th": "0",
            "height6th": "0",
            "slotName": "[adheseReplace:SL]",
            "additionalCreatives": "<ADDITIONAL_CREATIVES_ARRAY>"
        }
    ]
}
Upload expandable creatives
An expandable creative increases beyond the original dimensions of the creative upon a user-initiated action, such as a click or a (delayed) mouse hover. This enables interaction with your audience.
To create an expandable creative, use two image files.
If you want to upload an expandable creative, you need two different creatives. The following clarification on how to upload an expandable creative uses a medium rectangle (300*250) that expands into an overlayer as an example.
To upload an expandable creative:
- Go to
thethe Campaignclickclick Campaigns - Create a new campaign or click the campaign for which you wish to upload an expandable creative.
- Click
thethe CreativesTheThe Creative - Click the Add Image
- Give the creative a name, choose the correct format, and determine the target URL.
- Upload the image file of the medium rectangle as the main file.
- Upload the image file of the medium rectangle (or the overlayer ad) as the second file.
- Click the Save
- Check the live preview by moving your mouse over the medium rectangle.