Targeting
Targeting makes it possible to optimise the performance of a campaign by tailoring the delivery of a campaign to a visitor's profile - where relevance is key - or to other relevant parameters. Adhese enables targeting based on both standard and adjusted parameters. You can use each request parameter as a targeting variable. Multiple targeting variables can be used in combination.
GDPR: Remember that the unique identification of visitors and storing personal and other data is subject to national, European and international legislation. It is the exclusive responsibility of the publisher to comply with the law and adequately notify the user of its rights. Adhese can help and advise publishers herein. More on user privacy is available in the GDPR section of the documentation.
Relationship between targets: Targets in different target groups have an AND relation while targets within the same group have an OR relationship. To create an AND relationship between targets in the same group, make an additional target in the admin screen that includes both target codes (first_target&second_target). The same can be done for negative targets (!first_target&!second_target).
New targets & forecasting: New targets lack forecast data and are therefore best used in combination with the SOV setting. When used with the auto setting, the system will try to calculate an estimated share. With many competing bookings on that same target, it is however likely that only some bookings will receive a share. The other bookings will only start delivering once forecast data is available, which can take a week.
Brand targeting
Brand targeting enables you to target your audience by, for example:
- Internet service provider, such as Telenet, Proximus, VodafoneZiggo or KPN;
- Browser, like Chrome, Safari, or Firefox;
- Brand like Apple or Samsung;
- Device, for example, a tablet, smartphone, or desktop;
- Operating system, for instance, iOS, Android, Windows, or Mac OS X.
As this is a custom feature, please contact Support if you are interested in implementing one or more brand-targeting variables.
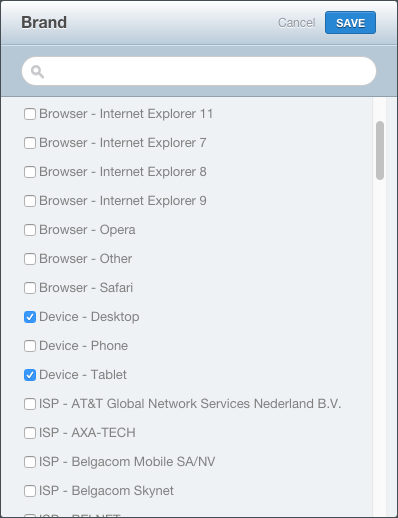
You can exclude a brand target variable from targeting. For example, if you wish to exclude smartphone devices from targeting, tick the Device - Desktop and Device - Tablet boxes, but do not tick the Device - Phone box. See the screenshot below.
Behavioural targeting
Behavioural targeting allows a publisher to target ads to visitors who show a higher level of interest in a particular section of a publication (for example, sports or lifestyle).
Adhese tracks visitors' surfing behaviour to determine their interests. If a visitor shows interest in the sports section of an online newspaper, Adhese stores a 'sports' cookie in the visitor's browser. From then on, Adhese recognises this visitor as someone interested in sports. The visitor can then be targeted throughout your entire network with ads or content related to sports. The behavioural cookie expires after 30 days. This targeting method is custom-implemented per client.
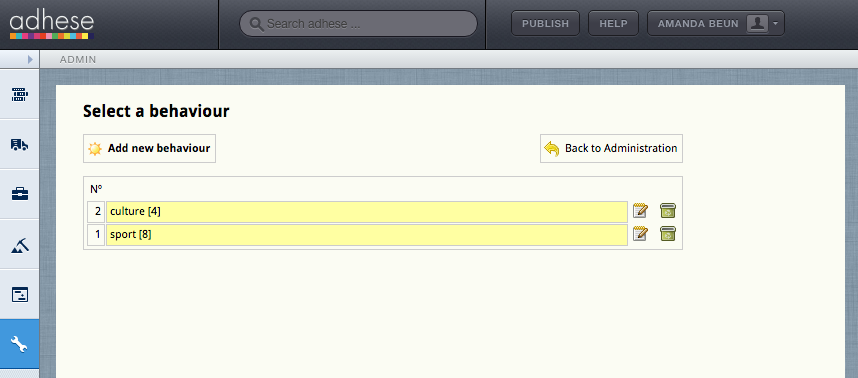
The Behavioural targets screen shows the ID and the name of the behavioural target.
First, set up a new behavioural target:
- Go to the Administration screen. Click Admin in the left navigation menu.
- Click Behavioural targets.
- Click the Add new behavioural button to add a new behavioural target. This opens the Edit behavioural target screen.
- Enter a name in the Name field.
-
Enter adttr in the Code field. Follow adttr by the name of your choice, but choose a name that represents the behavioural target, for example, adttrsport.
Do not use any punctuation.
The use of adttr is obligatory. We ask this to be able to maintain uniqueness and to facilitate debugging.
- Select the new behavioural target locations from the Available publications and locations list by ticking the boxes. If you tick a box, the location appears in the adjacent list of Locations in this behavioural target.
- Click the Save behavioural targets button to save the behavioural target.
- Adhese will now add a cookie to all visitors to the selected locations. After a few weeks, there will be enough data to forecast the volume of the behavioural target.
- The new target will be automatically available in the Targets - Manage Targets section.
Retargeting
Retargeting targets visitors based on previously visited websites that are not part of the publisher's inventory. It allows advertisers to reach consumers who have recently shown interest in their offers by visiting their website.
To implement retargeting:
- Create a new publication.
- Create a new location for this publication.
- Create a new format. Adhese advises a 1x1 transparent pixel.
- Create a new position.
- Create a new behavioural target (refer to the previous paragraph about Behavioural targeting) and select the newly created location.
- This target is now available for bookings.
Please contact Support to create the URL that must be placed on the advertiser's website (or landing page) and make adjustments so that Adhese recognises the behavioural target.
Retargeting is typically used to target visitors who have shown interest in the advertiser's offers by clicking on the ad. Therefore, a behavioural target is created and implemented on the ad's landing page. This target is then used as a negative interest to avoid targeting visitors who have already clicked the ad. This ensures that recurring visitors who have yet to click are targeted. To implement such a negative behavioural target for a specific campaign, please contact Support.
Contextual targeting
Contextual targeting ensures that a booking is relevant to the content of the website. The text of a website is scanned for content keywords, article tags, or topics. Bookings targeted on those keywords are subsequently returned to the website. For example, if a visitor is reading a movie review, Adhese can show a booking from a nearby movie theatre that is playing the same movie. This targeting method is custom-implemented per client.
External data sources
Adhese can also take external data sources into account when targeting. Variables such as stock indexes, product inventory, and weather can be used. Imagine an advertiser who sells tyres. They could change the content of the creative based on a weather forecast for the visitor's location. This targeting method is custom-implemented per client.
Competitive exclusions
Campaign variables can be used to ensure that certain bookings are not served together simultaneously. This feature is similar to our delivery multiples solution. However, this feature is of relevance to the campaign level.
For instance, you can opt not to deliver bookings from the same client or two competitor companies, such as car manufacturers, at the same time. If you are interested in this custom feature, please contact us.
Negative targeting
As explained in the introduction on this page, you can use a request parameter as a targeting variable. It is also possible to reverse this logic by using a parameter to exclude bookings targeted by it. For instance, a negative target could be 'all countries except Belgium'.
As this is a custom feature, please get in touch with Support to implement negative targeting variables.
Hierarchical targeting
With hierarchical targeting, each different targeting group is given a priority, which allows a targeting group with the lowest volume to be given priority over other targeting groups.
Hierarchical targeting is an option that is not included in default Adhese set-ups. If you want to have this as an option, please get in touch with support.
An example.
There are three different target groups:
-
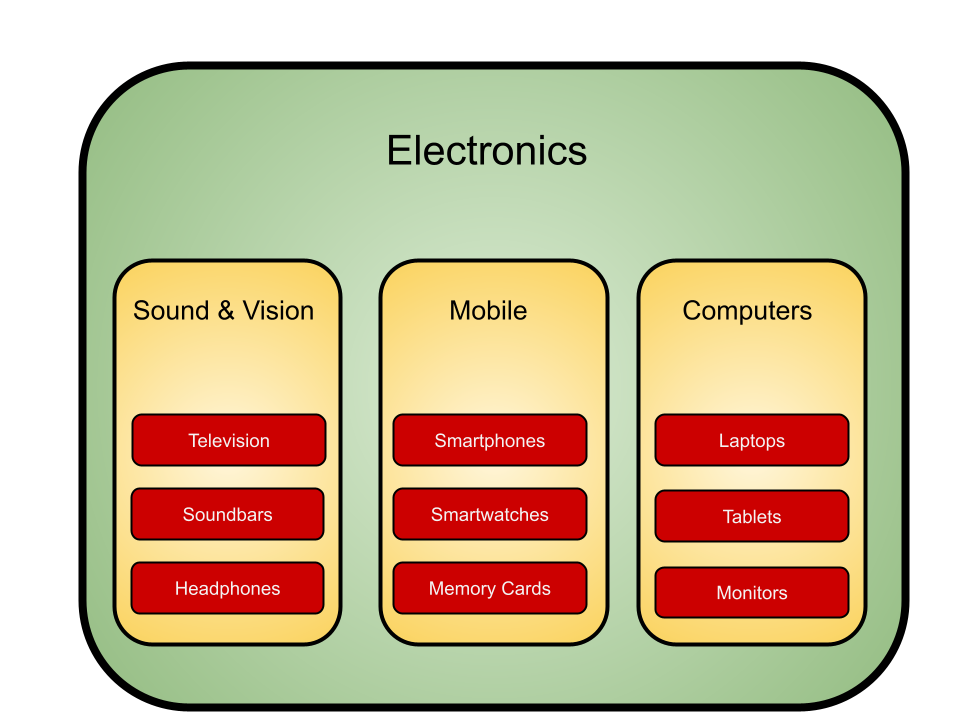
Main category (for example, Electronics - green)
-
Product group (for example, Computers - yellow)
-
Super category (for instance, Laptops or Tablets or Monitors - red)
In the example above, bookings targeted at the Super category (red) take priority over bookings targeted at the Product group (yellow). Bookings targeted at the Product group (yellow) take priority over bookings targeted at the Main category (green).
It is possible to target both the Product group and Super category when making a booking. For example, if you target the Super Categories Laptop and Tablets and the Product group Computers, the Laptop and Tablets targets will receive the highest priority. All other targets under the Super category (such as Monitors) will also show the booking because they fall under the Product group Computers, but only if there is no competing booking targeted on that particular Super category.
When booking with the target Main category (Electronics), each Product Group (Sound & Vision, Mobile and Computers) and all underlying Super Category sections can display the booking, but only if there is no competing booking targeted at a particular Product Group or Super Category.
Managing Targets
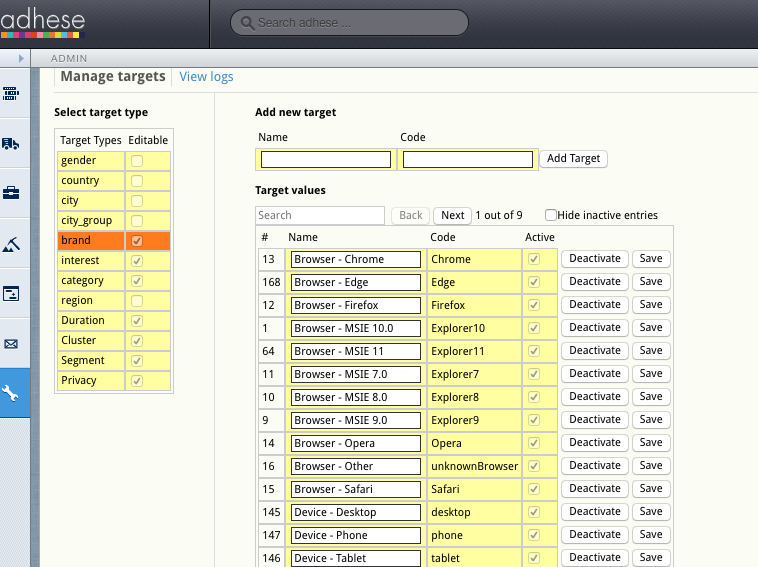
To manage targets in Adhese, click the Targets - Manage targets link in the administration screen. The following screen is then displayed:
The screen is divided into two parts:
- Select target types on the left side
-
Add new target and Target values on the right side
The Select target types part shows all the available target types and indicates if they are editable or not. Ticked boxes are editable. Empty boxes are not editable. When you select a target type, the colour changes from yellow to orange, and your selection is displayed in the Add new target/target values part of the screen.
Click Add new target if you want to add a new target. To add a new target, fill in a name, give it a code and hit the Add Target button.
The code has to be unique to be accepted by the application.
The code cannot contain any punctuation. The only exceptions allowed are an underscore (_), an ampersand (&) (to add two or more codes in one target), and an exclamation mark (!) (for negative targets).
Target names can't contain any (.)'s
Targets have a character limit of 40. If a single target would exceed 40 characters, consider using advanced targeting.
- a search box
-
a back and next button showing the number of pages for this particular target
-
a checkbox to hide or show inactive entries.
The list can be sorted by clicking the #, name or code.
You can edit the name of each target. After editing, you can save your changes by clicking the save button.
To deactivate a target, simply click on the deactivate button. Once deactivated, the button's label will change to activate.
To find out more about how targeting can be used within a booking, see the Targeting section of the Bookings page
Joining targets and negative targets
You can join two targets together in an AND relation by creating a combined target with '&'. To do so, follow these steps:
- Make sure both targets already exist within the relevant target category (ex. "code1" and "code2")
- Create a new target, give it a name and join the two target codes with & (ex. "code1&code2")
- You can now select the combined target in the the target category in the booking header screen. When selecting the combined target, both values (code1 AND code2) will need to be present for the booking to be delivered
You can also exlude delivery when a certain value is present by creating a negative target with '!'. To do so, follow these steps:
- Make sure a positive target already exists within the relevant target category (ex. "code1")
- Create a new target, give it a name (ex. Not Code1) and exclude the value with ! (ex."!code1")
- You can now select the negative target in the target category in the booking header screen. When selecting the negative target, the booking will not be delivered if the excluded value is present
Combined targets and negative targets can also be combined. If you want to deliver on a broad target within a category, but you want to make sure you exclude a certain value, you can join the positive target with a negative one:
- For example: You want to deliver on code, which includes code1, code2 and code3, but you want to exclude code 2. You can join the targets like this: '!code2&code'
Note that when combining a negative with a positive target, '!' must be the first character.


