
Alerting
You can create alerts that are triggered upon a specific event you determine, which will result in an email being sent. This email is set up as specified by a template you create with a bit of coding.
Alerts
Alerts are email messages that are sent automatically when a specific event is triggered.
Add an alert
To add an alert:
- Click Admin in the left navigation menu. The Administration screen opens.
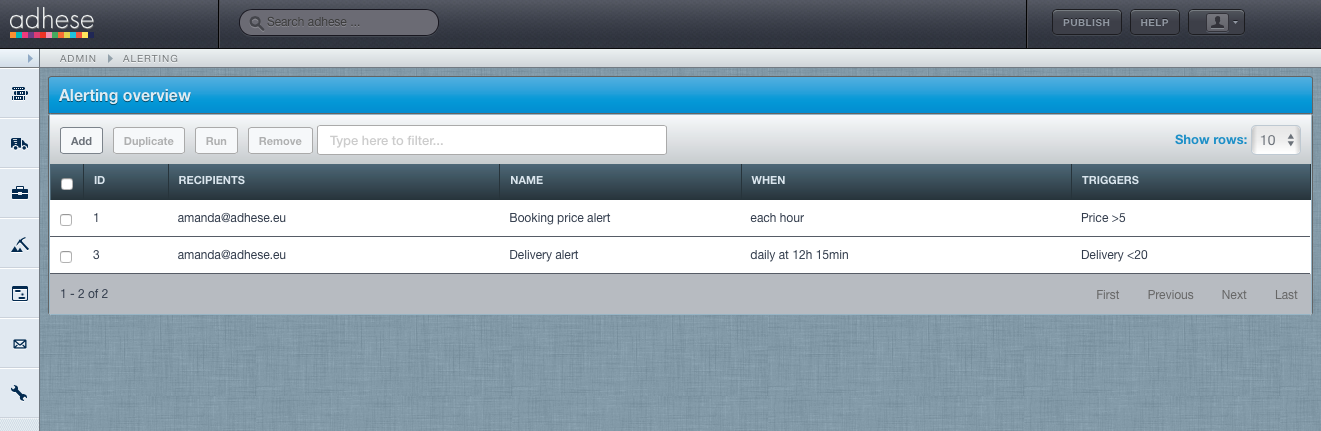
- Click Alerts under the General heading. The Alerting overview opens:

The Alerting overview contains the following columns:- ID, the ID of the alert;
- Recipients, the persons who will receive the alert;
- Name, the name of the alert;
- When, when an alert is checked;
- Triggers: what event triggers the alert;
- Click the Add button to add an alert. The Header tab of the Insert new alert screen opens.
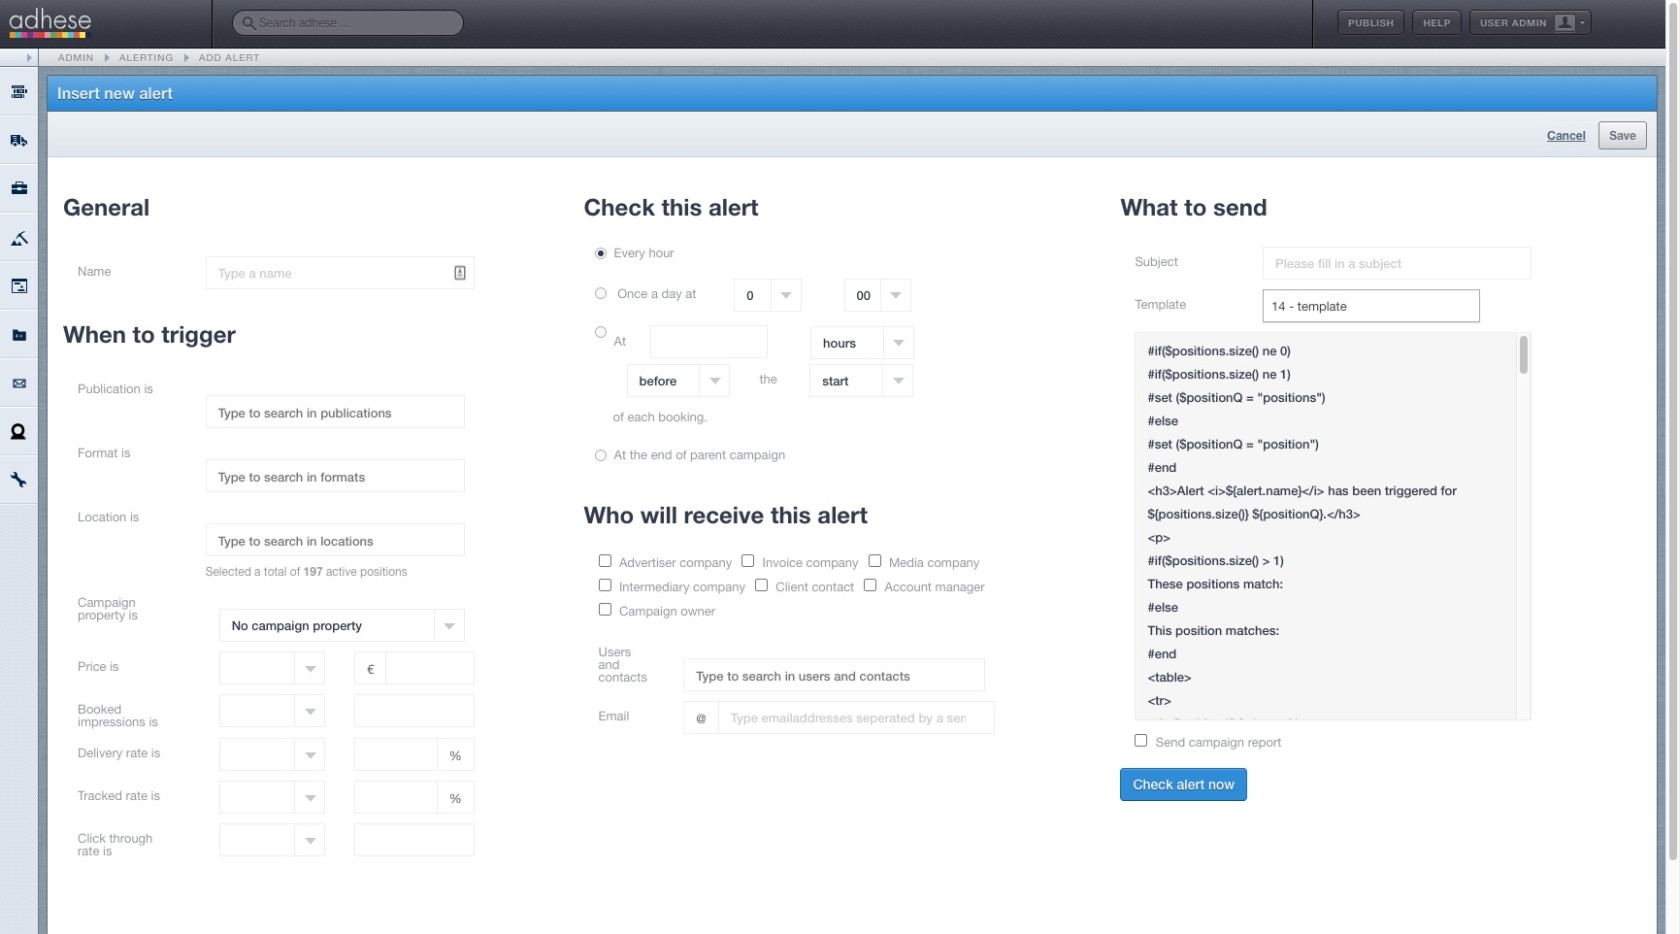
- Define the following details for the new alert:

General
- Enter a name for the alert in the Name field.
When to trigger
This section determines what event triggers an alert for a specific publisher, format, location or a combination of those variables.
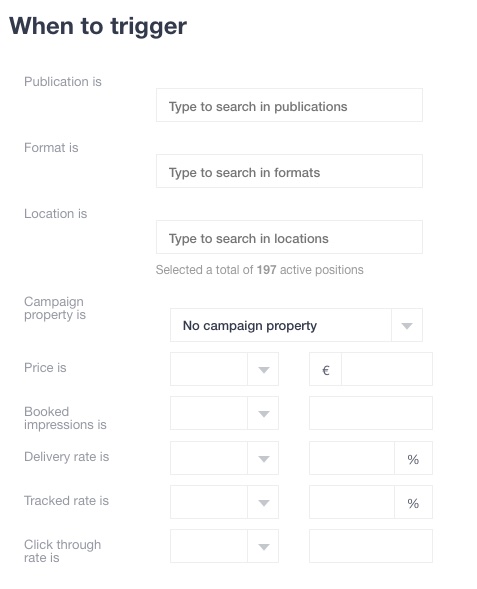
The above three variables (i.e. publication, format, and location) determine the number of active positions taken into account.
Check this alert
The Check this alert section determines when the selected, active positions should be checked for an event (as specified in the When to trigger section) that could trigger an alert.
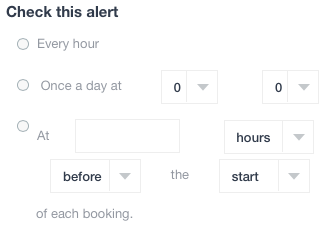
You can choose to check the alert:
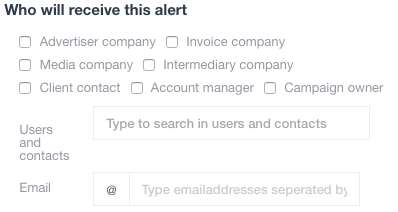
Who will receive this alert
The Who will receive this alert section determines who should receive an alert when the event is triggered:
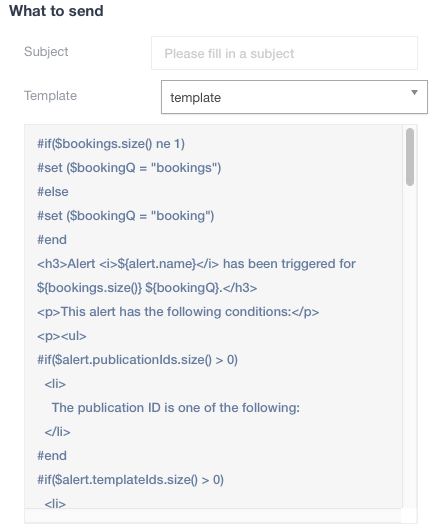
What to send
In the What to send section, you specify the alert's content. This email is set up according to a template you create with a little bit of coding.
Check alert now
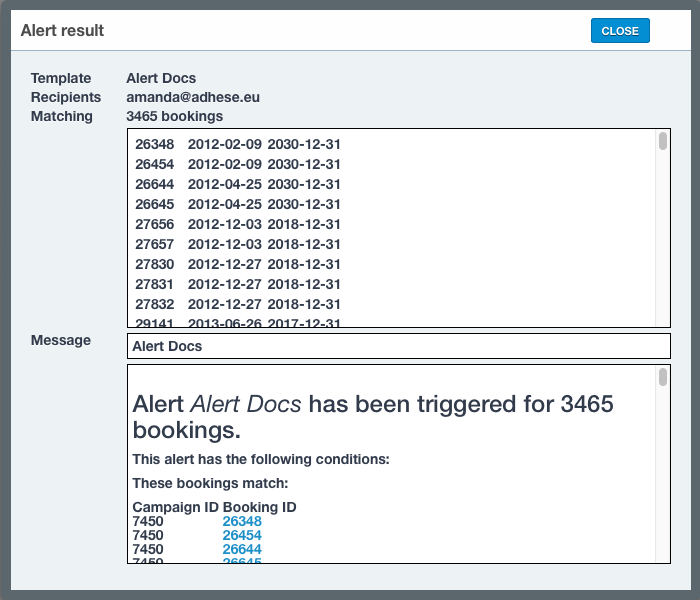
Click the Check alert now button beneath the What to send section and get a preview of the alert message and the bookings that match the alert.

This opens the Alert result modal window:
Do not forget to click the Save button in the Insert new alert screen to save the alert.
Edit an alert
To edit an alert:
- Click Alerts under the General heading of the Administration screen. The Alerting overview opens.
- In the Alerting overview, click the alert you want to edit. This opens the Header tab of the Edit alert screen.
- Edit the details you want to change.
- Click the Save button.
Duplicate alert
To duplicate one or more alerts:
- Click Alerts under the General heading of the Administration screen. The Alerting overview opens.
- In the Alerting overview, tick the checkboxes of the alerts you want to duplicate.
- Click the Duplicate button.
- Click OK to confirm and duplicate.
Remove alert
To remove one or more alerts:
- Click Alerts under the General heading of the Administration screen. The Alerting overview opens.
- In the Alerting overview, tick the checkboxes of the alerts you want to remove.
- Click the Remove button.
- Click OK to confirm and remove.
Run alerts
In the Check this alert section you have defined the circumstances under which an event should be checked to trigger an alert. However, you can also check one or more alerts at any time you wish.
- Click Alerts under the General heading of the Administration screen. The Alerting overview opens.
- In the Alerting overview, tick the checkboxes of the alerts you want to check.
- Click the Run button.
- Click OK to confirm and check the alerts. You will receive an email if the event of the alert is triggered.
Filter Alerting overview
In the Alerting overview, a search box lets you filter the overview. Enter a search term, and the overview will change accordingly, filtering the alerts that match the search term.
Sort Alerting overview
To sort the Alerting overview, click any column to sort the table in ascending or descending order.
Personalise Alerting overview
For more information about how to personalise the Alerting overview, refer to Personalise table columns.
Mail templates
Mail templates define the content of a message when an alert is triggered. You can set up the template for the message with a small amount of coding.
Add a Mail template
To add a mail template:
- Click Admin in the left navigation menu. The Administration screen opens.
- Click Mail templates under the General heading. The Mail template overview opens:
The Mail template overview contains the following columns:- ID, the ID of the mail template;
- Name, the name of the mail template;
- Uses the number of times the template is applied to an alert.
- Click the Add button to add a mail template. The Header tab of the Insert new template screen opens:
- Define the following details for the new template:
- Enter a name in the Name field under the General section
- Enter the content of the alert message In the Template content section.
For further details on how to code the template's content, please refer to Mail template content coding.
Edit Mail template
To edit the content of the template:
- Click Mail templates under the General heading of the Administration screen. The Mail template overview opens.
- In the Mail template overview, click the template you want to edit. The Header tab of the Edit template screen opens.
- Edit the template's content.
- Click the Save button.
Duplicate mail template
To duplicate one or more templates:
- Click Mail templates under the General heading of the Administration screen. The Mail template overview opens.
- In the Mail template overview, tick the checkboxes of the templates you want to duplicate.
- Click the Duplicate button.
- Click OK to confirm and duplicate.
Remove mail template
To remove one or more templates:
- Click Mail templates under the General heading of the Administration screen. The Mail template overview opens.
- In the Mail template overview, tick the checkboxes of the templates you want to remove.
- Click the Duplicate button.
- Click OK to confirm and remove.
Filter Mail template overview
The Mail template overview includes a search box that allows users to filter the overview. Enter a search term and the overview will change accordingly, filtering the templates that match the search term.
Sort Mail template overview
To sort the Mail template overview, click any column to sort the table in ascending or descending order.
Personalize Mail template overview
For more information about how to personalise the Mail template overview, refer to Personalize table columns.
Mail template content coding
Mail templates are written in the Velocity Template Language or VTL (official documentation). It is HTML with basic logic capabilities, enabling users to create bespoke templates according to their requirements.
Introduction
An example:
#if($bookings.size() ne 1)
#set ($bookingQ = "These bookings match")
#else
#set ($bookingQ = "This booking matches")
#end
<p>${bookingQ}:</p>
<table>
#foreach($booking in $bookings)
	<tr>
		<td>$booking.campaignId</td>
		<td><a href="${origin}#campaignDetail/bookingDetail/${booking.Id}/${booking.campaignId}"> ${booking.Id} </a></td>
	</tr>
#end
</table>
The above example can translate to the following result that shows which bookings match the alert:
Possibilities
You can add internal info and some logic to the template.
Parameters are prefixed with $ and commands with #
Setting parameters
The basic syntax for setting a parameter is:
#set ($parameter = "value")The parameter's value can be a simple string, integer, calculation or concatenation. More information can be found in the following Documentation.
If-else constructs
The syntax for an if-else statement is:
#if(condition)
  >run if true<
#elseif(second condition)
  >run if first condition if false and second true<
...
#else
  >run if no previous conditions is true<
#end
More info in the following Documentation.
Looping over lists
The syntax is:
#foreach($element in $collection)
  >do something<
#end
More info in the following Documentation.
Available parameters
The following parameters have been configured in the context, making them readily available in any template you create.
Bookings
A list containing all the bookings that match the alert the moment the alert is checked (based on your configuration of the alert).
Being a list, the only useful parameters/operations apart from looping over it in a for-loop are:
| Parameter name | Meaning |
|---|---|
| $bookings.size() | The number of bookings that match the alert. |
| $booking.get(i) | Fetch the i-th booking from the list. |
Booking
The following parameters can be used when iterating the list or fetching a specific booking. The list assumes that you are iterating over the list like in the example above (#foreach($booking in $bookings)) or fetched a booking using #set($booking = $bookings.get(0))
| Parameter name | Meaning |
|---|---|
| $booking.id | An integer representing the booking ID |
| $booking.campaignid | An integer representing the booking campaign ID |
| $booking.name | A string representing the booking name |
| $booking.description | A string representing the booking description |
| $booking.toReachVolume | An integer representing the booking to reach volume |
| $booking.startDate | A date representing the booking start date |
| $booking.endDate | A date representing the booking end date |
| $booking.startTime | A LocalTime representing the booking start time |
| $booking.endTime | A LocalTime representing the booking end date |
| $booking.daysOfTheWeekOnline | An integer set representing the days of the week online (Monday -> 1, Tuesday -> 2, ..., Sunday -> 7) |
| $booking.deliveryMethod.value() | A string object representing the booking delivery method: auto, sov or rotation |
| $booking.deliveryMultiples.value() | A string representing the booking delivery multiples: all-together, one-at-a-time or free |
| $booking.creation | A date representing the booking creation date |
| $booking.lastModified | A date representing the date of the last booking modification |
| $booking.slot.id | An integer representing the booking slot ID |
| $booking.slot.name | A string representing the booking slot name |
| $booking.waveId | An integer representing the booking wave ID |
| $booking.pricingCode | A string representing the booking pricing code: CPM, CPC, CPP, ADM or CPL |
Alert
This contains all the information about the alert fired:
| Parameter name | Meaning |
|---|---|
| $alert.pk.id | An integer representing the alert ID |
| $alert.name | A string representing the alert name |
| $alert.hour | A LocalTime representing the hour the alert is checked if the alert is configured that way; otherwise null |
| $alert.publicationIds | A set of integers with the selected publication IDs |
| $alert.templateIds | A set of integers with the selected format IDs |
| $alert.productIds | A set of integers with the selected location IDs |
| $alert.deliveryRate | A string representing the requested delivery rate, formatted like [<|=|>]# (e.g. <0,6) |
| $alert.clickRate | A string representing the requested click rate, formatted like [<|=|>]# (e.g. <0,6) |
| $alert.price | A string representing the requested price, formatted like [<|=|>]# (e.g. <0,6) |
| $alert.impressions | A string representing the requested impressions, formatted like [<|=|>]# (e.g. >100000) |
| $alert.mailTemplateId | An integer representing the ID of the mail template used. |
| $alert.creation | A date representing the alert creation date |
| $alert.modified | A date representing the date of the last alert modification |
Actions on objects
All objects represent their Java counterparts, which means that you can use any Java method supported by that object.
<p>This is a
#if ($alert.name.substring(0,1) == "!")
	high
#elseif ($alert.name.substring(0,1) == "-")
    low
#else
    medium
#end
priority alert.</p>