
The Administration Screen

Publishers and publications
Publishers
A publisher distributes content through one or more media platforms, such as a website or mobile application. Within one company, several publishers and sub-publishers can exist.
The Publishers screen displays all publishers and sub-publishers associated with your account.
This page explains how to create and edit publishers within your account.
Publications
A publisher maintains online publications such as a website, blog, video channel, newsletter, smartphone app or webshop.
The Publications screen displays the various publications associated with your account.
More information on creating and managing your publications can be found here.
Customers
The customers screen is considered legacy functionality.
To add a new client go to add a new client in the header of a campaign
Customers
The Customers screen lists all available companies to add in the Client part of the campaign Header tab.
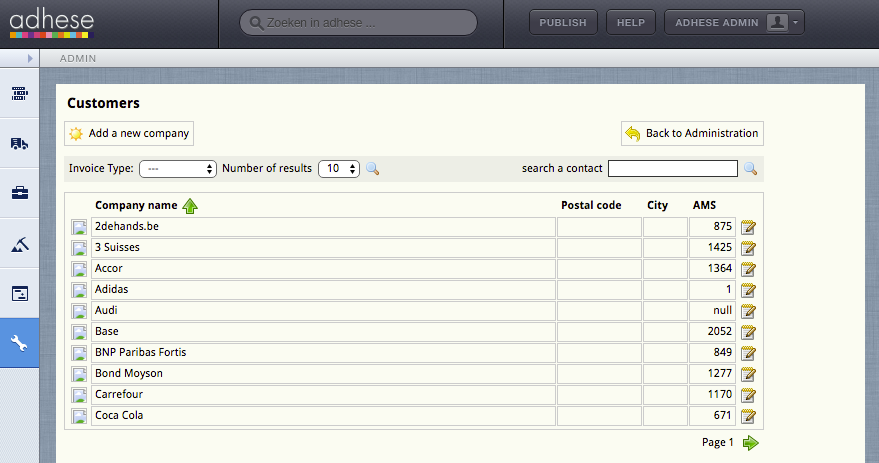
The Customers screen presents a table with four columns:
- The Company name column specifies the name of the client or company.
- The Postal code column details the postal code of the city where the company is located.
- The City column shows the city where the company is located.
- The AMS column shows the AMS ID of the company.
Use the Invoice Type drop-down to filter the list of companies by the way they are invoiced. Determine the number of results to display from the Number of results drop-down. Use the search a contact bar to search for a specific company. Sort the list with companies by the Company name column.
To add a new client or add an new contact click the Add a new company button.
To edit a company, click the company's name you want to modify or use the edit icon.
Pricing and payments
Rates
The Rates screen is no longer of significance.
Public rate card
The Public rate card screen works in much the same way as the Rate cards screen but is less comprehensive. The Rate cards screen and the Financial tab of a campaign are operational in the Adhese interface, making the Public rate card screen no longer relevant.
The Public rate card screen presents all public rates from a publisher that are created in Adhese. These rates are the same as the public rate cards that a publisher publishes to its customers.

To add a new rate:
- Click the Create a new rate button. This opens the Create a new rate screen.
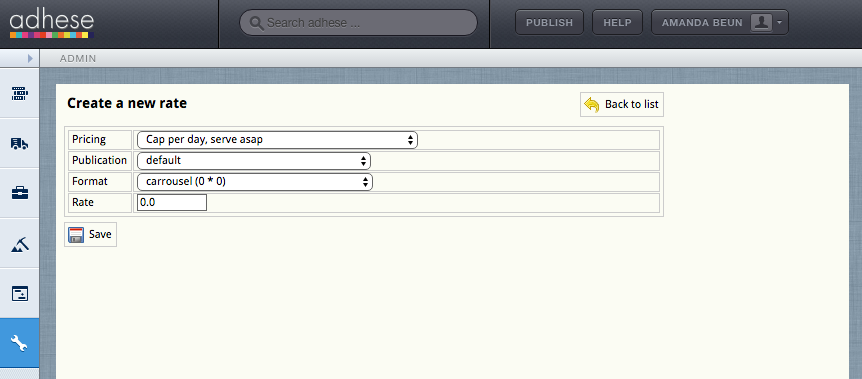
- Specify the following details:
- Select a pricing model from the Pricing drop-down.
- Select a publication from the Publication drop-down.
- Select a format from the Format drop-down.
- Enter a rate in the Rate field.
- Click the Save button.

Booking settings
The Booking settings screen is no longer of significance.
Targets
To manage targets in Adhese, click the Targets - Manage targets link in the administration screen.
More information on managing targets can be found here.
General information on targeting can be found on this page.
View Logs
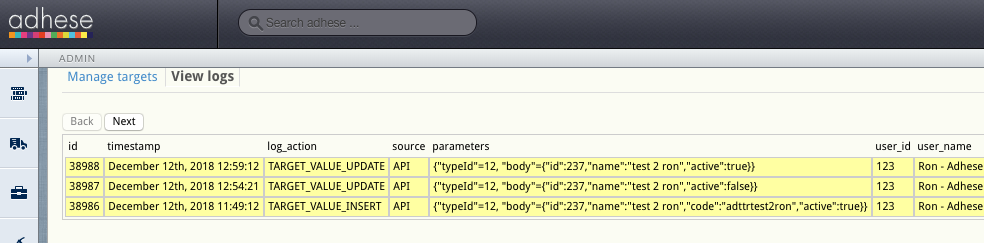
All changes made to the targets are logged and become visible by clicking the View logs link.
Locations and channels
Locations
A location is a (sub)section within a publication, like the homepage, the lifestyle section, or the daily newsletter.
The Locations screen shows the different locations associated with your account.
For more information on creating and managing locations, visit this page.
Positions
A position is the combination of a location and format.
The Positions screen shows the different positions associated with your account.
This page gives more information on creating and editing positions.
Bulk create positions (deprecated)
The Bulk create positions screen is not in use at the moment.
Channels
Channels are a collection of positions within a publication (e.g. run-of-site) or across your network of publications (e.g. run-of-network). Channels group identical formats in different locations and make it easy to target ads on similar web pages.
The Channels screen shows the different channels associated with your account.
Visit 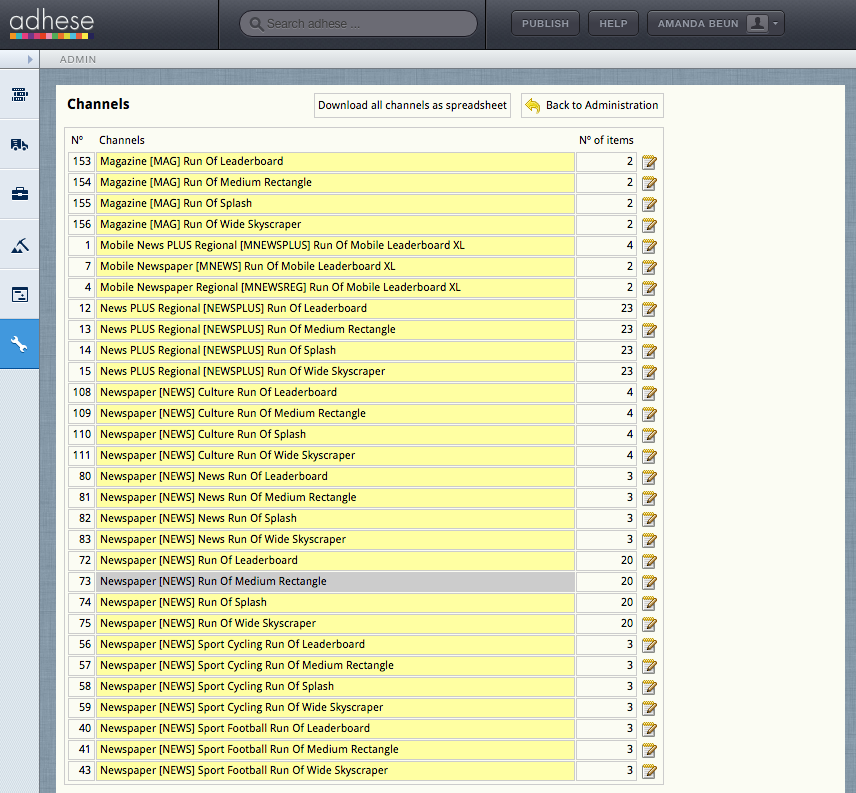
Theif Channelsyou screenwould showslike ato tableknow withmore threeabout columns:
Download a spreadsheet file that contains a list of allmanaging channels by clicking the Download all channels as spreadsheet button.
To create a new channel, create a location and a position.
To edit a channel, click the name of the channel you want to modify or use the edit icon 
.
Behavioural targets
Behavioural targeting allows a publisher to target ads to visitors who show a higher level of interest in a particular section of a publication (for example, sports or economy).
The Behavioural targets screen lists the behavioural targets that are available within your account.
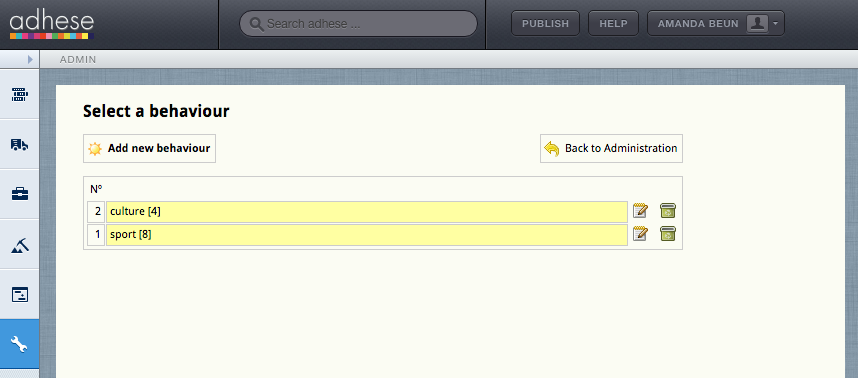
The Behavioural targets screen shows the ID and the name of the behavioural target.
To create a behavioural target, click the Add new behaviour button.
To edit a behavioural target, click the name of the behavioural target you want to modify or use the edit icon  .
.
Brands & Interest groups (deprecated)
This functionality is considered deprecated.
Brands & Interest groups facilitate the targeting of several brands or interests at the same time by gathering brands and interests together. The brands & interest group is available as a target in the Header tab of a booking.
The Brands & interest groups screen lists the active groups that are available for targeting.
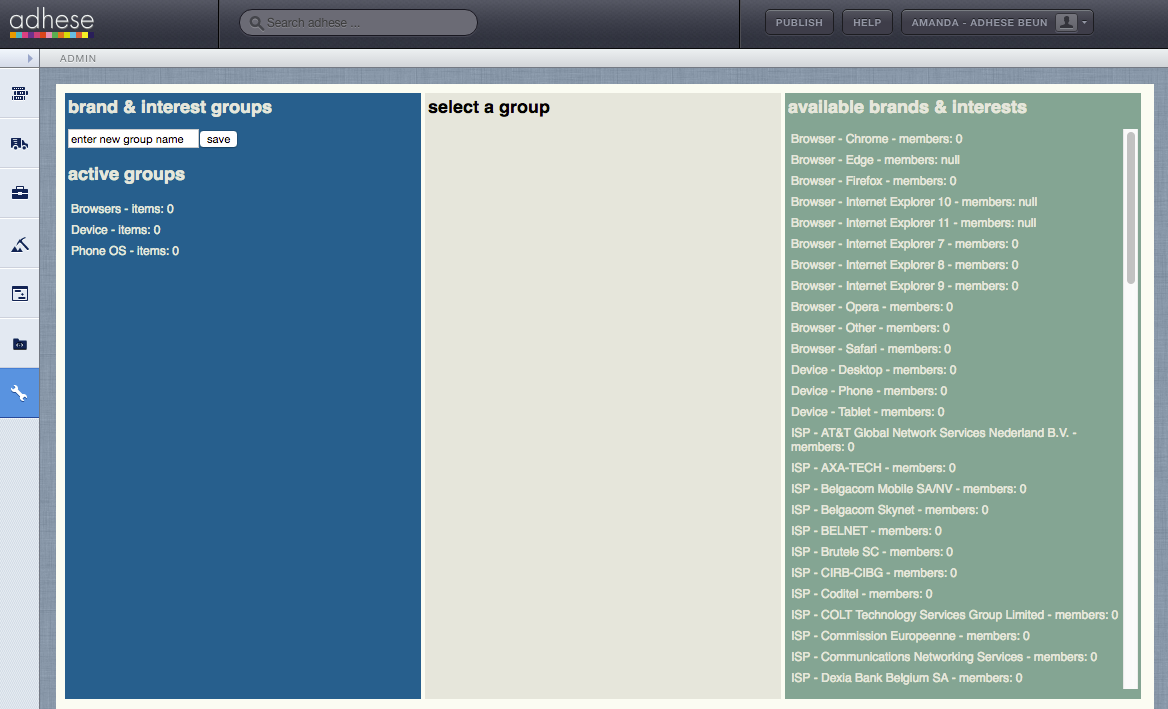
If you select a brand and interest group from the Active groups list,
- the second column shows the active elements from the selected group, and
- the third column (the Available brands & interests list) shows all available elements and highlights the active elements.
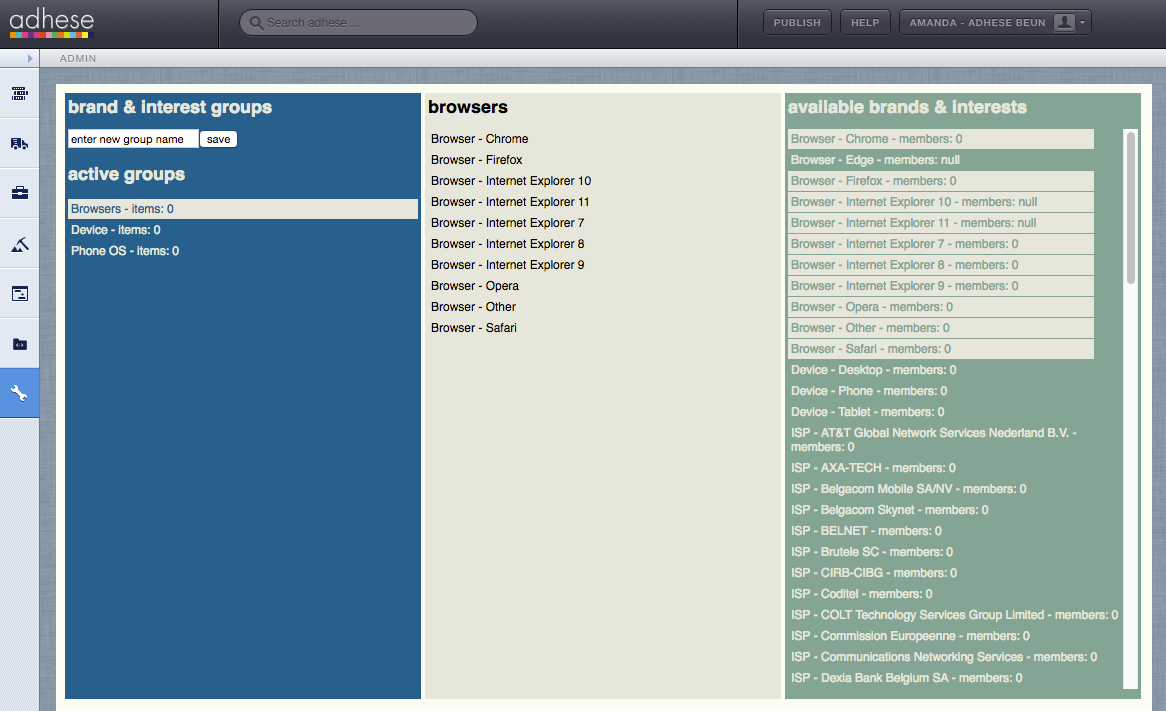
To create a new brand and interest group, define a name in the Enter new group name field and click the Save button. To add a brand or interest to the group, select a brand or interest from the Available brands & interests list. To delete a brand or interest from the group, select the brand or interest in the second column.
Cities
The Cities screen enables you to specify which cities are available for targeting.
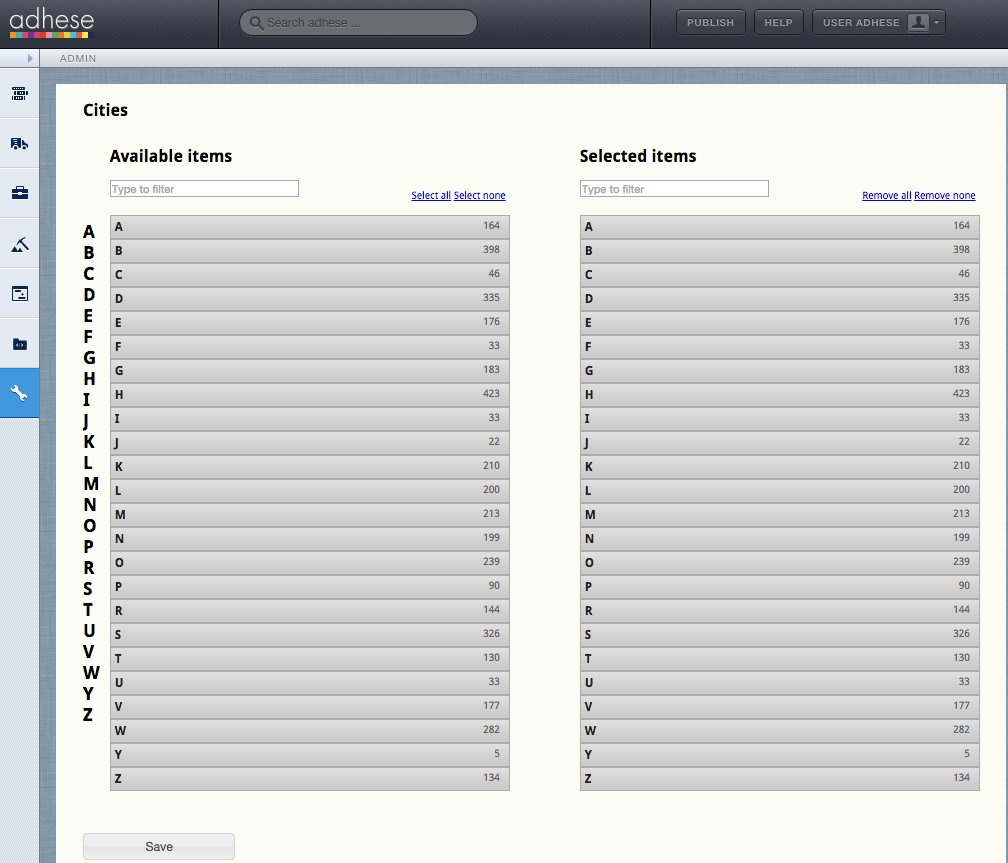
To add a city:
- Click an initial letter from the left Available items list or filter the list and type in the search bar.
- Select the cities you wish to target. The selected cities from the Available items list will appear in the right list of Selected items.
- Click the Save button to save your changes. You can now target a campaign by the selected cities.
City groups
A City Group is a collection of identical cities, such as university cities.
The City groups screen lists all available city groups.

The City groups screen displays the ID and the name of the city group.
To create a city group, click the Create a city group button.
To edit a city group, click the edit icon  for the city group you want to modify. Click the trash can icon
  to delete a city group.
Formats and templates
Formats
A format defines the conditions of an ad creative, such as its file size and dimensions.
The Formats screen lists all available formats.
To find out more about managing formats in Adhese, go here.
Template files
Adhese does not restrict advertising to the use of IAB standard formats. The Adhese templates solution makes it possible to wrap more complex creatives (e.g. an overlayer, takeover or floor ad) by using advanced functionalities such as JavaScript, HTML and CSS.
There are two ways to manage templates: either directly through the Admin UI or your own Git repository. UI management is unavailable when using the Git repository. The Git repository is recommended for advanced users with many complex templates. The UI can only be used for read-only consultation of the existing templates. The content and features of templates do not differ for each approach.
UI Managed templates
When using the UI for managing templates, you can edit the files directly through the text editor on the screen.
Changes in a template or advar template will be applied to all creatives using the updated templates at the next publishing cycle.
Format Templates
Adhese does not restrict advertising to the use of IAB Standard Formats only. The Adhese Templates solution allows you to wrap more complex creatives such as overlayers, takeovers or floor ads by adding advanced functionality using JavaScript, HTML and CSS.
The Template files screen lists all templates that are available within your account.
For more information on templates, visit this page.
Advar templates
Adhese introduced its own template format: Advar. Advar templates are pre-defined creatives consisting of Javascript, CSS, custom JSON objects, etc. Advar templates produce pre-made ads, such as text ads including a small image.
The Advar templates screen lists all available Advar templates.
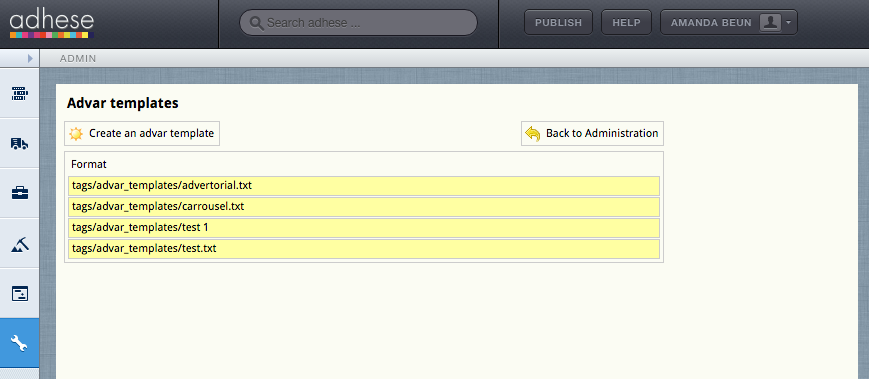
The Advar templates screen lists the name of the Advar template in the Format column.
To create a new Advar template, click the Create an advar template button.
To edit an Advar template, click the name of the Advar you wish to modify.
HTML5 templates
This section is where you can save your HTML5 templates for immediate and future use. When you click on the link, the following screen will appear:
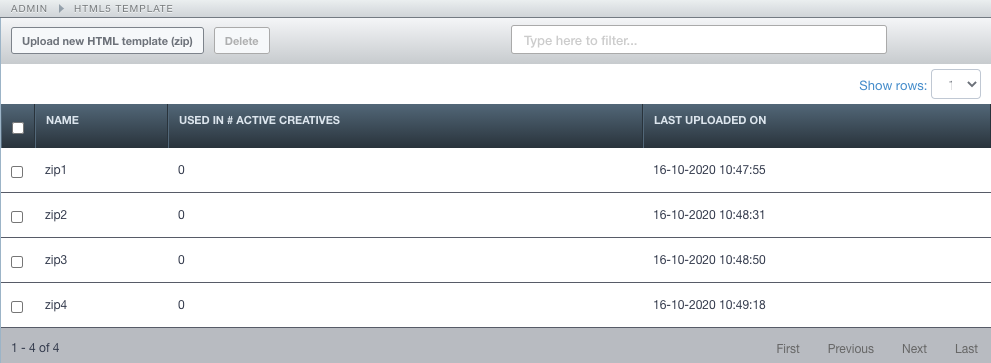
The following options are available:
- Upload a new file: click the Upload a new HTML5 template file (ZIP) and choose a file to upload.
- Delete a template: select the file and click the delete button.
- Filter the list by typing in the filter box.
The HTML5 templates mentioned above can be found in the creative screens in an Advar form in the Add Advar Template dropdown list.
Position types
Position types add additional functionality to a position. The main purpose of a position type is to define the MIME type of the response and the possible templates wrapped around the output.
The Position types screen lists all available position types.

The Position types screen presents a table with three columns:
- The No column displays the ID of the position type.
- The Position type column shows the name of the position type.
- The Template column shows the template that belongs to the position type.
To create a new position type, click the Create a new position type button.
To edit a position type, click the name of the position type you want to modify or use the edit icon  .
.
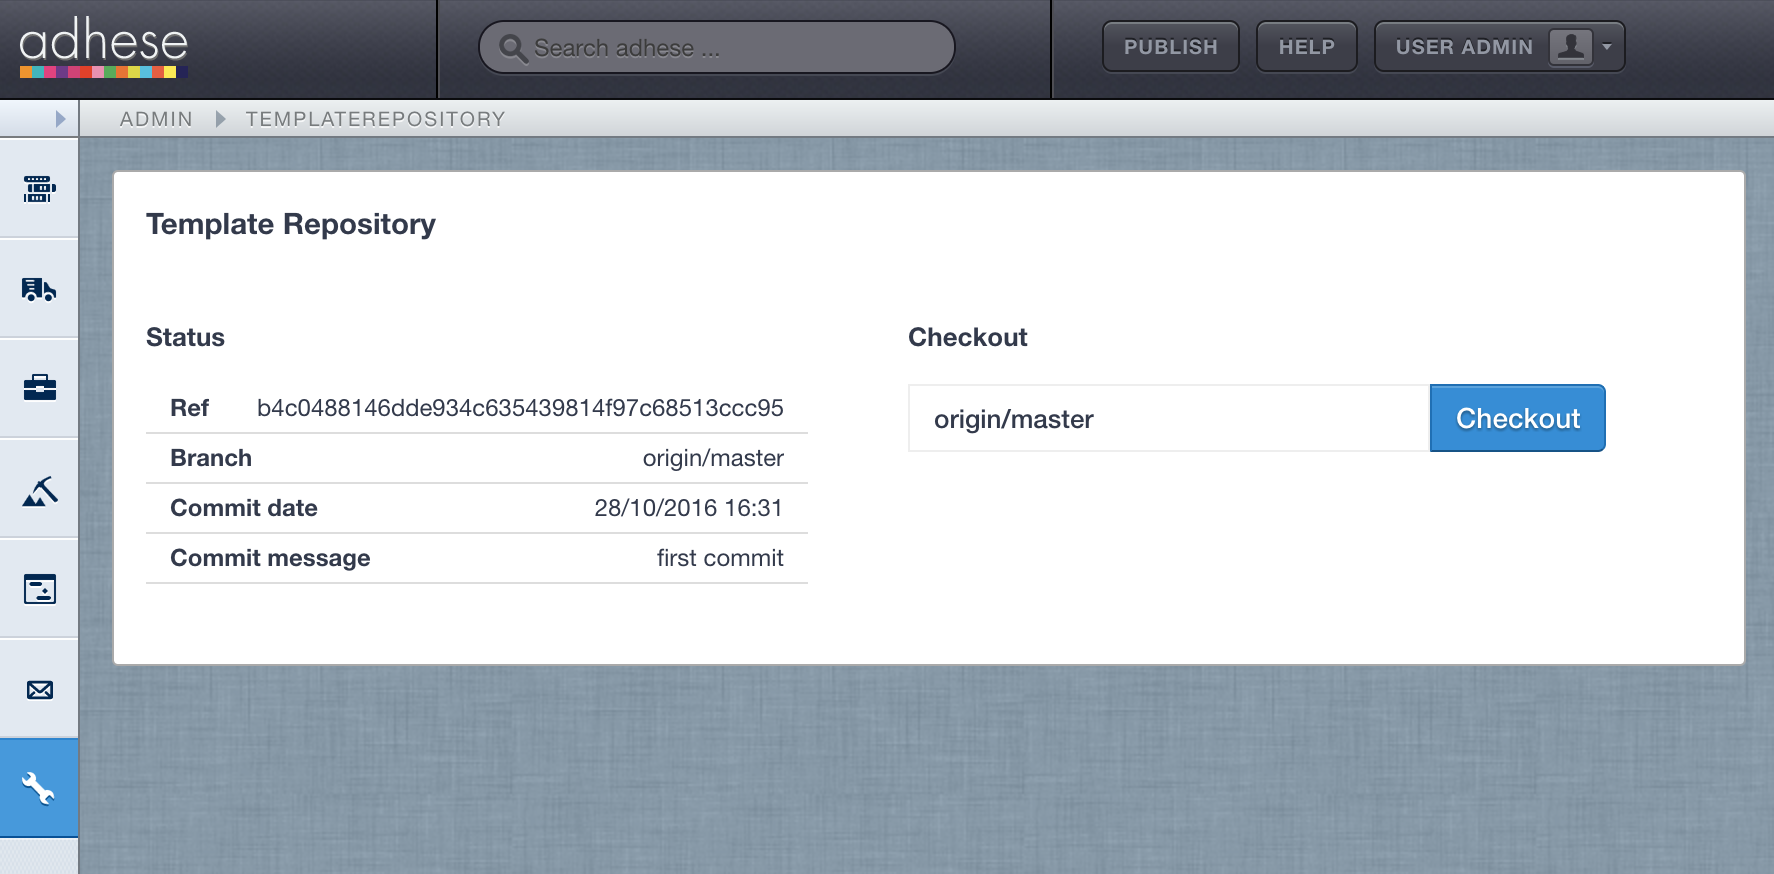
Template Repository
The Template Repository lets you control Template files and Advar templates using a Git version control system. Once this option is enabled, you can store your templates in your own version control system, maintain a detailed history of your changes, and effortlessly switch between different versions of your templates. Edit templates in your preferred IDE and only check out a branch in your Adhese account.
Changes in the checked-out version on your Adhese account will be applied to all creatives using the updated templates with the next publish.
Directory Structure
The main directory of your repository should contain all templates. Filename extensions are not obligatory, but we do recommend using .txt for readability. You can also add a directory called, for example, "advar_templates", which contains all the Advar template files and their description files (.descr). The name of the directory will be added to your Adhese configuration.
Advar Templates always consist of two files. When creating Advar templates, you should always include a second file with the same name but with a .descr extension. If you have a template called "advertorial.txt", the 2nd filename should be "advertorial.txt.descr". The second file contents are needed for rendering the UI Form through which users will fill out the actual creative.
Usage
The Template Repository screen shows two panels. On the left, you can see a summary of the Git commits currently used. It contains the Git hash, the branch, and the date and message when it was committed. On the right, you see a text field and button to change the commit for checkout:
- Enter branch name or Git hash to use (e.g. origin/master)
- Press Checkout button
The specified Git commit will be checked out. All the template changes will be applied in the next publish phase.
Activation
To activate this option, please get in touch with our Support department. You will also need to provide the following information:
- the URL of your Git repository, this needs to be accessible from the outside (e.g. git@github.com:adhese/my_template_repo.git)
We will send you the public SSH key that you need to add to your Git configuration to allow us access to the repository you would like to use for managing your templates. If you use Github, add this as an SSH key to Your Repo > Settings > Deploy Keys.
Benchmarking
Campaign properties
The Campaign properties screen enables you to add custom metadata properties to a campaign. Metadata provides additional information about a campaign, such as the sector in which an advertiser operates (e.g. car manufacturers or financial institutions).
To add a campaign property, select a name that identifies the metadata campaign property and specify the different elements. For more information, refer to Metadata.
General
Users
For user management, we refer to the following User Management page
Messages
The Messages screen is no longer significant.
Advertiser properties
The Advertiser properties screen enables you to add custom metadata to a company in the Add a new company screen.
To add an advertiser property, select a name that identifies the metadata property and specify its different elements.
Campaign properties
On the Campaign properties screen, you can add custom metadata properties to a campaign. Metadata provides additional information about a campaign, such as a sector in which an advertiser operates (e.g. car manufacturers or financial institutions).

To add a campaign property, choose a name that identifies the metadata campaign property and specify the different elements. For more information, refer to Metadata.
Booking properties
The Booking properties screen lets you add custom metadata properties to a booking in the Header tab of a booking. Metadata provides additional information about a booking.
To add a booking property, choose a name that identifies the metadata booking property and specify the different elements. For more information, refer to Metadata.
Alerts
Alerts are email notifications about a specific type of booking or campaign
The Alerting screen displays all the alerts defined in your account. At the top, there are four function buttons along with a filter field. You can create a new alert using the Add button. The other three buttons, Duplicate, Run, and Remove, are available when one or more alerts are specified.

The Alerts screen displays a table with the following columns that detail the properties of a booking:
- A tick box to indicate an alert. This action makes the Duplicate, Run and Remove buttons available.
- The ID of the alert.
- The Recipients of the alert mail.
- The Name of the alert.
- The Hour when the alert runs.
- The Triggers set for the alert.
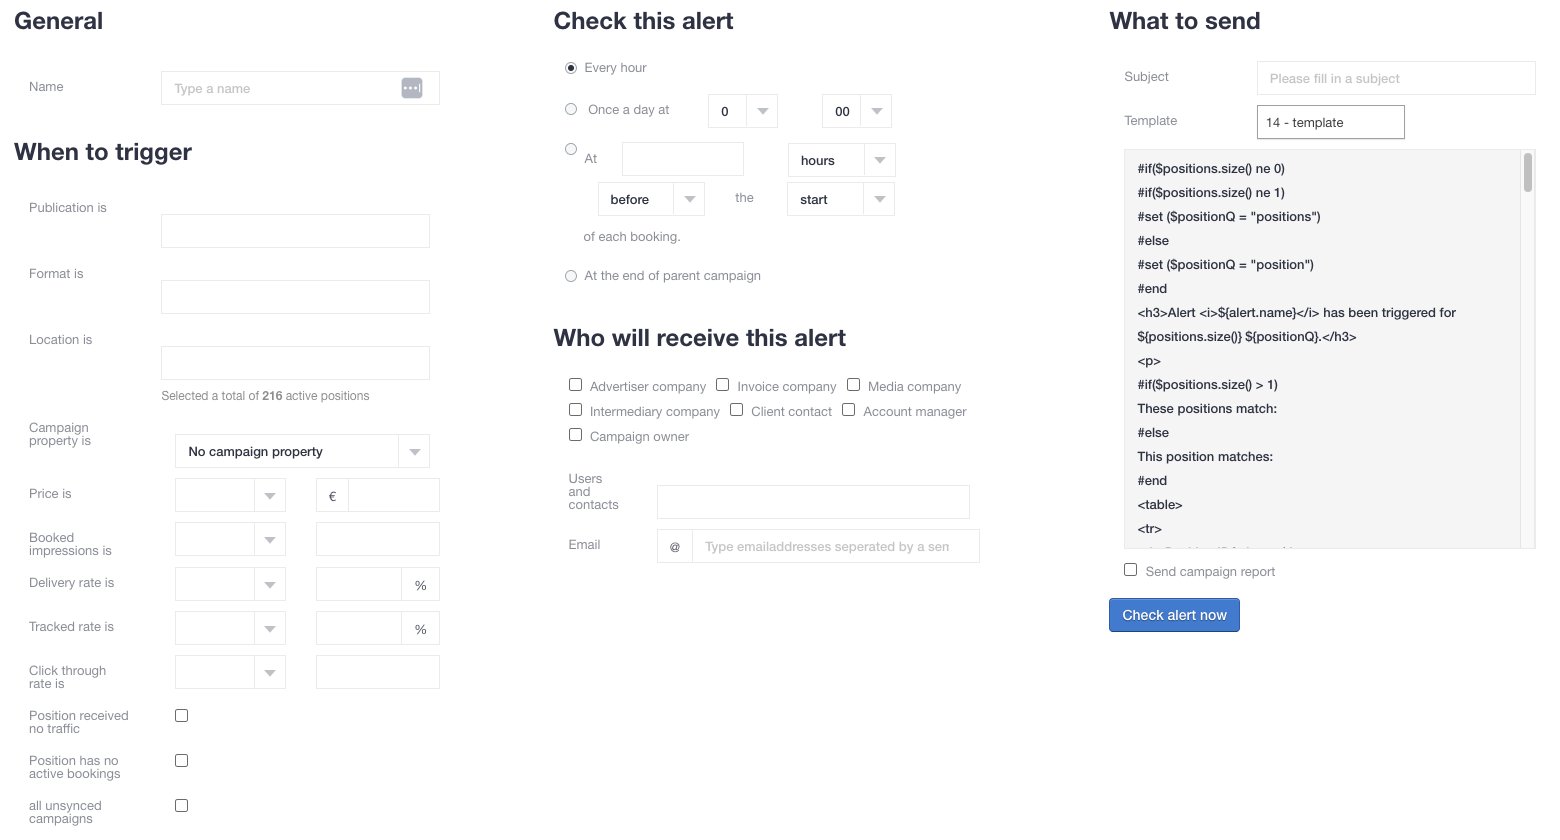
Create an alert
To create a new alert:
- Click the Add button. The Insert new alert screen becomes visible:

- In the General section, you must give the alert a name.
- In the When to trigger section, you fill in the triggers for the alert:
a. Choose one or more Publications from the Publication list
b. Choose one or more Formats from the Format list
c. Choose one or more Locations from the Location list
d. The Campaign property box has two settings:
- No Campaign property - the alert is for all campaigns
- Auto Reporting: the alert is only for campaigns wherein the header of the campaign the System meta tag: Auto reporting is selected.
e. The Price can be set as less than, equal to or more than a set amount of Euro
f. Booked impressions can be set as less than, equal to or more than a number of impressions
g. Delivery rate can be set as less than, equal to or more than a set percentage
h. Click-through rate can be set as less than, equal to or more than a set percentage - In the Check this alert section, you can choose a time slot. There are four radio buttons to choose from:
a. Every hour; the alert runs every hour
b. Once a day; You can set a time when the alert must run
c. At a specific time (hours, days, working days) before/after the start/end of each booking
d. At the end of the campaign
In the Who will receive this alert section, you can:
a. Tick one or more of the predefined boxes
b. Select one or more users from the Users and contacts list
c. Fill in one or more email addresses separated by a semicolon - In the What to send section, you can fill in the subject that will appear in the outgoing mail.
You can leave the default template, but you have to tick the box Send campaign report. - Hit the button Check Alert Now
User and campaign logs
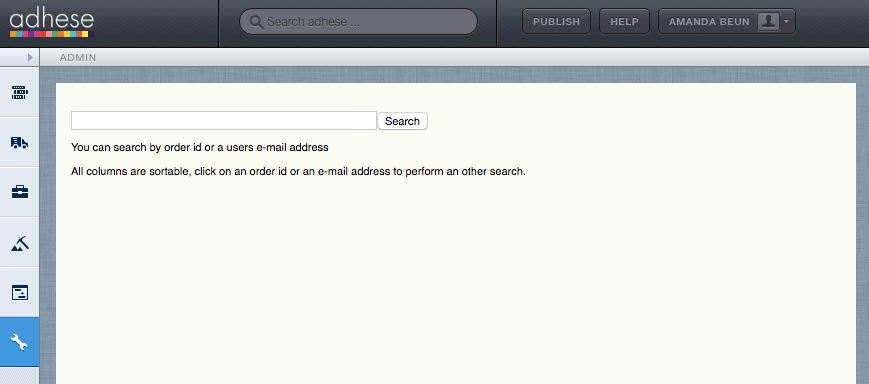
The Users and campaign logs screen allows searching for logs from a specific user or campaign. Enter a campaign ID or a user's email address in the Search bar and hit the Search button.
The Users and Campaign Logs screen allows you to search for logs from a specific user or campaign. To search, enter a campaign ID or a user's email address in the Search bar and click the Search button.
Creative 3rd party regular expressions
The Creative 3rd party, regular expressions screen, is no longer of significance.
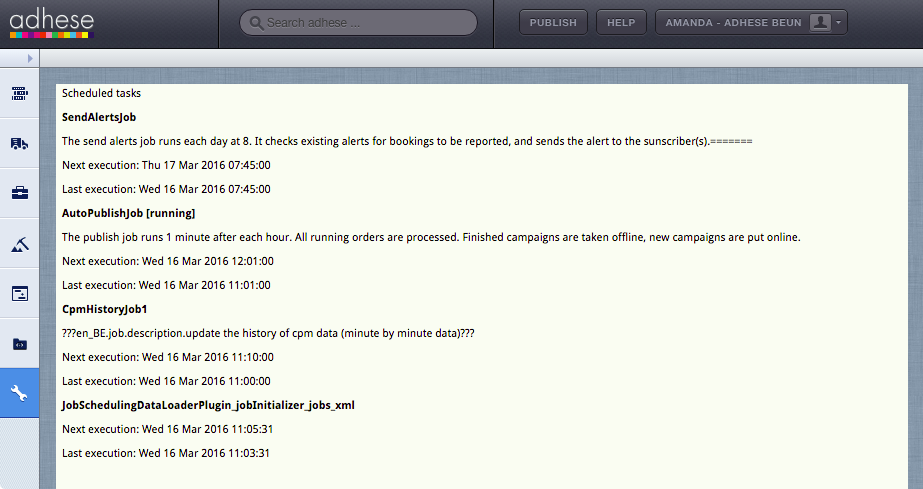
Go to Tasks
The Tasks screen displays information about Adhese's specific actions, such as publishing or sending alerts.
Ratecard configuration
The Rate cards screen details all rate cards and lets you create, duplicate, activate or deactivate a rate card.
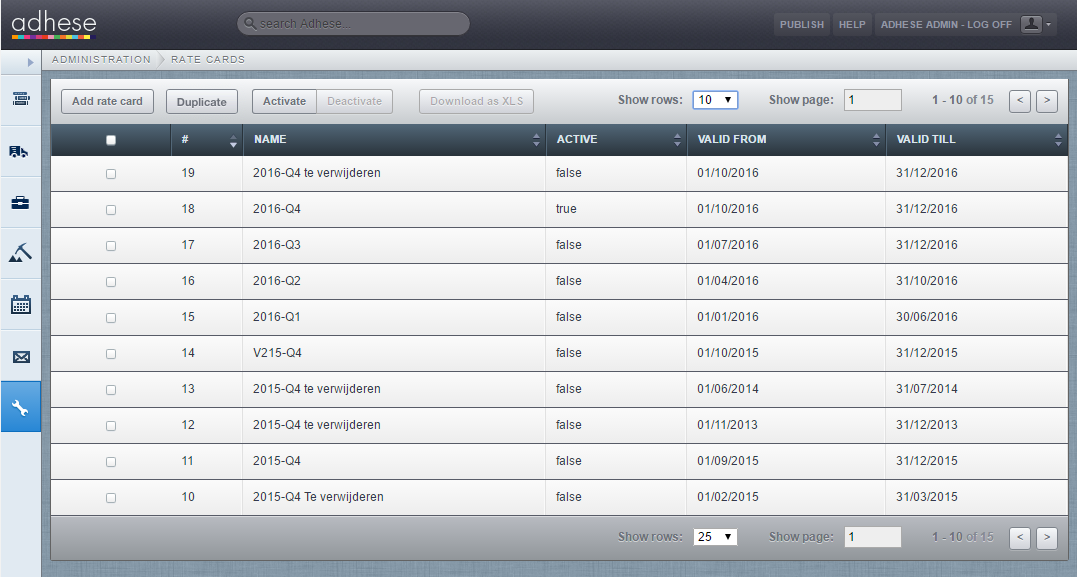
- To create a new rate card, click the Add rate card button. For more information, refer to Create a new rate card.
- To duplicate a rate card, select the rate card and click the Copy button.
- To activate an inactive rate card, select the rate card and click the Activate button.
- To deactivate an active rate card, select the rate card and click the Deactivate button.
For a description of the different table columns, refer to Table columns - Rate cards.