
Campaigns
Adhese makes it easy to target, monitor and optimise the delivery of online campaigns. Campaigns are a grouping of booking conditions and creatives.
Add a campaign
To add a new campaign:
- Click Campaigns in the Adhese navigation menu on the left. The Campaign overview opens:
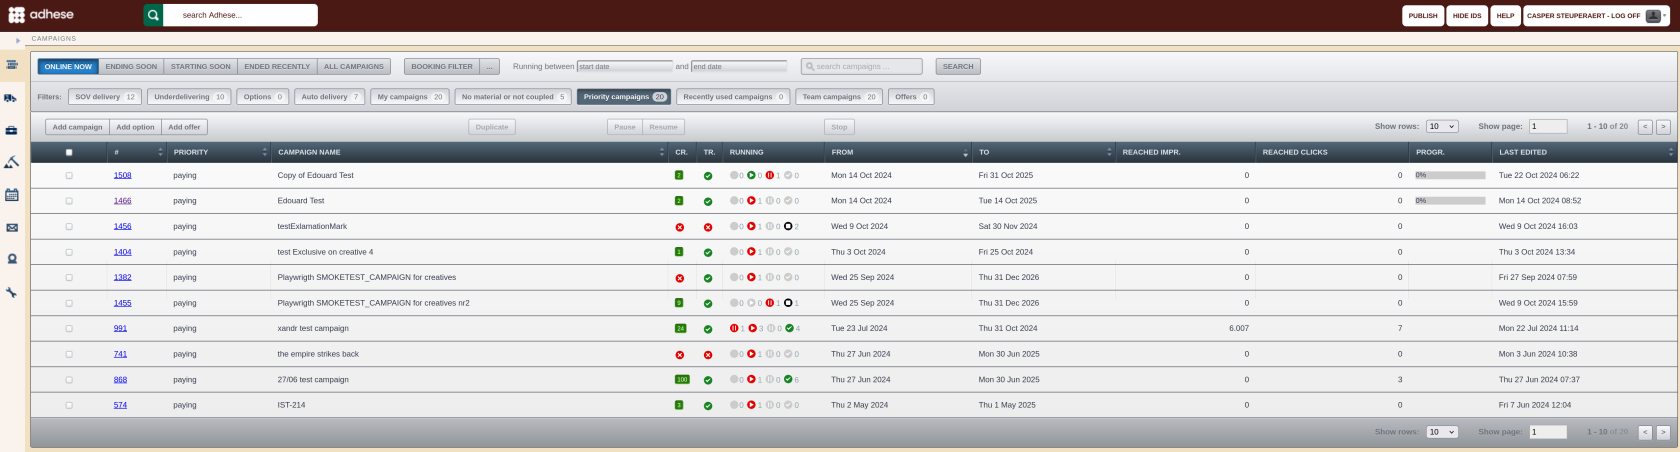
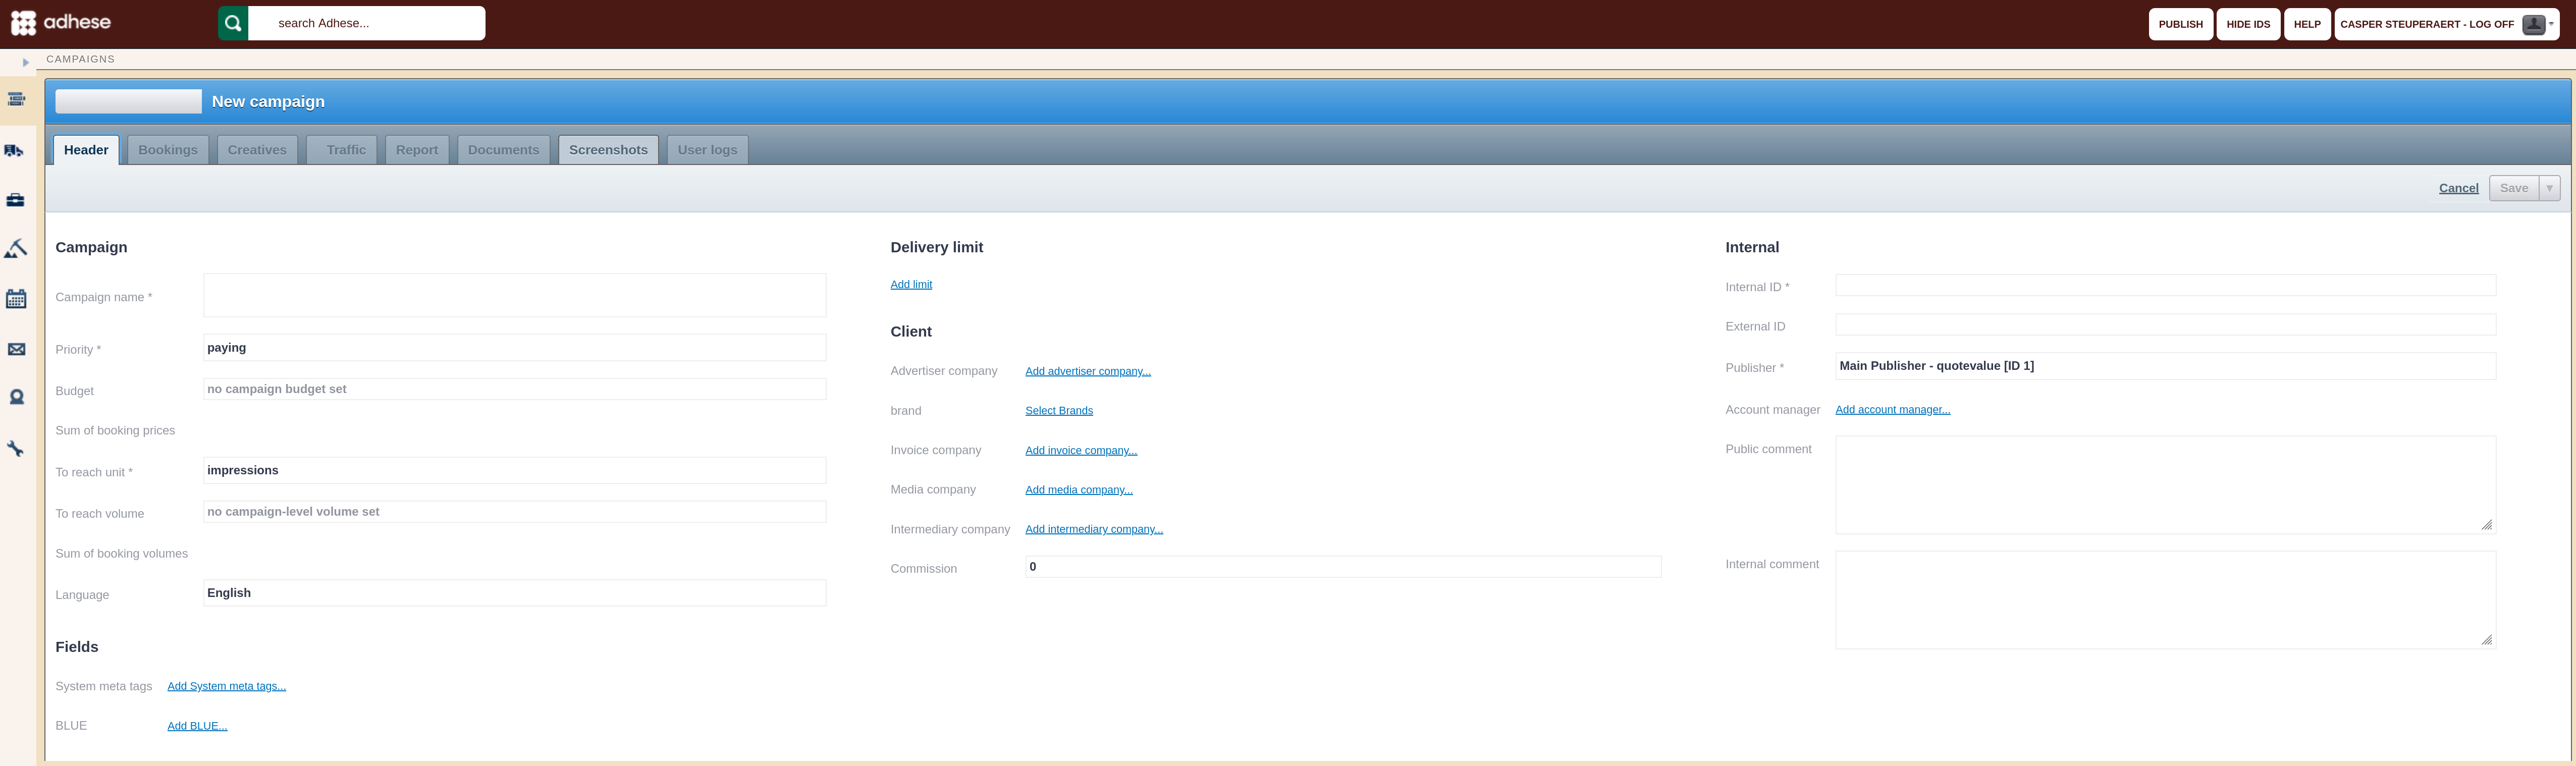
- Click the Add campaign button. The Header tab of the campaign opens with a blue coloured header.
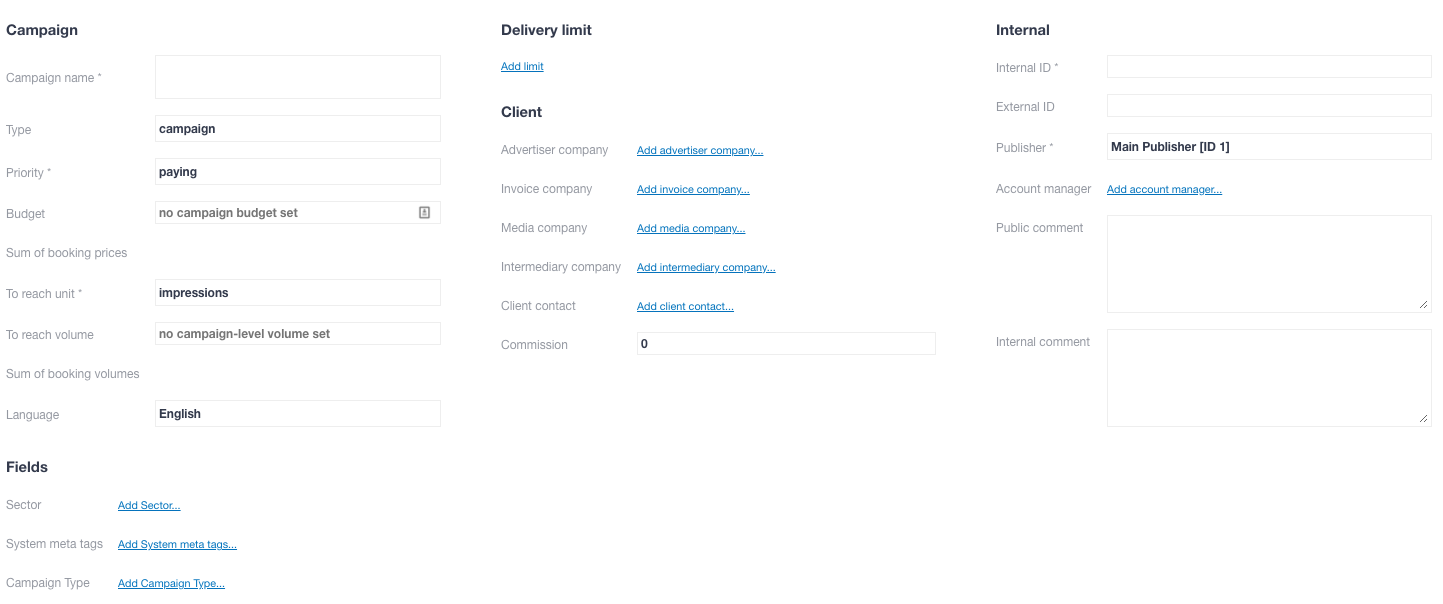

The Campaign header contains general campaign information and is divided into five sections:
- Campaign
- Fields (client-specific)
- Delivery limit
- Client
- Internal
A name is required for the campaign. It is possible to save a campaign without filling in all the compulsory fields, but the header status will be red, and the mandatory fields will be set to their default value.
During the setup of the Adhese account, the client decides which fields are mandatory. Rules can be set up to ensure that specific users or user levels complete one or more input fields.
Campaign
Campaign name
Enter a name for the campaign in the Campaign name field. To make the campaign easy to identify and locate, give it a unique, unambiguous name before saving it.
Priority
Select the priority of the campaign from the Priority drop-down.
The priority of a campaign determines how important it is for a campaign to achieve its objectives within the specified timeframe relative to other campaigns. It is one of the factors that determines whether a campaign takes precedence over competing campaigns (i.e. campaigns booked at the same position).
Multiple priority levels are available in the drop-down menu to rank campaigns based on their importance. Some typical examples of priority levels are paying, exchange, and inhouse.
Priority levels are defined during the implementation process.
Budget
Enter the campaign budget in the Budget field. The budget is based on the cost of a campaign and does not affect delivery (in most setups). Once a campaign has reached its budget limit, it will stop.
Sum of booking prices
The sum of the booking prices equals the sum of the budgets of the bookings that are part of the campaign. The budget for each booking is determined in Add a booking: Booking price.
To reach unit
A campaign can have an objective or a goal associated with it. Select one of the following units from the To reach unit drop-down:
- Impressions
- Clicks
- Unique visitors
- Tracking of certain events, for example, leads, purchases, etc.
The first two options are implemented by default. The remaining two are optional.
To reach volume
In the To reach volume field, enter the number of impressions, leads, … a campaign must reach before its delivery can stop.
It is possible to define and combine multiple goals, as an individual booking of a campaign can also have a goal associated with it. (see To reach and Unit).
A campaign will stop being delivered:
- If the campaign has achieved its goal
- If each booking of the campaign has achieved its goal
If you are planning to combine multiple goals, please ensure there is some logic between the desired to reach volume of a campaign and its bookings.
The to reach volume field in the Campaign distributes the volume over multiple (AUTO) bookings only if they have the same start and end date. Combining SOV and AUTO bookings with a to reach volume in the Campaign header is possible, but the combination must be logical. For instance, you could have a booking with 100% share of voice (SOV) on the first day of the week, followed by an AUTO booking with no volume for the remainder of the week. However, the to reach volume must exceed the estimated forecast volume of the 100% SOV booking.
Sum of booking volumes
The sum of booking volumes equals the sum of all volumes added to each booking.
Compete with RTB
Optional, depends on your Adhese configuration.
This part comes into view after saving the campaign.
Ticking the Compete with RTB box determines whether all bookings for a campaign should compete for Real-Time Bidding or RTB revenue.

The image above shows that the default RTB value for the selected campaign priority indicates that the campaign cannot compete with RTB. The ON radio button is selected to enable competition.
This setting can also be defined at the level of an individual booking. For more information, refer to Add a booking: How. Suppose one or more bookings are not permitted to compete with RTB revenue. In this case, the RTB checkbox on the Header tab of a campaign show how many bookings are and are not allowed to compete with RTB revenue:

Language
Select the language for reports and invoices from the Language drop-down menu. Available options include Dutch, French and English.
Fields
Sector
Client-specific. You can use sectors to specify campaigns by sector, like Financial or Auto. See Metadata for more info.
System meta tags
Client-specific. See Metadata for more info.
Delivery limit
Important: Delivery Limits are applied from the moment they are configured and published. Any impressions already served before the limit was set, will not be counted toward the total. If you add a delivery limit later in the day to an already-running campaign, the impressions delivered earlier that day are excluded from the count.
Additionally, delivery limits are based on tracked impressions rather than requested ads. If there is a significant delay between an ad request and the moment the impression is registered, the campaign will continue delivering during that window, which may result in overdelivery.
You can set a maximum delivery limit of impressions or clicks per day or hour for a campaign.
To add a Delivery limit:
- Click Add limit. The Delivery limit box appears:

- Choose between a Daily or an Hourly limit and between Impressions or Clicks
- Fill in the maximum number of Impressions (or Clicks)
- You can combine several delivery limits:


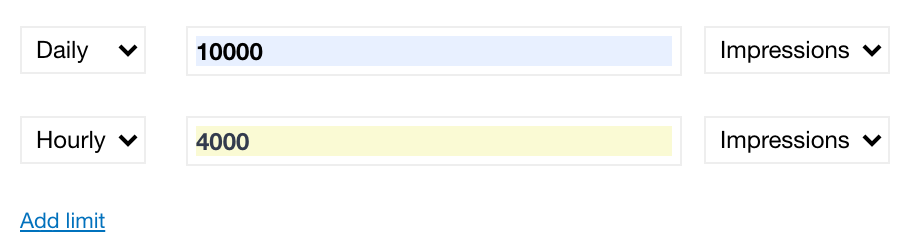
In the example above, the campaign's maximum daily impressions are 10000, with an hourly maximum of 4000.
Client
The following fields are optional and will not affect the start or delivery of a campaign. They can be used to provide additional information for the campaign or invoice.
To add the Advertiser company (or the client of the campaign):
- Click Add advertiser company. The Advertiser company modal window opens.
- Search for the company or add a new company straight away.
- Click Save.
For proper reporting of advertisers in BQ/Lookerstudio, make sure to fill in a valid domain in the quote field (ex. example.com). Valid domains cannot contain spaces or most special characters.
To add the Invoice company (or the party to whom you bill the campaign):
- Click Add invoice company. The Invoice company modal window opens.
- Search for the company or add a new company right away.
- Click Save.
To add the Media company (or the party providing the creative files for the campaign, such as a freelance designer or advertising agency):
- Click Add media company. The Media company modal window opens.
- Search for the company or add a new company immediately.
- Click Save.
To add an Intermediary company (for example, a media network):
- Click Add intermediary company. The Intermediary company modal window opens.
- Search for the company or add a new company instantly.
- Click Save.
To add a Client contact (or the person who represents the client):
- Click Add client contact. The Client contact modal window opens.
- Search for the contact or add a new contact at once.
- Click Save.
To determine the commission percentage paid to an agent, enter the percentage in the commission field.
Internal
The following fields are optional and will not affect the start or delivery of a campaign. These input fields are primarily intended for public or internal comments.
-
If there is a link to an internal system, such as an internal invoice system or customer relationship management (CRM) programme, enter an internal ID or key in the InternalID field.
-
If there is a connection with an external party or system, such as a third-party ad server or invoicing system, provide an external ID or key in the ExternalID field.
-
Choose a publisher from the Publisher drop-down.
The drop-down menu only shows the publishers and sub-publishers that have been assigned to you, as defined by the Company property in your user profile. Refer to Create a new user for more information. Selecting a publisher will also filter the available positions for a booking.
-
To add one or more Account managers (or a point of contact at the publisher's side):
- Click Add account manager. This opens the Account manager modal window.
- Select one or more users from the list.
- Click the Save button.
The users assigned as Account managers have access to the campaign.
-
Provide a public comment (like an announcement about the campaign's premature ending) in the Public comment field. A public comment will be visible on the invoice report.
-
Provide an internal comment (for instance, the need to monitor the campaign closely because of the importance of the client) in the Internal comment field. An internal comment will only be visible in the Adhese interface.
Save a campaign
Remember to click the Save button to save the campaign. Once saved, you can add one or more bookings to the campaign.
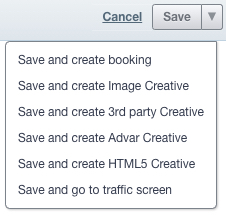
You can save the booking by clicking on the Save button. When clicking the arrow next to this button, additional saving options become available in a drop-down menu:
|
Save and create booking |
Saves the current campaign and opens a new create booking screen |
|
Save and create Image Creative |
Saves the current campaign and opens a create Image Creative screen |
|
Save and create 3rd party Creative |
Saves the current campaign and opens a create 3rd party Creative screen |
|
Save and create Advar Creative |
Saves the current campaign and opens a create Advar Creative screen |
|
Save and create HTML5 Creative |
Saves the current campaign and opens a create HTML5 Creative screen |
|
Save and go to the traffic screen |
Saves the current campaign and go to the traffic screen |
Metadata
You can create custom metadata fields to add to a campaign. Metadata provides additional information about the campaign. A typical example is a sector in which an advertiser operates, such as car manufacturers or financial institutions.
Metadata enables the comparison and benchmarking of similar campaigns. Additionally, metadata allows competing advertisers to avoid appearing on the same web page.
To add metadata to a campaign, first, add a campaign property to your Adhese account:
- Go to the Administration screen. Click Admin in the left navigation menu.
- Under General, click Campaign properties. This opens the following screen.
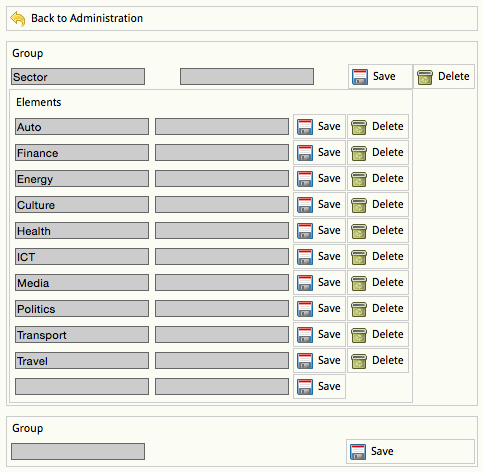
- Enter the name of the campaign property in the left Group field, for example, Sector.
- Enter a code or ID for the campaign property in the second (or right) Group field. The code can be the same as the property name.
- Click the Save button.
- In the Elements field, provide the options for the campaign property. Enter a name in the left field and a code or ID in the right field. Click the Save button to add an option to the campaign property.
- To save the campaign property, click the Save button next to the Group field.

Once you have saved the campaign property, a new section called Fields will appear in the Header tab of the campaign. This is where you can define the campaign property.
Assume you added Sector as a campaign property to your Adhese account. To add a specific Sector to a campaign:
- Go to the Campaign overview. Click Campaigns in the left navigation menu.
- Click the campaign for which you want to add metadata. The Header tab of the campaign opens.
- Click Add Sector. This opens the Sector modal window.
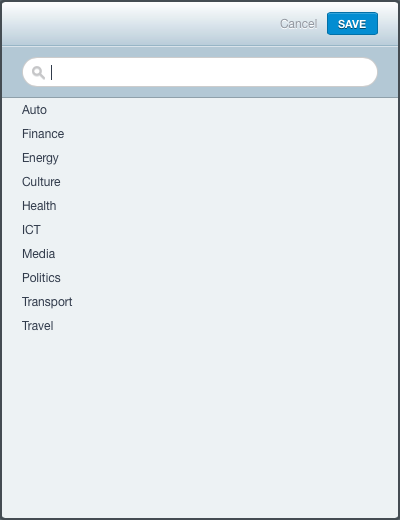
- Choose a sector from the list. Once an industry is chosen, the Sector modal window will close.

Campaign Dashboard
Once a campaign has been selected, an overview will appear. At the top of this overview, you will find a campaign dashboard. The Campaign dashboard is also visible in all Booking and Creative overviews.

The Campaign dashboard provides an overview of the campaign's bookings, based on the following information and metrics:
- Start and end date (start of the earliest booking and end of the latest booking);
- Total number of calendar days the campaign is scheduled to run, along with a progress bar indicating the number of days that have passed;
- Total number of campaign days between the start and end date, or the number of days when bookings are running. If a campaign consists of two bookings, each running five days, the total number of campaign days is equal to 10;
- Total number of impressions booked for all bookings in the campaign;
- Reached impressions or the total number of impressions served, up until the last hour;
- A pie chart indicating the delivered impressions as a percentage of the booked impressions;
- Total number of impressions for the past seven days
- A bar chart denotes daily impressions. The weekends are indicated with a darker colour, while today is coloured orange;
- Below this bar chart, you see the number of impressions that have already been served today;
- Delivery rate (DR): the total number of served impressions as a percentage of the expected impressions until now. The DR indicates the speed of the delivery of a booking or campaign. This DR is calculated if an impression volume is defined in the Header tab of the campaign. Refer to Delivery overview for more information about the delivery rate;
- Total number of clicks;
- Total number of contacts or the total number of unique daily impressions;
- Total number of clicks for the past seven days
- A bar chart denotes the number of daily clicks. The weekends are indicated with a darker colour, while today is coloured orange;
- Below this bar chart, you see the number of daily clicks that have already been served today;
- Click-through rate or the number of clicks as a percentage of the total number of impressions;
- Click-through rate/contacts or the number of clicks as a percentage of the total number of contacts;
- Total budget;
- The estimate of today's budget;
- eCPM, or the effective cost per 1000 impressions. The eCPM is calculated by dividing the total earnings by the total number of thousands of impressions. The eCPM gives an idea of how much a booking would have cost if sold on a CPM basis. This allows for comparisons between different bookings or campaigns.
- eCPC, or the effective cost per click. The eCPC is calculated by dividing the total earnings by the total number of clicks.
Edit a campaign
To edit a campaign:
- Go to the Campaign overview. Click Campaigns in the left navigation menu.
- Click the campaign you want to modify. The Header tab of the campaign opens.
- Change any of the properties in the Header tab.
- Click Save. A confirmation message briefly appears.

Duplicate a campaign
To duplicate or copy a campaign:
- Go to the Campaign overview. Click Campaigns in the left navigation menu.
- Select the campaign you want to duplicate by ticking its box in the overview.
- Click the Duplicate button above the overview.

- Click OK on the confirmation screen. The campaign is duplicated

- The duplicated campaign has the following campaign name: Copy of [name of the original campaign].


Or,
- Go to the Campaign overview. Click Campaigns in the left navigation menu.
- Click the campaign you want to duplicate. This opens the Header tab of the campaign.
- Click the small triangle next to the Running status, left to the title of the campaign. A list appears.

- Click Duplicate campaign.
- Click OK on the confirmation screen. The campaign is duplicated.
- The duplicated campaign has the following name: Copy of [name of the original campaign].

The duplicated campaign is an exact copy of the original campaign. Its Running status is switched to paused. Remember to traffic bookings and creatives and to resume the campaign.
It is impossible to duplicate a campaign if one of the bookings is booked on an inactive position.
Pause a campaign
To pause a campaign:
- Go to the Campaign overview. Click Campaigns in the left navigation menu.
- Select the campaign you want to pause by ticking its box in the overview.
- Click the Pause button above the overview. The campaign is paused.


Or,
- Go to the Campaign overview. Click Campaigns in the left navigation menu.
- Click the campaign you want to pause.
- Click on the small triangle next to the Running status, left to the title of the campaign. A list appears.

- Click Pause campaign. This pauses the campaign.

When you pause a running campaign, its status changes to paused. The paused tooltip within the paused icon of the Running status (see Campaign status) denotes this.
Resume a campaign
To resume a paused campaign:
- Go to the Campaign overview. Click Campaigns in the left navigation menu.
- Select the paused campaign you want to resume by ticking its box in the overview.
- Click the Resume button above the overview. This resumes the campaign.


Or,
- Go to the Campaign overview. Click Campaigns in the left navigation menu.
- Click the campaign you want to resume.
- Click on the small triangle next to the Running status, left to the title of the campaign. A list appears.

- Click Resume campaign. This resumes the campaign.

Resuming a paused campaign will change its status back to its original status.
Stop a campaign
To stop a campaign:
- Go to the Campaign overview. Click Campaigns in the left navigation menu.
- Select the campaign you want to stop by ticking its box in the overview.
- Click the Stop button above the overview.

- Click OK on the confirmation screen. This stops the campaign.


Or,
- Go to the Campaign overview. Click Campaigns in the left navigation menu.
- Click the campaign you want to stop.
- Click on the small triangle next to the Running status, to the left of the title of the campaign. A list appears.
- Click Stop campaign from the list.

- Click OK on the confirmation screen. This stops the campaign.


The status changes to Stopped. A black circle in the Running status (see Campaign status) indicates this.
Campaigns that have not yet delivered any impressions will automatically be hidden in the UI when stopped.
Campaign forecasting
In addition to the performance data in the dashboards, Adhese forecasts the delivery of a running booking.
Forecasting figures
Several forecasts are given for the period the booking is running:

- Booking will reach is the number of impressions the booking is expected to reach. This is useful if you have predetermined the number of impressions you want. You can use this number to check whether or not this campaign will achieve its goal;
- Still available impressions are the total number of impressions available for the position during the period of the booking;
- Booked is the total number of impressions booked for this position. When you click on this number, it changes to a percentage showing the number of impressions booked relative to the number of impressions still available;

- Higher priority is the percentage of bookings with a higher top priority than the selected booking;
- Left available is the number of impressions still available for the position for the selected booking period. This number is equal to the number of impressions still available minus the number of impressions booked;
- Needed is the number of impressions that still need to be delivered for the selected booking.
The background colour of this section indicates whether the booking target will be met based on the forecasts. The colour can be any shade from red to green. If the background colour is red, it is likely that the target will not be met. However, forecasts are always subject to change as new data becomes available.
Position averages
The position average shows four intervals that represent the distribution of the impressions or contacts you can reach on a specific day:
- Number of impressions during a weekday;
- Number of contacts during a weekday;
- Number of impressions during a day at the weekend;
- Number of contacts during a day at the weekend.

This range represents the total number of daily impressions or contacts that the selected position can achieve with 95% confidence, for example, 208<325k>637. Adhese predicts, with 95% confidence, that more than 208 000 and less than 637 000 impressions will be delivered on a weekday. The middle number, 325 000 impressions, is the median of the past 30 days. You can view additional information by clicking More.

Refer to the following three paragraphs for more information about the additional graphs.
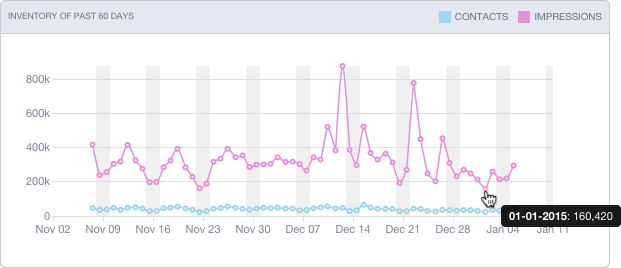
Inventory of the past 60 days
The past 60 days inventory line graph shows the volume of impressions (the pink sparkline) and contacts (the blue sparkline) served by the position over the past 60 days. Hover over the line graph to see the exact number of daily impressions or contacts.
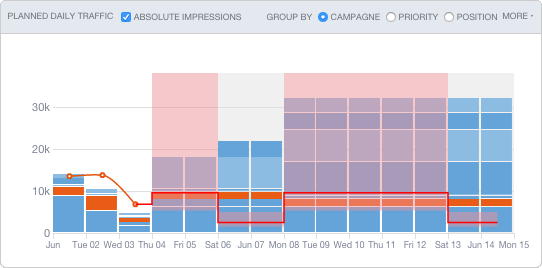
Planned daily traffic
The Planned daily traffic bar chart shows the position's daily traffic for the booking period and allows you to examine the delivery on a daily basis. The traffic (or number of impressions) is expressed in either absolute or relative numbers.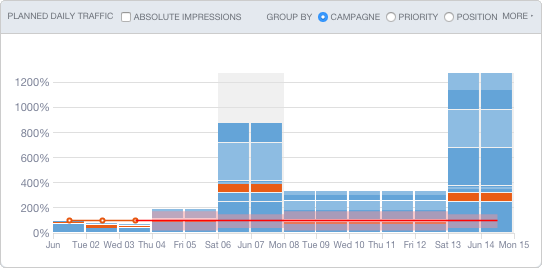
The bookings represented in one bar can be grouped by campaign, position or priority level (high-priority bookings appear lower in a bar).
Hovering over the bar chart highlights each individual booking and shows the delivered or expected volume of daily impressions.
When analysing the Planned daily traffic bar chart, you need to make a distinction between the past and the future:
- Past data
The red curve represents the total daily volume of online traffic for the booked position. The height of each bar represents the total number of impressions delivered. Each part of an individual bar represents the daily volume achieved by each booking (as a percentage or in absolute impressions). The selected campaign is highlighted in orange.
- Forecasted future data
The expected daily traffic for the position is shown to the right of the red curve. Each part of a single bar indicates the expected daily volume for each booking. The selected booking is coloured orange. The range of expected volume (or position average) is coloured red. A dark red line marks the median. The height of each bar represents the daily volume of impressions booked for that position. A position is considered overbooked if the height of an individual bar exceeds the dark red line, meaning that the number of booked impressions exceeds the number of forecasted impressions.
Competing bookings
Clicking More in the top right corner of the Planned daily traffic graph (see the previous paragraph) displays the competing bookings in the Competing bookings table. The selected booking shares inventory with other bookings booked at the same position, hence the name competing bookings. The bookings are sorted from highest to lowest priority.
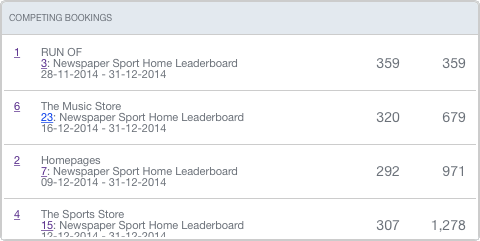
On the right-hand side of the Competing bookings table are two columns of impression figures that provide more information about the shared inventory volume for the period of the selected booking.
The first column represents the number of impressions each competing booking is expected to deliver during the selected booking period. The second column shows the cumulative number of impressions.
No comments to display
No comments to display